CapCut is a popular, mobile-focused video editing app. With it, you can produce short-form videos and clips with ease. Owned by ByteDance, the owners of TikTok, CapCut is often used by social media creators just like you.
By default, CapCut includes a watermark on each video that you edit. Odds are, you’d rather not have this watermark in your finished videos. Not to worry! It’s amazingly easy to remove.
In this tutorial, you’ll learn how to remove CapCut watermark graphics from the end of your videos. Let’s get started!
Why Does CapCut Have a Watermark? (And Why Should You Remove Them?)
You may be wondering: why does CapCut have a watermark? And why might you want to remove it? You’ll find the CapCut watermark at the very end of any video that you edit. It’s a black title card, featuring the app’s logo.


Many free video editors include watermarks. Fundamentally, they exist for advertising purposes. If you share a video with the watermark, it might inspire others to download the app. But what if you don’t want to display the logo? It can be distracting – especially if you have your own logo to share.
Fortunately, it’s simple to remove CapCut watermark designs. And what’s more: you don’t have to purchase the premium version of CapCut to do it. It works on the free mobile app, right on your phone.
How to Remove a CapCut Watermark (Step-by-Step)
Let’s learn how to remove a CapCut watermark, step by step. For this example, we’ll use the free CapCut app for iOS. You can download it for free on the Apple App Store. CapCut is also available from the Google Play store for Android, or for your Windows or Mac computer.
As we work, we’ll use a stock video clip from Envato Elements. If you want to download it, click here to follow along.
1. Create and Open a Project in CapCut
CapCut watermarks are found in your video projects. A project is any production that you’re working with, containing one or more video clips. To begin, let’s create a project in CapCut.
To do that, go ahead and launch the app on your phone or other device. When you do, you’ll be taken to CapCut’s home screen. Across the bottom of your screen, you’ll see four tabs. Make sure that you’re working on the leftmost tab, which is labeled Edit. Press Edit if it isn’t already selected.


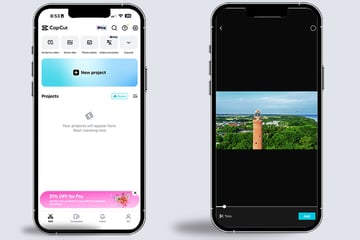
In the upper center of your screen, you’ll see a blue box titled New project. Click on New project. Browse to a video clip on your device, and tap to select it. Next, click Add in the lower right corner.
When you press Add, your project is created! You can see your video displayed in the center.
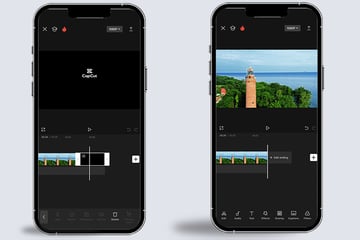
2. Locate the Watermark on the Video
Now, let’s look at how to remove a CapCut watermark from a project. At first, the watermark is not immediately obvious. It doesn’t overlay your footage throughout a video. Instead, it exists as a title card at the very end of your video.
Below the video preview is the Timeline feature. You can use this to scrub through your video to reach the end. Press and hold on a spot right of center on the filmstrip preview, then swipe to the left. You’ll scroll through your video until you reach the end.

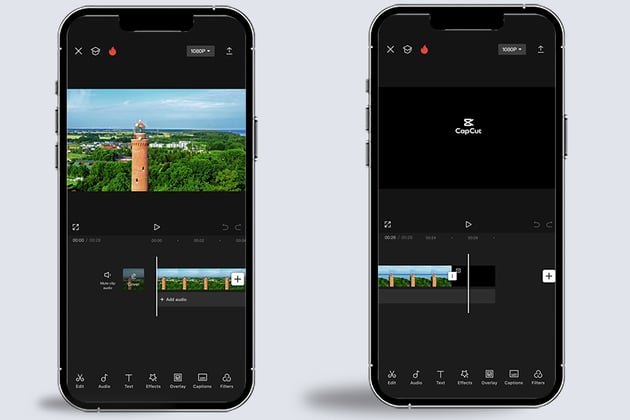
Notice now that the watermark is visible. It’s a black screen, with the white CapCut logo in the center. It’s ready to be deleted.
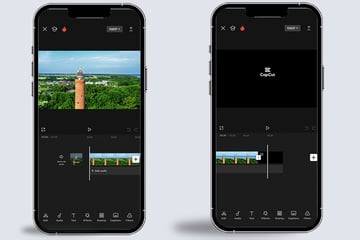
3. Remove the Watermark
With the CapCut watermark in view, let’s demonstrate how to delete it. Notice that it’s visible on the filmstrip section of your Timeline. It looks like a black box at the very end of the Timeline, right after your video clip itself concludes.
To see how to get rid of a CapCut watermark, press on the watermark in the Timeline with your finger. This selects the watermark itself. Notice now that the menu bar at the very bottom of your screen changes. You’ll see options available to select. On the right side is a Delete button.

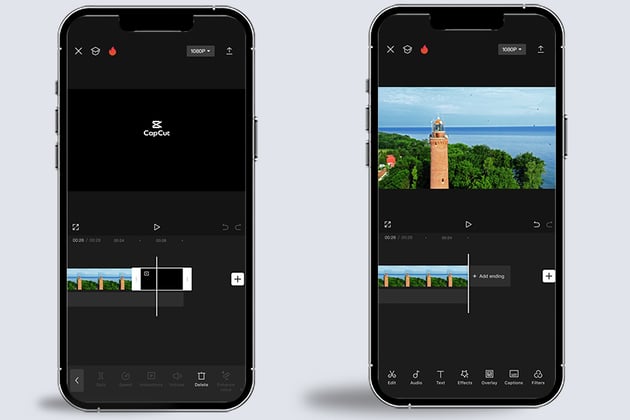
To remove the CapCut watermark from a project, choose the Delete button. That’s all it takes! Just like that, the watermark will vanish. Now, you can choose to end your video there. Or, you can add your own title card, logo, and more.
4. Share the Complete, Watermark-Free Clip
Now, you are ready to share your video with the world! By removing the watermark, you’ve made your production truly your own. It’s now ready to download, share, post online, and more.
It’s always a good idea to remove the CapCut watermark. It can be distracting to your audience. You want their final impression to be of your video – not that you used a free app to create it!
Remove a CapCut Watermark with Ease Today
In this tutorial, you learned how to remove a CapCut watermark. As you saw, it’s a very quick process. Simply select the watermark at the end of your video by pressing on it. Then, tap the Delete button. That’s all it takes.
Keep this new skill in mind as you edit and share videos using CapCut. Why add a watermark when it’s free and easy to remove? Don’t wait.