Introduction
For those of you who don’t know: ACF is a WordPress plugin that allows you to add custom fields and the reason we need a plugin like this, is that even though WordPress does support Custom Fields by default, they are pretty limited, so this plugin takes the functionality to the next level giving us a high degree of customization.
Now here’s the thing: if you’re not code savvy and you want to display Custom Fields on the front end, so on the actual website, you might find it a bit difficult, because you need to write some PHP code to grab those fields from the database.
<?php

// it's a simple example for a text field, fields have different types (select, image, gallery…),
// and displaying depends on a type

echo get_field('page-subtitle');

?>
That’s why in this tutorial I’ll show you two ways you can do that. First with code, and second with an awesome plugin called ACF Views. Which is actually the sponsor of today’s article. ACF Views is a WordPress plugin which works on top of Advanced Custom Fields. It allows you to display Posts and ACF fields anywhere on your site using shortcodes. This means you’ll no longer need to write any PHP code to query posts or get field values and display them.
ACF Views is free to download and use, or costs 25 dollars per year for the Pro version, if you want to unlock extra features, like advanced filtering, Ajax pagination, custom Gutenberg blocks and more. And if you use the promo code envato you get a 20% discount for the Pro version.
About the WordPress Post Meta and Custom Post Types
Before we get to work with ACF Fields. There are two basic notions you need to understand: the WordPress Post Meta and Custom Post Types. So let’s see what these are, and what role they’re playing when it comes to Custom Fields.
Now if you’ve worked with WordPress before, then you know there are certain types of data you can enter yourself or create yourself, like Posts, Images or any kind of Media, Pages, Users, and so on. And here’s the thing: WordPress actually houses all of this information in a single table, and that table is called WP Posts.
So even if the information we’re entering is a Post or a Page, or an Attachment, or even a WooCommerce Product, everything will be placed inside the WP Posts table in the database. So let me actually show you that table. And I’m using a local installation of WordPress here, but the database, the table is exactly the same. So if we open up WP Posts, and we go to select data here, you can find all the content that I have currently entered in my WordPress installation.
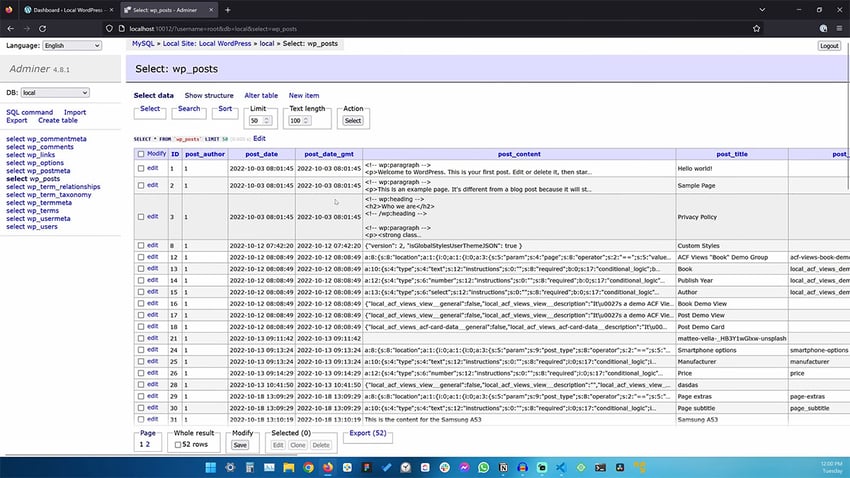
So I have a post here called “Hello World”, and we can actually find it right here, it’s the first one. You can see we have a Post Title and this has a Post ID of 1, but also I have a couple of pages, or actually just one page called “Sample Page”. And we can also find that right here, right with the Post ID of 2.
So this is a Post, this is a Page, but they’re both saved inside the WP Posts table in the database. And you’ll see that if we scroll all the way to the end here, you’ll see that each entry in this table has a different Post Type.

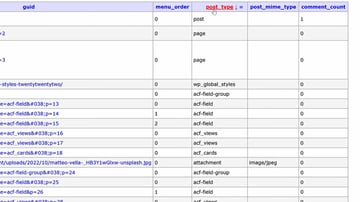
My original post has a Post Type of Post. My page has a Post Type of Page. And you can see there are a couple of more post types here. Now each post in this table has the exact same structure, right, it has an ID, it has a Post Author, Date, Content, Title, Excerpt, Post Type, right the one that you saw here, and that’s non-negotiable.
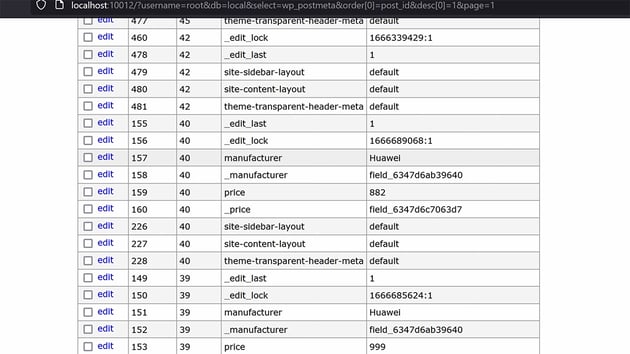
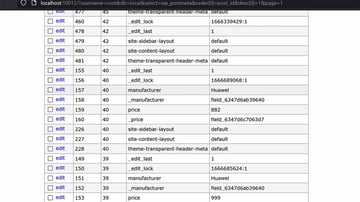
Basically every single entry has the exact structure defined by the structure of this table. So we cannot add different characteristics to the posts in this table right, I cannot add another column here and name it however I want. That’s simply not possible, and this is where Post Meta comes in, and Post Meta is saved in a separate database called WP PostMeta, and if we take a look at the data here, you can see that the structure of this table is very simple.
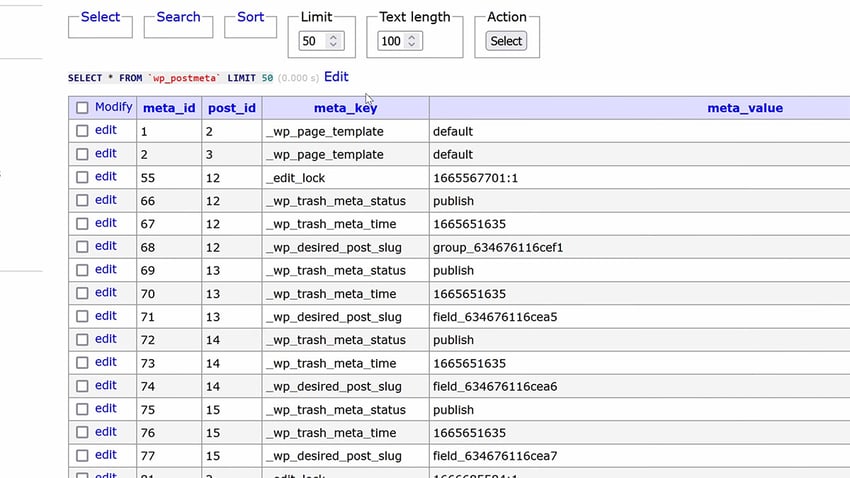
We have a Meta ID, a Post ID, a Meta Key and a Meta Value, and the way this works is super simple: each entry in this table has a Key and a Value, and I can associate this pair to any Post ID. So for example, for my “Hello World” post, which has a Post ID of 1, I have this post meta, associated with my sample page, which has a Post ID of 2. I have two entries here, I have the Page Subtitle, and the Page Subtitle with an underscore.
And don’t worry about what these mean, basically these are distinct characteristics of that post, or page, or whatever it is.
So whenever I need to add a special characteristic to a Post, or a Page, or an Attachment, or whatever it is, I don’t do it in the WP Posts table, I do it in the Post Meta table right. I just need to make sure to reference the correct Post ID. So if I want to add a Meta Key and a Meta Value for my “Hello world” post, which has a Post ID of 1, I just create a new entry, I select the Post ID of 1 and I enter my information, but obviously you won’t be doing this manually in the database, you will be doing it from the WordPress backend. I’m only showing you these tables in the main database just so you can understand what’s happening behind the scenes.
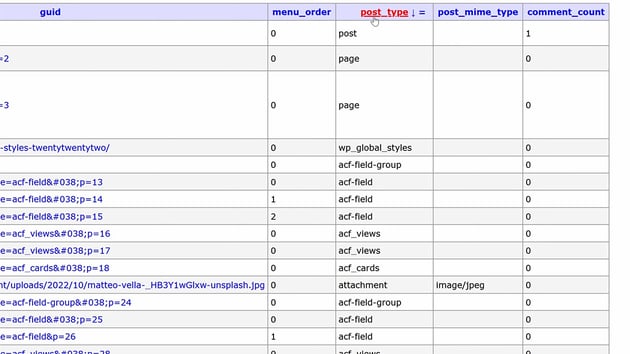
Okay, so that’s basically Post Meta. Now I also mentioned Custom Post Types. So what are those exactly? Well, if we’ll go back to WP Posts, and we go on the data, and we scroll right here, where it says Post Type, you’ll see that every entry in this table has a Post Type.
We can have Page, Post, ACF field, Revision, Smartphones, Attachments, even if you have like images added to your WordPress installation right, these are all post types, but the one that you see here, Smartphones, is actually one that I created myself, and if we open up the theme, that I’m using, which is Astra, just for for this demo, and we go to functions.php , you’ll see that I am registering a Custom Post Type here, called “Smartphones”.
<?php
function add_cpt()
{
    $args = array(
    'labels'    => array(
    'name'      => 'Smartphones',
    'singular_name' => 'Smartphone',
    ),
    'hierarchical'  => true,
    'public'        => true,
    'has_archive'   => true,
    'menu-icon'     => 'dashicons-smartphone',
    'show_in_rest'  => true,
    'supports'      => array('title', 'editor', 'author', 'thumbnail', 'excerpt', 'comments',),
    'taxonomies'    => array('category',),
    );
register_post_type('smartphones', $args);
}

add_action('init','add_cpt');
Custom Post Types, if done correctly, will actually allow you to see those posts separately in your WordPress backend. So I have a separate entry here, in the menu, called “Smartphones” and I have a list of posts that uses this Custom Post Type, and I also have categories for them: Budget, High-end, Midfield, and I can also add, remove and edit, just like I would any other post in my WordPress installation.

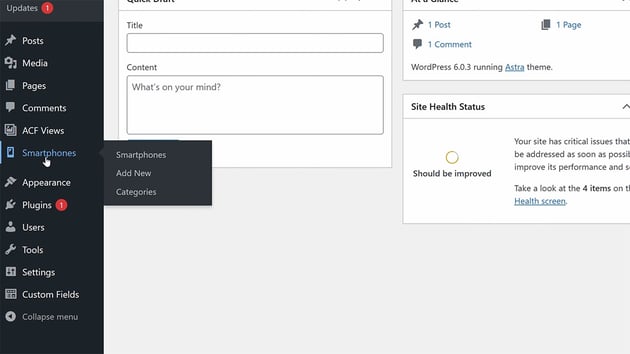
This is super useful, for example if you’re building a website for someone that wants to sell smartphones, or they want to display like a catalog of smartphones they have on sale having a separate category here in the menu makes it so much easier for them. But also this ties in really well with ACF, right, ACF stands for Advanced Custom Fields, it’s an awesome plugin. So, if we go to Custom Fields, I have a Group here, called Smartphone options, and you’ll see that this Field Group is only shown if the Post Type is equal to Smartphone.

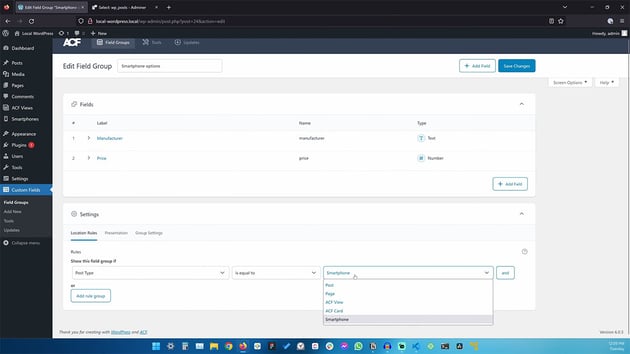

Okay, so if I go to “smartphones” and I open one of them, you’ll see that I have some Custom Fields right here, at the bottom, “Manufacturer” and “Price” that I can edit and use of course to display custom information like the “Brand” and the “Price” of the phone and of course these are or have different values for each post, and if I go to a regular post, like “Hello World”, yeah, you’ll see that those fields are not present, I cannot change them, because this entry is just a regular Post, it’s not a “Smartphone”.
Now speaking of “smartphones”. Let me actually show you how the Post Meta ties into all of this. So if we open up this one, it’s the “Huawei Nova”, this has a Post ID of 40, and if we go to the WP PostMeta table, and we sort by Post ID, you’ll see that where it says Post ID 40, we have Custom Fields right, we have the “Manufacturer”, as the Key and “Huawei” as the Meta Value and also the “Price”.
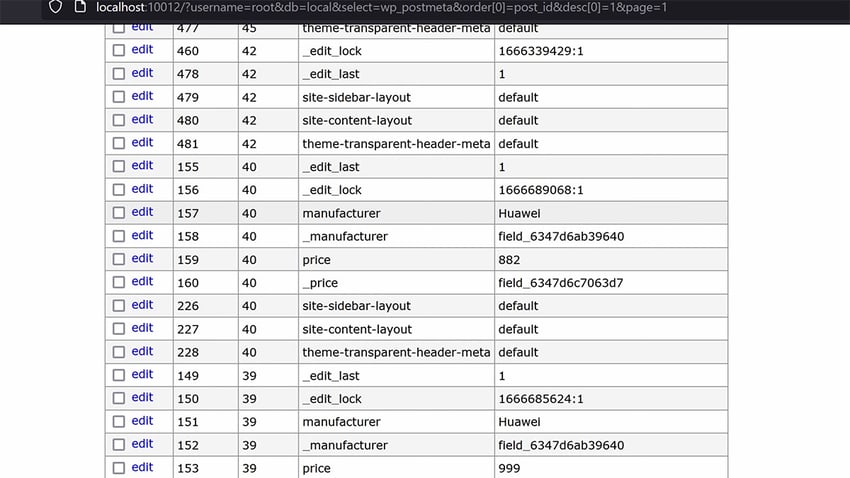
So in this instance the Post Meta table is used to display or to store the Custom Fields for these posts right, so that’s a really quick look at how WordPress stores post information, also Post Meta and we also saw how to create Custom Post Types, and also how to use them in conjunction with ACF, or the Custom Fields in WordPress.
How to Display ACF Fields (2 Ways)
Alright, so now that you hopefully understand how Post Meta and Custom Post Types work in WordPress. Let’s see how we can display the ACF fields or the Custom Fields we saw earlier to the front end and as I was saying I’m going to show you two ways for that one with code and the second with a plugin.
Let’s start with code.
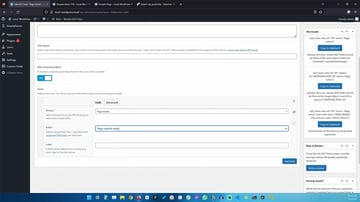
So if we take a look at the Custom Fields, I have a Group here, called Page extras, and this custom field is only visible if the Post Type is equal to Page, yeah, so if I go to my pages, and I open my Sample page, you’ll see the Custom Field Group here, Page extras, and the custom field itself, Page subtitle.
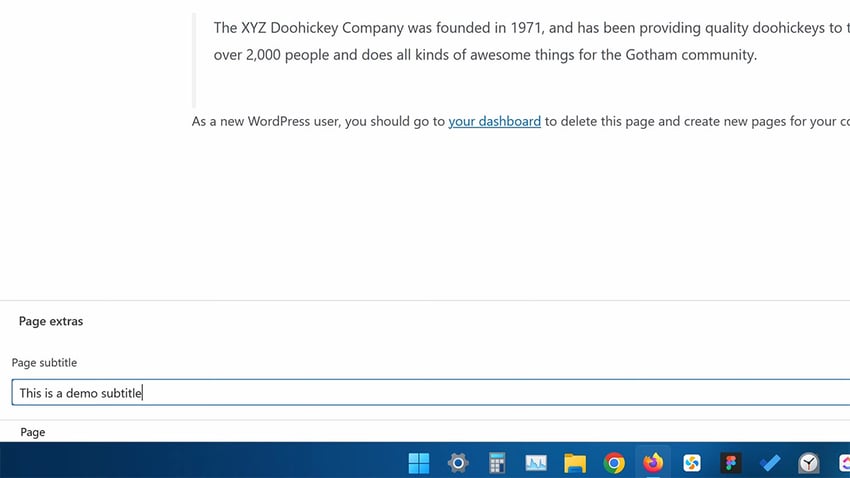
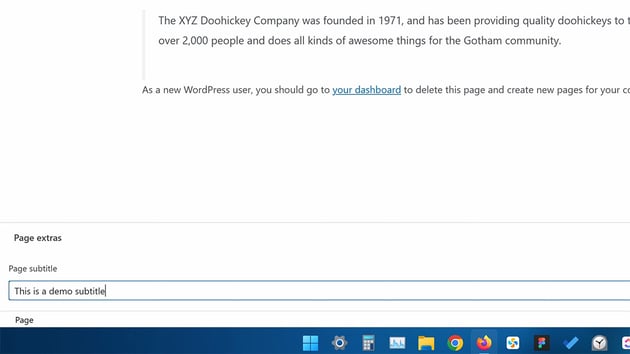

So let’s say: “this is a demo subtitle”. Okay, this is the value of the custom field and I’m gonna hit update. Now if I’m going to open my page, I don’t see that text anywhere, so how do I add it to the front end, how do we display that custom field value on the actual website?
Well with code we need to do something like this: we’ll go to page.php and this is the template that WordPress uses to display this content, and right here I can do something like this: I can say PHP, the_field, and then I’m going to say Page subtitle, which is the name of my custom field, and I’m going to close the PHP tag.
<?php the_field('page_subtitle'); ?>
So I’m going to save this, refresh, and actually little typo here, it’s like this, refresh and now I can see the “Subtitle” right here, and surely enough, if I change it and refresh that’s going to be displayed on the front end as well. So that’s a really simple demo, but what about those smartphones, because if I go to the smartphone list, let’s open this “Huawei Nova”, here you can see that I have two Custom Fields, the “Manufacturer” and the “Price”. So if we hit “update”, and if we open this page, we can just see the “title” and the content that’s defined basically here. How do we display these two? Well this one, we’ll actually use the single smartphones PHP template.
So let’s go ahead and modify this. Right before the loop I’m gonna say something like this: H3, characteristics and then let’s do a list and then a list item and we’re going to say “Brand” and then inside we’re going to say PHP and I’m going to say the field “Manufacturer” and then let’s go ahead and copy this, and let’s list the “Price” and I’m going to add a dollar sign in front and I’m going to change this to “Price” then save and now when we refresh.
<h3>Characteristics</h3>
<ul>
    <li>Brand: <?php
    the_field('manufacturer'); ?></li>
    <li>Brand: $<?php
    the_field('price'); ?></li>
</ul>
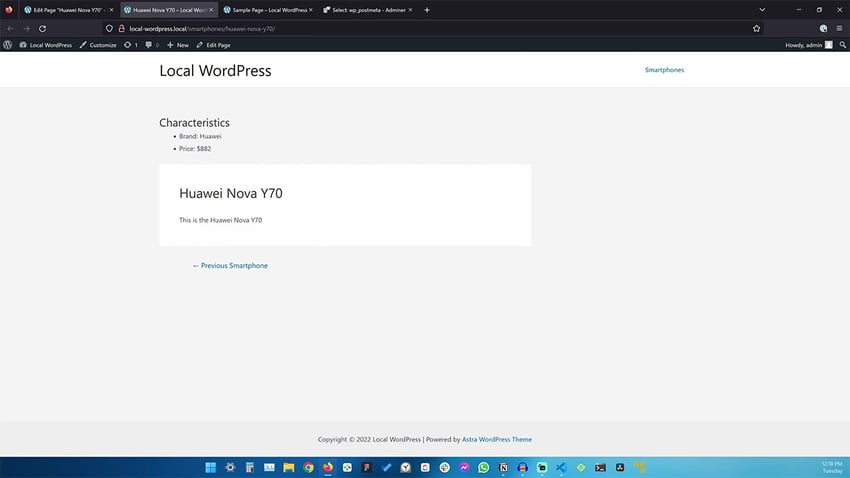

You’ll see that the characteristics are now shown right here and of course I can cycle through these and WordPress will display those custom fields right where I set them in the template so it’s totally possible to display those custom fields using code but you need to know exactly how to write the code, you need to know where to put it, and if you’re just getting started with WordPress this can be a little difficult.
Instead what you can do is you can install a plugin that’s going to allow you to get access to those ACF fields and display them wherever you want on your page and so that plugin is called ACF Views, it’s this one right here and of course it relies on you having installed ACF in the first place so you need some custom Fields before working with ACF Views and this is created by WP Lake. I’ll tell you more about this in just a little bit.


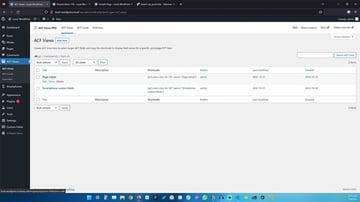
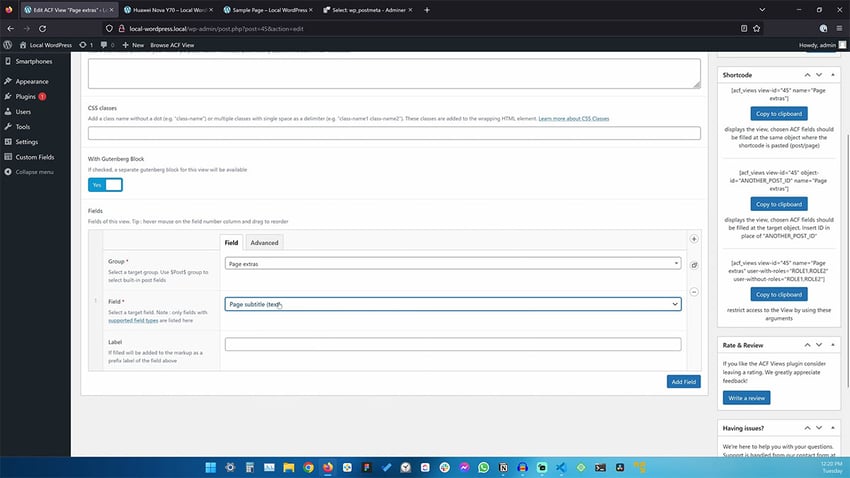
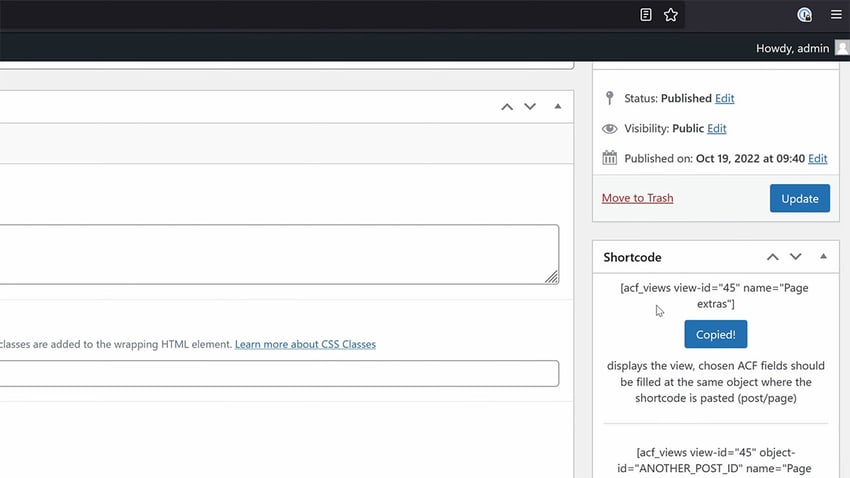
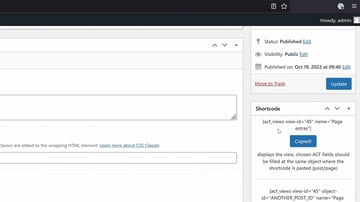
With both of these plugins installed and activated you can go to ACF Views and here you can see that I have two Views created, the first one is called “Page extras” and “Page extras” works in the following way, by the way you can call this whatever you want but what’s important is that you select the correct custom field group, the one that you defined here in my case it’s “Page extras” and from there you need to select the custom field that you want to display in my case it’s “page subtitle”’ which is a text, you can give this an optional label if you want and then you can hit “create” or “update” and this works by using shortcodes so you can actually copy this shortcode and you can then go to any page, let’s open up our sample page here and let’s go and insert a shortcode here in Gutenberg and I’m going to hit “update”.


Now if we view this page you’ll see that we have the custom field displayed right here and of course this being Gutenberg you can go ahead and move this wherever you want. If you have a custom template here you can choose where to display it. Let’s say we want to display this right at the top so if I hit ‘update’ and I refresh now that’s going to be displayed right here and we did that without writing a single line of code.
This page still displays my initial custom field because that’s still hard-coded in my theme right here, but I can very easily comment this out and if we do a refresh, that’s gone, so only this one will be displayed.
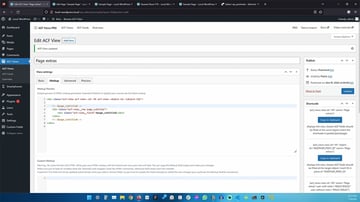
So, now this View actually uses this markup, right, so it creates a div and then it uses a couple of variables to display the value of that custom field and you can also create a custom markup which I’ll show you in just a little bit so that was a simple example for the “Page extras”.


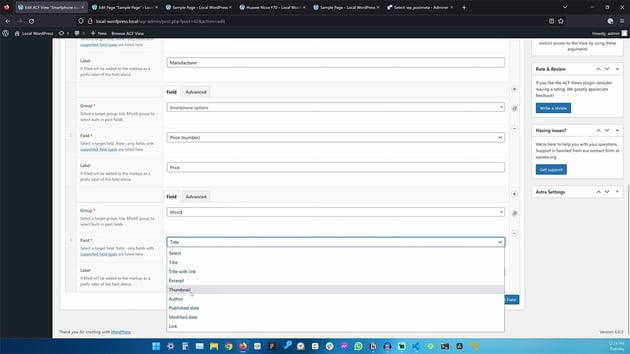
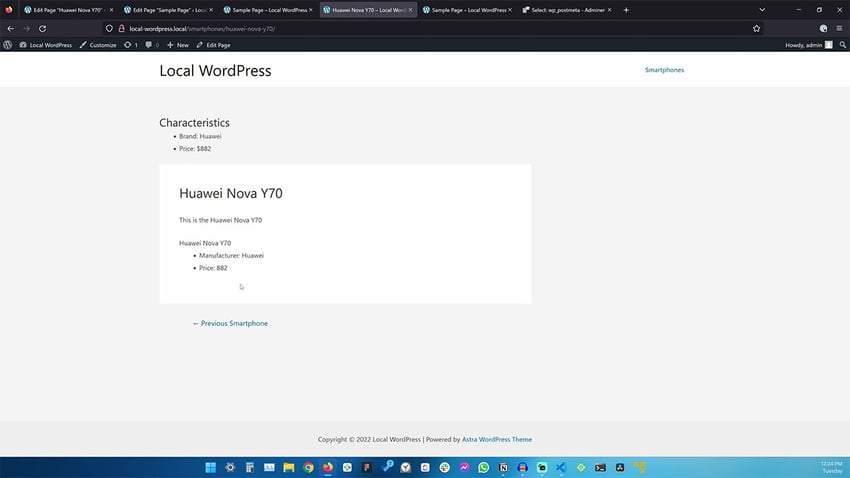
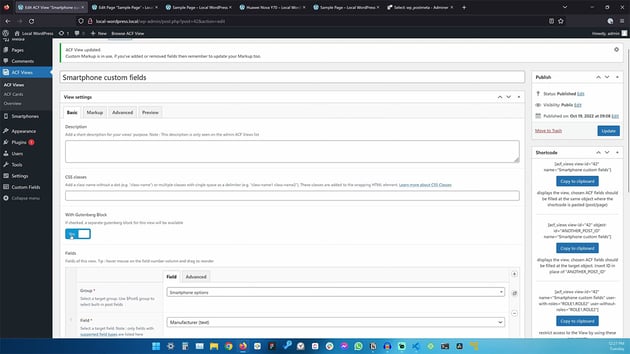
Let’s have a look at this next View that’s for the “smartphone custom Fields” if you remember when we defined the custom Fields here in ACF we have a group called “smartphone options” which has the “manufacturer” and “price” so if we go to the ACF Views and we open this second View that I created, again we are referencing the “smartphone options” ACF group and we’re getting the “manufacturer” we’re also setting a label here and we’re also setting the price, on top of that we’re also getting the post title and you can do that really easily in an ACF View by selecting “$Post$” here and you have a bunch of options for the actual field and this works exactly the same way, you have a shortcode that’s being generated for you automatically and you can just copy that to the clipboard and then you can go to “smartphones”.

Let’s open up this this “Nova” and it’s exactly the same, insert a shortcode, paste that here, “update” and now when we refresh the page here you’ll see that we now have that custom information, those custom fields displayed right where we wanted them and again if you have a template you’ll probably be displaying these fields somewhere else but we did that without needing to write a single line of code.


Now, if you don’t like the way this is displayed you can actually use custom markup. If we go back to ACF Views you’ll see that under markup this is the default that’s being generated for you automatically and I’ve actually added my own custom markup here, so if I’m gonna delete this and hit “update” the default markup looks something like this.

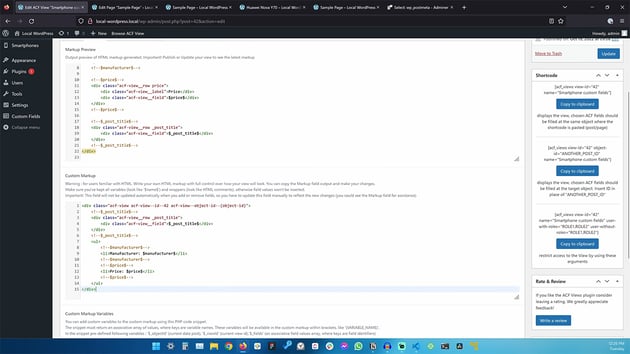

It’s just one element displayed after another, I wanted to use a list element so instead under custom markup I created this, just be careful when doing this you need to display these variables like so because otherwise you will not have access to the actual custom field so just add these comments with the variable name inside and then follow it up with your markup so now when we hit “update” and we go back to that “Nova” phone we can see the new markup taking place.

Now what’s really cool about the ACF View plugin is that it also supports Gutenberg blocks so I can turn this “smartphone custom field” View into a Gutenberg block all I gotta do is check out this box right here, hit ‘update’ and now when I go to edit my page, let’s go here and here and when I click this plus sign and I search for a “smartphone custom fields” I now have a Gutenberg block which I can edit right here in the sidebar so I can say ‘manufacturer’, I can say something else entirely the values that you set on the actual Gutenberg block are different from the initial ones you set here and obviously that makes sense because this is a Gutenberg Block it’s meant to be reused, so you can bypass this functionality all together and simply use the Gutenberg block to define the “manufacturer” let’s say “test” and “price” is 111, okay so I want to hit “update” and when I view this page.
You’ll see that I now have the exact same markup, the exact same structure for this content but with the new values, so this is great. I can now take this block, I can put it somewhere else, I can basically reuse it across my document.
The Gutenberg block functionality is actually part of ACF Views Pro there is a pro version to this plugin, now I do have it installed and you can get the pro version by going to https://wplake.org/acf-views and then “Get PRO” and by the way this is the official website for the plugin they also have a YouTube channel and documentation for the plugin and you’ll find links to that in the video description but you can get the pro version from here, and if you use the promo code envato you will get 20% off the pro version so remember that envato promo code 20% off. Right and that’s how you can use ACF Views to display custom fields without writing a single line of code.
How to Display Posts (2 Ways)
Now let’s turn our attention to this displaying posts and even custom post types so far we’ve looked at how to display ACF Fields by using code and the ACF Views plugin but the ACF Views plugin can also be successfully used for querying and displaying posts based on different criteria like meta filters and taxonomy so let me show you a few examples.
First, let’s start with the code demo. I have an archive for the “smartphones” custom post type and in this archive I’m basically using WP_query to get a bunch of posts from the database based on these arguments and here I’m using meta filters, I’m filtering using the “price” custom field and I’m only displaying the posts that have the “price” less than 1700, all right, so I’m defining the arguments, I’m creating my query using WP_query and then I’m getting the posts and for each post I’m basically displaying the “title”, “description”, “manufacturer” and “price”.
<?php
    $queryArgs = [
        // your post type here
        'post_type'         => 'smartphones',
        // target post status
        'post_status'       => 'publish',
        // maximum amount of posts, use -1 to set unlimited
        'posts_per_page' => 10,
        // type of order
        'order'         => 'DESC',
        // order field
        'orderby'       => 'date',
        'meta_query'    => array(
            array(
                'key'       => 'price',
                'value'     => 1700,
                'compare'   => '<',
                'type'      => 'numeric',
            ),
        ),
    ];

    // SQL query will be executed during this line
    $query = new WP_Query($queryArgs);

    // WP_Posts array
    $posts = $query->get_posts();

    echo "<div class='smartphones'>";
    foreach ($posts as $post) {
        $postId         = $post->ID;
        $title          = get_the_title($postId);
        $description    = get_the_excerpt($postId);
        $price          = get_field('price', $postId);
        $manufacturer   = get_field('manufacturer', $postId);
    ?>

    <h3><?php
        echo $title ?></h3>
    <h3><?php
        echo $description ?></h3>
    <ul>
        <li>Manufacturer: <?php
        echo $manufacturer ?></li>
        <li>Price: $<?php
        echo $price ?></li>
    </ul>

<?php
}
echo "</div>";
?>
Now if I go to my WordPress installation here, and let me close out a couple of these tabs and if I go to “smartphones” which takes me to the archive you can see that this displays every smartphone that fits this meta filter, right so “price” is lower than 1700 but I can also make the price lower than “700”. Okay, so that’s just gonna display a handful of my posts that have the custom post type of “smartphones” it’s this one, this one and this one so to get something like this you would have to write all of this code by hand which you know if you’re a WordPress developer it’s no problem whatsoever but if you’re just getting started and if you’re not familiar with how WordPress works, the hierarchy and all of that stuff then this could be problematic for you.
All right now let’s say we want to do all of this using the plugin, well there are a few ways we can do that. First of all if we take a look in “smartphones” and under categories we have a taxonomy defined here so we basically have categories for smartphones, we have budget high-end, Midfield and so on and each one of these have a category assigned to it, so if for example I were to display just the “Midfield” smartphones I would do it the following way.
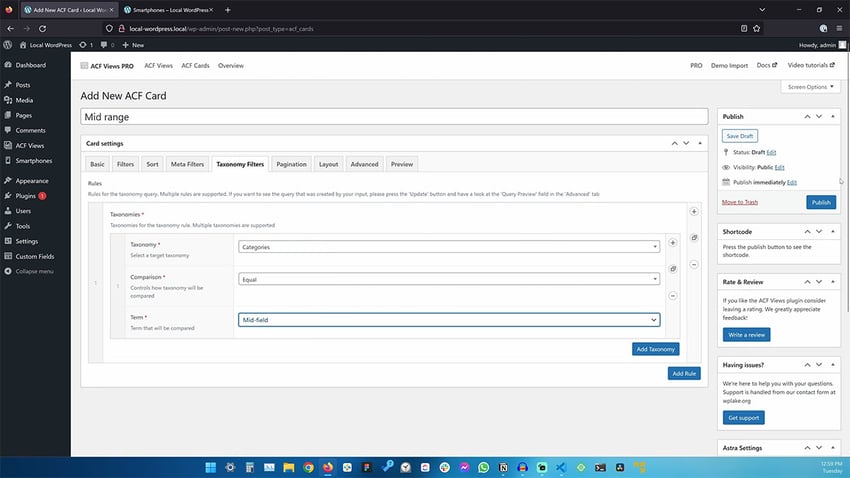
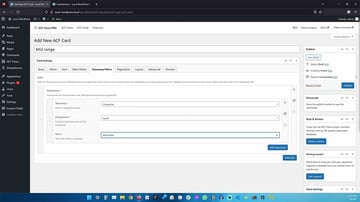
I will go to ACF Views and then ACF Cards and I’m going to create a Card and I’m going to name this “mid-range” I’m going to select the ACF View “smartphone custom fields” and then filters, I’m going to filter this to only show “smartphones post type” and then we go to taxonomy, we add a rule, we add a taxonomy “Categories” will be equal to and we select “Midfield” or “mid-range” or whatever it is that you defined so now we published this ACF Card we copy the shortcode and then we go to our pages, we can create a new page, let’s call this “mid-range smartphones” and here we can simply paste in that shortcode, publish the page and when we open the page that’s going to display only the mid range smartphones.
The plugin uses this taxonomy to filter those posts and display them on the page and at any point I can go back to the Card, I can edit the Card and I can change the taxonomy to something else, maybe I want to display the budget phones right so now it’s it’s gonna display just the budget phones. So that’s how you can use taxonomies.
What if you want to display these phones by Price or actually by manufacturer?
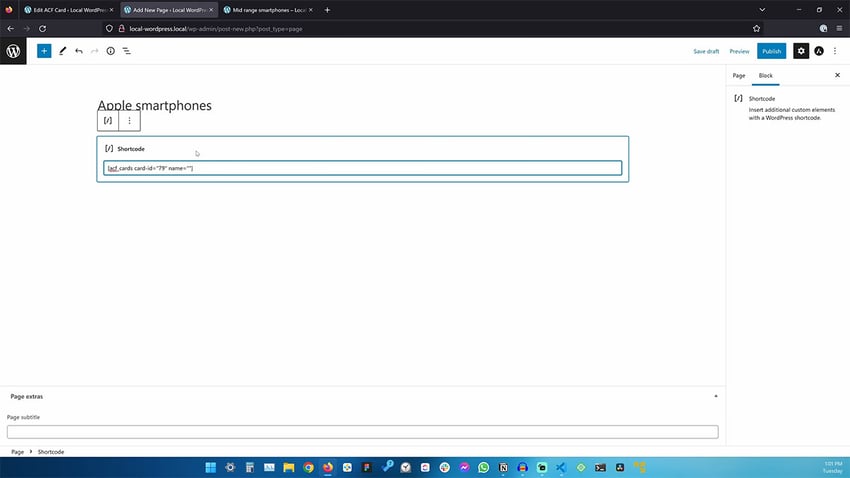
Let’s say we just want to display the “Apple” phones well, I can add a new page and I can say “Apple smartphones” and we’ll come back to this in just a little bit we can go back to ACF Cards, we can create a new one, we’ll select the correct View and we’ll go to filters, again we’ll just display smartphones and then under meta filters I can add a rule and I can select the manufacturer to be equal to “Apple” okay, make sure the correct group, ACF group is selected here, so we’ll publish that, we’ll copy the shortcode and we’ll paste that in and we’ll publish the page and now when we open the page it just shows me the “Apple smartphones” and that’s how you can use the meta filters in ACF Views to display a list of posts based on different criteria.

Now something else you can do with the plugin is pagination and for that let me actually open the “mid-range” Card that was using the taxonomy filters. Let’s select the “Midfield” phones, let’s “update” okay, so now we have four phones here but let’s say I want to display just two of them and then have some sort of pagination using code, it’s a lot of work to make this happen but with the plugin you can go to pagination, you can enable it, you can decide how many posts you want per page and you can “update”.
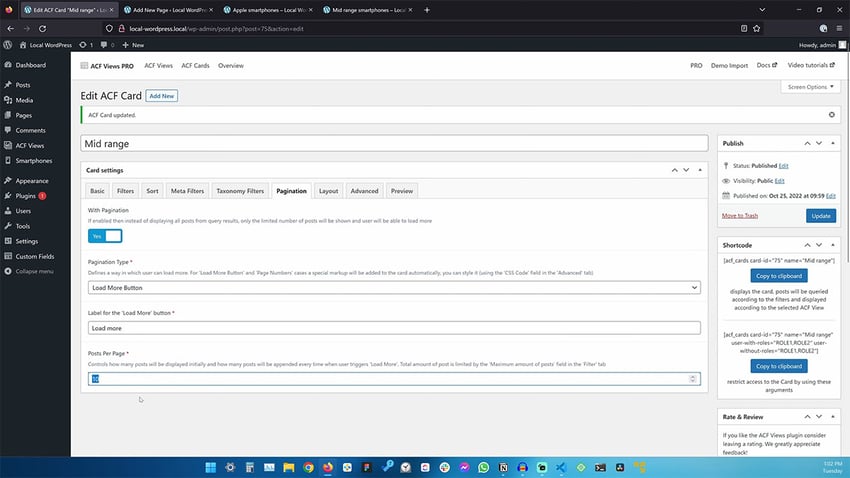


So now if I refresh I’m just displaying two posts with a load more button that shows me the other two and those are two ways of displaying posts and their ACF fields in WordPress.
Conclusion
I showed you how to do it in code and also how to do it with the awesome ACF Views plugin. Remember if you want to purchase the pro version of the plugin use code envato for 20% off.
I hope you found this video useful, remember to also check out the envato tuts plus YouTube
channel for more content like this but also to learn about web design, web development and a lot more and don’t forget to subscribe and give this video a thumbs up if you liked it. I’m Adi, thank you very much for reading and I will see you next time.