In this two-part series, we’re taking a look at the WordPress hook system. Specifically, we’re taking a close look at both actions and filters and the role they play in WordPress development.
Though they are both defined as hooks, each plays a specific role in WordPress development. And if you’re looking to become a more accomplished WordPress developer, it’s important not only to understand the difference between them but how you can implement custom hooks, as well.
In the first post in the series, we defined what hooks were, saw how they were used elsewhere, and also reviewed actions including how to define our own. If you haven’t caught the first article, I highly recommend reading it before proceeding with this tutorial.
Before getting started with hooks, I’ll provide a quick refresher of what was discussed in the previous article, and then we’ll move forward from there.
With said that, let’s get started.
A Quick Refresh
In the previous article, we saw how hooks are an implementation of the event-driven design pattern. In particular, we defined it as the following:
- The software has certain points in which it broadcasts a message that something has happened.
- We, as developers, are able to write code that listens for this message and then respond to it with custom code.
And then throughout the content, we reviewed exactly how this pattern is implemented in WordPress. We talked about how we can take advantage of it, and then we talked about how we can implement our own action.
We recognized a subtle distinction, too:
Actions are intended to work with functionality, and filters are meant to work with data.
Whereas actions allow us to modify the way something behaves, filters are going to allow us to modify data before it’s saved, retrieved, or displayed on the screen. In this tutorial, we’re going to take a look at how to work with filters before writing data to the screen, such as how to lowercase the text and remove vowels from the text.
Ultimately, it’s about trying to have fun and see tangible results through the work we’re doing while learning all about this powerful aspect of WordPress.
Before we do that, we need to make sure that we have our local development environment set up and ready to go.
Getting Started
Recall from the previous article that our local development environment should consist of the following:
- WordPress 6.0.1
- your preferred IDE
- a web server
- a copy of PHP
- a database
For many, Apache, PHP, and MySQL can be easily installed. If you’re more advanced then you may be using something such as Nginx and an alternative database. If that’s the case, that’s fine, but for the purposes of this tutorial I’m assuming you have the former.
And if you don’t have any of that set up, then no worries: We’ve got you covered. The linked tutorial will provide you with everything you need to get started working with WordPress on your local machine.
Once you’re set up, we’ll be ready to proceed.
Understanding WordPress Filters
The WordPress Codex provides a comprehensive set of resources for those looking to learn all about filters. As we’ve stated, it defines filters as the following:
Custom Filters differ from custom Actions because custom Actions allow you to add or remove code from existing Actions. Whereas custom Filters allow you to replace specific data (such as a variable) found within an existing Action.
But if you’re looking for an entire list of the available filters in WordPress, then be sure to reference (and bookmark) this page in the Codex. It has roughly 20 seconds worth of filters, many of which are linked to their own page of documentation.
This means if you’re curious if a specific filter exists, then you can reference this page. Similarly, you can visit that particular filter’s page in order to few the arguments parameters, an example function definition, and how to work with it.
A Word About Priority and Parameters
Before we go any further, I want to make sure that we’re all on the same page as to what priority and the number of arguments are referring to whenever we talk about them in the context of WordPress hooks.
Take, for example, the following line of code:
<?php
add_filter( 'author_edit_pre', 'filter_function_name', 10, 2 );
This tells us four things:
- the name of the filter that we’re hooking into
- the name of the function that should be called
- the priority of when the function should be called
- how many parameters the function should accept
Generally speaking, the first two points are quickly understood; however, the other two can often trip up new developers, but it’s not a hard concept to understand.
First, think of priority as when the function is called. Remember, since a given hook can have multiple functions associated with it, priority allows you to define how soon or how late your function is called. The lower the number, the sooner it fires; the higher the number, the later it fires.
Second, the number that indicates how many parameters an argument takes. If you don’t specify a number, it will either accept none or whatever the default argument is. If you want to pass a different amount than what’s expected, then you would specify how many parameters the argument should accept. We’ll see this in more detail later in the tutorial.
Working With Filters
To begin working with filters, let’s go ahead and create our own file in the root of the twentytwentytwo directory. We’ll call the file tutsplus-filters.php. Then, in twentytwentytwo’s functions.php, we’ll add the following line of code:
<?php
include_once( get_template_directory() . '/tutsplus-filters.php' );
This will make sure that all of our custom code will reside in a single file that we can exclude when we don’t want to use it. It also keeps it contained in its own area so that it doesn’t get baked in with any code that exists with the theme.
Filtering Post Title and Content
Before we begin defining our own custom filters, it’s important to understand how filters work. Since filters are meant to be used to modify data and since posts are one of the building blocks of a blog, let’s take a look at how we can filter the content of a blog post before it’s displayed on the screen.
The blog post in our case will be a simple joke. You can create a new post by navigating to Posts > Add New from the WordPress admin dashboard. My own post looks like this:


The post title simply says, “Joke of the Day”. The post content has the actual joke. We will be making two modifications to the post. First, we will add a credit at the end of our joke by using the the_content filter hook. Then, we will use the the_title filter hook to append today’s date to the title.
When working through this example, notice how it’s similar to how we work with WordPress actions, but rather than modifying behavior, it’s modifying data.
1. Registering Our Filter
To register our filter, we need two pieces of information:
- the name of the filter to which we’re going to hook our function
- a function that will be responsible for filtering the data
Since we’re going to be modifying post content, we can take advantage of the_content filter. The gist of the function is as follows:
- it accepts a single argument, the post content, allows us to modify it, and then returns it to the caller
In this case, WordPress is passing the post content to the function, and then the function will be returning the data after it completes its work.
Let’s name our custom function tutsplus_the_content and then register it with WordPress.
<?php

add_filter( 'the_content', 'tutsplus_the_content' );
function tutsplus_the_content( $content ) {
    return $content;
}
At the most fundamental level, this is what the function should look like. Of course, it doesn’t do much. It simply returns the content that’s passed into it.
2. Modifying the Content
Let’s have this function modify the data just a little bit. Specifically, let’s do this:
- Make sure that the post is being viewed in the single post view
- Add a message at the bottom of the post that tells viewers where the joke in the post came from.
It’s not the most practical use of a filter, but it will give you an idea as to how you can modify the function.
Here’s what the code should look like. Pay attention to the code comments, as well:
<?php

add_filter( 'the_content', 'tutsplus_the_content' );
function tutsplus_the_content( $content ) {

    // Don't proceed with this function if we're not viewing a single post.
    if ( ! is_single() ) {
		return $content;
	}

	$credit = <<<SOURCE
    <p>
        This joke was taken from <a href="https://www.rd.com/list/short-jokes/" target="_blank">rd.com</a>
    </p>
    SOURCE;

	// Now append it to the content.
	$content .= $credit;

	return $content;
}
If you look at the page in the index view or in the main view of the blog, then you’ll see the standard posts that look exactly as they would without any modification. If you visit the joke post now, though, you’ll see a new phrase appear at the top of each post. Specifically, you’ll see something like this:



Try visiting some other pages and you will see that the credit message is being displayed at the end of all posts. This might not be the desired behavior
Let’s do something a little more targeted with the title. In addition to adding a credit message at the bottom of the content, let’s update the post title as well to show today’s date before returning it to WordPress.
To do this, we’d use the following code:
<?php

add_filter( 'the_title', 'tutsplus_the_title' );
function tutsplus_the_title( $title ) {

    // Don't proceed with this function if we're not viewing the joke post.
    if ( is_single() && get_the_ID() == 60 ) {
		return $title." — ".date("F j, Y");
	} else {
        return $title;
    }
}
Implement that code, save it, and then visit any post in your WordPress installation. You will notice that the date is appended to the title only on the Joke post.



What if you want to append the date as well as capitalize the post title? You can do so with the help of following code:
<?php

add_filter( 'the_title', 'tutsplus_joke_title', 10, 2);
function tutsplus_joke_title( $title ) {

    $post_list = [60, 64];

    if (is_single() && in_array(get_the_ID(), $post_list) ) {

        $title = strtoupper($title);
		return $title." — ".date("F j, Y");

	} else {
        return $title;
    }
}
This time we create an array of post IDs for which I want to append the date. This could include things like Quote of the day, Joke of the day etc. The code basically checks if we are working with an individual blog post and its ID matches the ID we want. If it does, we capitalize the title and append the date.
Defining Custom Filters
It’s easy to take advantage of pre-existing filters, though. As mentioned earlier, it’s really a simple matter of calling add_filter, specifying the filter’s name, and then passing the name of the function that we want to be called to filter the data.
But what if we want to create our own custom filter? Perhaps we want to create a filter that will lowercase all of the text in the post? Or maybe we want to create a filter that will replace some text in the post?
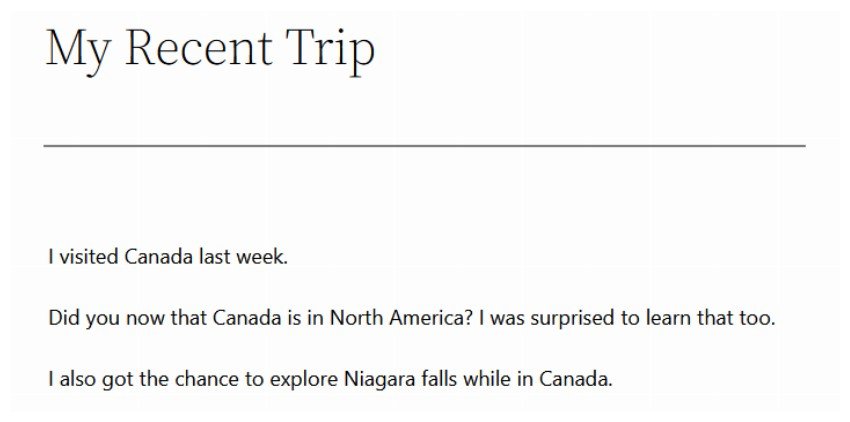
For our example, I have created a simple blog post about my hypothetical trip to Canada which looks like this:


Understanding apply_filters
This is where we begin to take interest in apply_filters. This particular function is one that accepts two arguments:
- a tag that identifies the name of the filter hook
- a value that refers to the value on which the filters are applied
If you were to look at an example of, say, get_the_content in WordPress core, then you would notice it passes the specified value through the_content via apply_filters.
And this is useful to understand, but how do we define our own custom filters such that others can call apply_filters on functionality we’ve developed?
Adding Our Own Filters
Adding our own filters is easy. We need to specify the same four things that we outlined above:
- the name of the filter
- the function the filter should call
- the priority of the function
- the number of arguments that it should accept
Let’s start with a simple example.
Lowercase Everything
Let’s begin by making sure the content of the entire post is lower case.
First, we want to define the filter with a priority of 10. We know it’s only going to accept a single argument, the content, so we’ll pass the number 1 when adding our filter:
<?php
add_filter( 'tutsplus_lowercase_all', 'tutsplus_lowercase_all_callback', 10, 1 );
Next, we’ll define a simple function body that uses PHP’s strtolower function for lowercasing whatever value has been passed to it, and we’ll return it.
<?php
function tutsplus_lowercase_all_callback( $content ) {
    return strtolower( $content );
}
The final version of the code will look like this:
<?php
add_filter( 'tutsplus_lowercase_all', 'tutsplus_lowercase_all_callback', 10, 1 );
function tutsplus_lowercase_all_callback( $content ) {
    return strtolower( $content );
}

add_filter( 'the_content', 'tutsplus_the_content' );
function tutsplus_the_content( $content ) {

    // Proceed with this function only if we are viewing a particular post.
    if ( is_single() && get_the_ID() == 66) {
		return apply_filters( 'tutsplus_lowercase_all', $content );
	} else {
        return $content;
    }
}
The output of above filter on our blog post will produce something like this:


Easy enough to understand, right? Let’s take a look at one more example where we will replace the country name.
Replace the Country
To replace the country, we can use the built-in str_replace() function. However, we need to change the way in which the filter is registered with WordPress, and then we need to make sure that the function registered with WordPress properly calls apply_filters.
Since we’ve seen how to add our own filter, specify a priority, define the number of arguments it should accept, and implement a function, I won’t waste time with trivial details.
Here’s the filter and it being called all on its own:
<?php

add_filter( 'tutsplus_replace_country', 'tutsplus_replace_country_callback', 10, 1 );
function tutsplus_replace_country_callback( $content ) {
    return str_replace( 'Canada', 'U.S.', $content );
}

add_filter( 'the_content', 'tutsplus_the_content' );
function tutsplus_the_content( $content ) {

    // Proceed with this function only if we are viewing a particular post.
    if ( is_single() && get_the_ID() == 66) {
		return apply_filters( 'tutsplus_replace_country', $content );
	} else {
        return $content;
    }
}
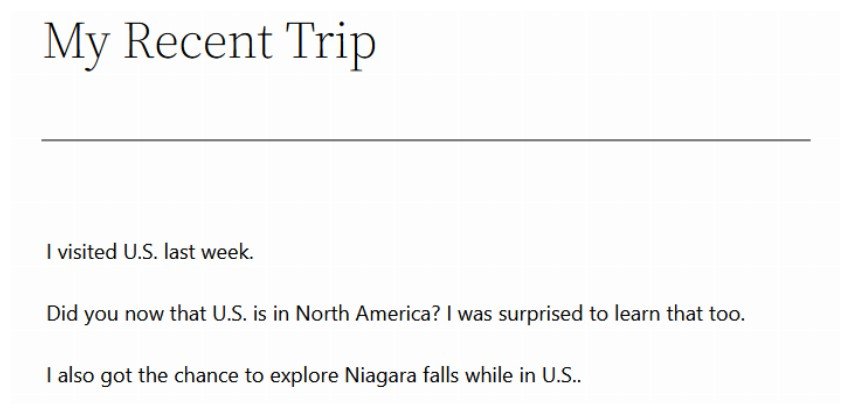
The output with above filter will look like the image below:
And then this is how you can call it from within the initial hook.
Calling Them All Together
Finally, it’s possible to call apply_filters multiple times:
<?php

add_filter( 'tutsplus_lowercase_all', 'tutsplus_lowercase_all_callback', 10, 1 );
function tutsplus_lowercase_all_callback( $content ) {
    return strtolower( $content );
}

add_filter( 'tutsplus_replace_country', 'tutsplus_replace_country_callback', 10, 1 );
function tutsplus_replace_country_callback( $content ) {
    return str_replace( 'Canada', 'U.S.', $content );
}

add_filter( 'the_content', 'tutsplus_the_content' );
function tutsplus_the_content( $content ) {

    // Proceed with this function only if we are viewing a particular post.
    if ( is_single() && get_the_ID() == 66) {
		return apply_filters('tutsplus_lowercase_all', apply_filters( 'tutsplus_replace_country', $content ));
	} else {
        return $content;
    }
}
Here is the final result of applying both the filters together:
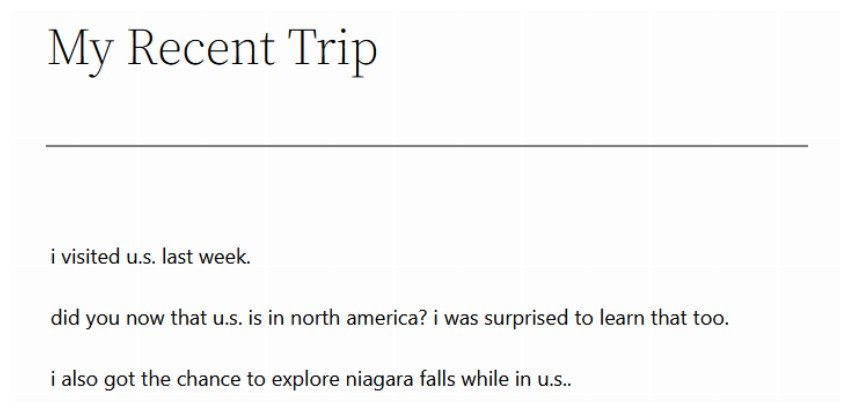


Notice that this achieves the combined result of the previous cases, but it does so by condensing them into a single line of code. There are other ways that this could be written as well, but the purpose of this tutorial is to educate you on how to write your own filters and how to take advantage of apply_filters in your own work.
Conclusion
This tutorial concludes our introduction to WordPress hooks. Throughout the series, we’ve reviewed how to take advantage of existing actions and filters, as well as how to create and implement our own.
The hook system is one of the most powerful aspects of WordPress for developers, so it’s important to become familiar with it. In doing so, you’re not only able to manipulate behavior and data that WordPress provides, but you’re able to define your own hooks that other developers can use throughout their own code.
This post has been updated with contributions from Nitish Kumar. Nitish is a web developer with experience in creating eCommerce websites on various platforms. He spends his free time time working on personal projects that make his everyday life easier or taking long evening walks with friends.