
In this tutorial I’ll show you how to create dynamic racing photo manipulation in abstract world. If you are interested in not only repeat this photo manipulation, but also learn how to create such an abstract rendering then you should read my tutorial “Create colorful abstract glossy render in Cinema 4D” on this site. Today I’ll tell and show you how create a “Racing vertical” artwork starting from the creation of stage and finishing with effects. Work with a variety of tools, filters and adjustment layers. There will also be described in detail the creation of light. realistic shadows and reflections, a lot of interesting effects, creating a harmonious composition and much more! Read this tutorial and immerse yourself into the world of cyber racing!
Final Image Preview

What you’ll be creating
Let’s start creating this picture with the construction of the base composition. The next step will be to work with motorcyclists, Then I show you how to make realistic shadows, reflections and add dynamics to the racers. In the final part, we will work with adjustment layers and filters to create improve image mood and story, increase sharpen of image. You will need: download all attachment links, a little logic, a good mood and be sure to have Photoshop beginning with CS version.
Tutorial Resources
Step 1
So let’s start from new blank document (File > New or use Cmd/Ctrl + N) with following settings: Width: 3840, Height: 2160, resolution 200ppi. It’s a larger wallpaper with ratio 16:9.

Step 2
First, we need to create a main scene (landscape) in the working document. In this tutorial I use my own abstract render. If you are interested to create your own rendering, I devoted an entire tutorial that you can read here or you can download a ready-made image pack. Very rarely images as an abstract rendering is used as a place of action, not decoration.
Go to File > Place/ Place Embedded… and open image “Colorful abstract render 003” from Colorful abstract render pack.

Step 3
In Free transform mode (Cmd/Ctrl + T or Edit > Free Transform) place image in lower left corner of working field and increase the size of the image with holding Shift key. Use the image below to see how I did it. Tap Enter/Return key or check mark at the Properties bar to apply changes.

Step 4
Now we continue to complement the scene using wireframe images. Go to File > Place/ Place Embedded… and open image “Wireframe_002”. Place image below colorful render in layer stack. It’s a main image and fill almost all working field. Change Blending Mode to “Multiply”.

Step 5
Duplicate this image several times (Cmd/Ctrl + J or go to Layer > Duplicate Layer…) and place it, where lacks texture. Use Free Transform Tool (Cmd/Ctrl + T) to rotate and resize images, as shown in image below. Try to line preserved its direction relative to the main image. We’re doing the race track, so all roads must be correct.

Step 6
I conceived the race track as the digital world, where knights fight with speed on metallic horses. So you need to add the appropriate changes. I decided to make the transition between wireframe world and 3D. So I duplicate original colorful render layer (Cmd/Ctr + J or go to Layer > Duplicate Layer…). Then go to Filter > Filter Gallery… > Sketch > Photocopy. Set following values: Detail: 3, Darkness: 6 and apply filter. Reduce layer Opacity to 67%.

Step 7
Then on a Smart Filter layer mask I remove some texture from foreground. Take a Brush Tool (B) and set Soft Round brush with Size: 1000px, Opacity 100- 50% and set foreground color to Black (press to set default colors D and then X to switch them). On a layer mask remove from foreground wireframe image. Just leave texture a little bit at the center and on the edges of colorful render.


Step 8
Now we start adding the main characters, namely motorcyclists. Go to File > Place/ Place Embedded… and open image with a Main motorcyclist. Increase image a little and Rotate on -6.30 degrees it to give more dynamism to pose and matching with the surface.

Step 9
Now remove the background. I recommend you to use Pen Tool (P) to create a path around motorcyclist. Carefully create a path around. Try to the circuit did not get the background and clothing did not go beyond the path. After having done the path create a selection from it. Right click on working area > Create Vector Mask or use “Mask” button on Properties bar.

Optional: you can use Make Selection… command, but in this case you’ll working with raster mask. In window that appear set Feather Radius to 0px and click OK. Add layer mask to hide background by clicking on “Add layer mask” icon at the bottom of Layer panel or go to Layer > Layer Mask > Reveal Selection.
Step 10
A model is separate from the background we can see the remains of the background. To remove them take a Direct Selection Tool (A) and move anchor points to on a vector mask and remove unnecessary parts of background. Also use Add/Delete Anchor Points Tool (P) to correct path and add more anchor points.

Step 11
Repeat steps 8-10 to add more racers. Place them as shown in image below, or do not be afraid to add other racers and change their number. Most importantly, you are exactly placed rider in the desired plane that it matches to perspective. Trying to catch their posture and correctly use it in artwork.

Step 12
Once you have added all the racers, we proceed to embed them into the surrounding atmosphere. Let first add a shadow from riders. In our image of the light source is not indicated. So shadows must be soft. Select foreground racer by holding Cmd/Ctrl and clicking on a vector or raster mask. When you get selection create a new layer (Cmd/Ctrl + Shift + N or use “Create a new layer” button at Layer panel) and fill selection with black color (Edit > Fill > Black/Color… or use Cmd/Ctrl + Del/ Backspace for background color or Opt/Alt + Del/ Backspace to foreground).

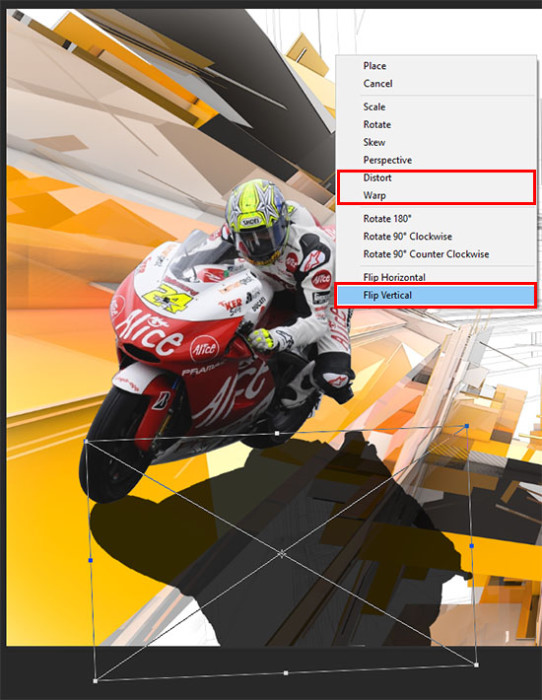
Step 13
Move this layer under all racer layers in layer stack. With Free Transform Tool (Cmd/Ctrl + T) flip shadow vertically (right–click > Flip Vertical). Use Warp tool/ Distort tool to place the shade exactly on the plane and in accordance with the shape of the object. And do not forget that the shadow should be under the wheels of a motorcycle. Now the most important thing is the shadow of the object. Work on the object of itself we will have a little bit later.
Step 14
Add a layer mask to shadow layer and with Brush Tool (B) (Soft Round brush, Size: 450px. Or use Eraser Tool (E) on a layer) remove everything that is not located on an abstract render.

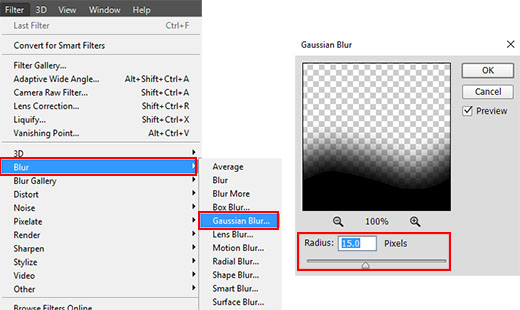
Step 15
Go to Filter > Blur > Gaussian Blur… and set Radius around 15 pixels. That should be enough for a realistic shadow. Change layer Blending Mode to “Multiply” and reduce Opacity to 85- 60%. This will help you better adapt the shadows to the picture and make it more realistic. Also in the picture I am working with Smart objects so I can change filter settings in any time. In you want, you can convert shadow layer to Smart Object and then add layer mask and “Gaussian Blur” filter.
Step 16
Repeat steps 12 -15 for Yellow motorcyclist and Front motorcyclist. Now create a new layer (Cmd/Ctrl + Shift + N or use “Create a new layer” icon at Layer panel) above all racer layers and use black soft round brush with Opacity 20-50% and draw shadow on wheels and motorcycle places of contact with the surface. Be very careful to keep realistic shadows. Select all racer layers in layer stack and group it (Layer > Group Layers… or use Cmd/Ctrl + G). Change name group to “Motorcyclists”.

Step 17
When the work with the shadows is completed, we can start adding reflections.
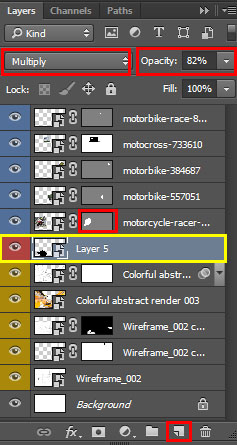
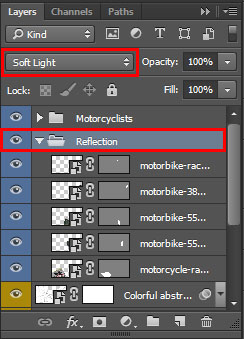
Keep in mind that the abstract render is glossy. And in addition to a soft shadow, you will need to add reflections on different planes render to the picture looks realistic. Reflections will be not only under motorcycle, but the side planes. So, duplicate group “Motorcyclists” (Layer > Duplicate Group or Cmd/Ctrl + J). Change name to “Reflection” and delete all shadow layers and Jumping motorcyclist layer in this group. Select group and go to Edit > Transform > Flip Vertical.
Step 18
- Now move and transform these layers so it fit to originals. The same technique as work
- with shadows. But do not forget to make one more copy of Front motorcyclist and
- White motorcyclist layers to place it on walls. Change group blending mode to “Soft
- Light” and add a layer mask to remove some reflections with Brush Tool (B).

Step 19
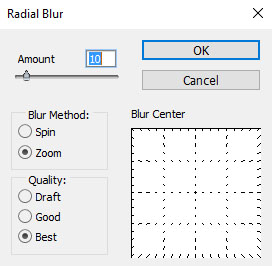
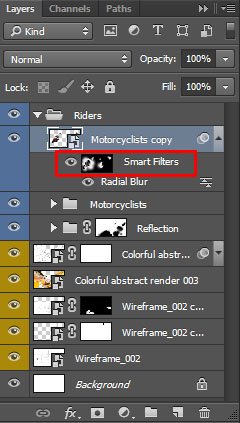
Now duplicate “Motorcyclists” group again and convert it to Smart Object (right-click on a group > Convert to Smart Object). Go to Filter > Blur > Radial Blur… In window that appears set Amount: 10, Blur Method: Zoom, Quality: Best and apply changes.
This create effect of motion for the riders.
Step 20
Go to smart filter layer mask and fill it with black color (Edit > Fill > Color…). Use Brush Tool (B) with white color, Size: 300-200px and soft round form to return effect on the edges of riders.

Step 21
On this stage, group all motorcyclists’ layers and groups it (Layer > Group Layers or Cmd/Ctrl + G). Next we will only work with adjustment layers Create a new adjustment layer “Color Balance” (use “Create a new Fill or Adjustment layer” icon or go to Layer > New Adjustment Layer > Color Balance…). In Properties tab click on “making a clipping mask” button and set following values for mid tones:
Cyan-Red: +19;
Magenta-Green: 0;
Yellow-Blue: -16.
All other settings do not change.

Step 22
Now add a Gradient Fill layer (Layer > New Fill Layer > Gradient…). In window that appears set Gradient: Black, White; Style: Linear; Angle: 120 degrees; Scale: 100% and click OK. Make a Clipping Mask to a riders group (Cmd/Ctrl + Opt/Alt + G or right click on the layer > Create a Clipping Mask). Change Blending Mode to “Overlay” and reduce Opacity to 20%.

Step 23
Now you need a little bit to adjust the lighting direction. Create a new layer (Cmd/Ctrl + Shift + N) and set Blending Mode to “Overlay” and Opacity to 30%, make a clipping mask to group (Cmd/Ctrl + Opt/Alt + G).
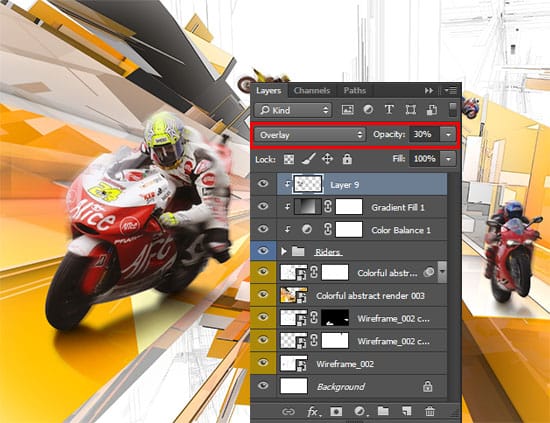
Step 24
Take a Brush Tool (B) and select the Soft Round brush preset, and set the size around 250px, Opacity around 10 – 20% and use white /black colors to create lighting/shadow on riders. If you need to remove unnecessary lighting, use Eraser Tool (E).
Step 25

Step 26
To their appearance matched the place where they were going, I used “Photocopy” filter from Filter Gallery. Go to Filter > Filter Gallery… > Sketch > Photocopy. Set following values: Detail: 1, Darkness: 20 and apply filter.

Step 27
This is what it looks like after applying the filter. In order not to repeat each time the same path, select each layer and use Cmd/Ctrl + F to apply last filter.

Step 28
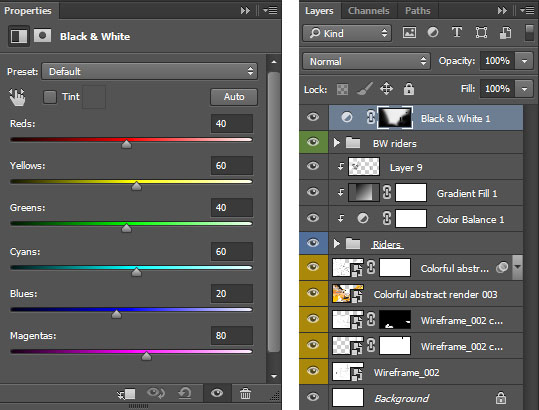
Add an adjustment layer “Black &White” to create effect of “changing reality” (Layer > New Adjustment Layer > Black &White…). Leave default settings and on layer mask remove effect from foreground with Brush Tool (B) (Size: 600-200px, Opacity: 50%, soft round brush). Try to make the transition between wireframe world and colorful render.

Step 29
In last step I increase sharpness of the image. Create a merged copy of image (Cmd/Ctrl + Opt/Alt + Shift + E), convert it to Smart Object (right click on layer > Convert to Smart Object). Go to Filter > Other > High Pass. Set Radius to 2.0 pixels and click OK.

Step 30
To get rid of the gray background change Blending Mode to “Linear Light”. Using this mode will overlay greatly increase the brightness, so reduce Fill to 50% (do not use Opacity).

Well, that’s all! I hope you enjoyed this tutorial and you could find it useful. I am satisfied with my result. I hope that you are satisfied your result too and spent time with benefits. Thank you very much for taking the time to study this tutorial! I wish all lucked in your future achievements! I thank the authors of resources for their excellent work and good quality! More of my work can be found on my pages Facebook Deviantart Behance. I am open to suggestions and cooperation! With best wishes!