In this tutorial, we’re going to discuss php.ini—the main configuration file in PHP. From the beginner’s perspective, we’ll discuss what it’s meant for, where to locate it, and a couple of important configuration settings it provides.
What Is php.ini?
Whether you’re a PHP beginner or a seasoned developer, I’m sure that you’ve heard of php.ini: the most important PHP configuration file.
When PHP is run, it looks for the php.ini file in some specific locations and loads it. This file allows you to configure a few important settings that you should be aware of. Quite often, you’ll find you need to tweak settings in the php.ini file.
On the other hand, it’s certainly possible that you’ve never needed to modify php.ini. PHP can run happily with the settings provided in the default php.ini file, since PHP ships with these default recommended settings. In fact, there are no critical configuration parameters that you must set in order to run PHP.
However, the php.ini file provides a couple of important settings that you want to make yourself familiar with. In fact, as a PHP developer, it’s inevitable, and you’ll encounter it sooner rather than later.
Where Is php.ini?
In this section, we’ll see how to find the php.ini file which is loaded when you run the PHP script. This can be tricky—the location of the php.ini file vastly varies by the environment you’re running PHP with. If you’re running Windows, you’ll likely find the php.ini file within the directory of your PHP installation in the system drive. On the other hand, if you’re running another operating system, then it’s difficult to guess the exact location of the php.ini file—there are several possibilities.
This is where the phpinfo() function comes to the rescue. It will tell you where php.ini is located, and it will also output all the important PHP configuration information.
You can run phpinfo() by creating a .php file and calling that function. Go ahead and create the phpinfo.php file with the following contents and place it in your document root:
<?php
phpinfo();
?>
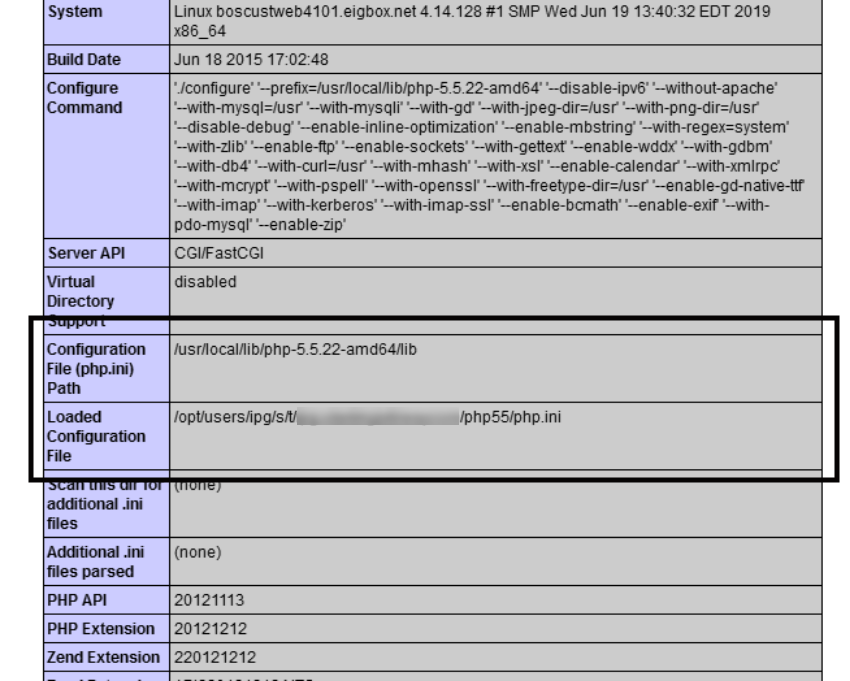
Load this file in your browser, and you should see the output of phpinfo(). Look for the following section.

As you can see, there are two sections. The first one, Configuration File (php.ini) Path, indicates the default path of the php.ini file in your system. And the second one, Loaded Configuration File, is the path from where the php.ini file is being loaded when PHP is run.
So you can edit the php.ini file indicated in the Loaded Configuration File section, and that should work in most cases. Of course, if you’re running PHP as an Apache module, you need to restart the Apache server to make sure that the changes you’ve made in the php.ini file are reflected.
On the other hand, if you’re using software like WAMP or XAMPP to run your web development stack, it’s even easier to modify the php.ini file—you can directly access it via the WAMP or XAMPP UI.
In the next section, we’ll explore a couple of important settings in the php.ini file.
Important Settings in php.ini
The php.ini file provides a lot of configuration directives that allow you to modify various behaviors of PHP. In fact, when you open the php.ini file, you may get overwhelmed by the number of directives it provides. I’ll try to group them based on their behavior, and I hope it’ll be easy for you to understand.
Of course, we won’t go through each and every directive, but I’ll try to cover the most important ones. Let’s have a look at the types of directives that we’re going to discuss.
- error handling directives
- file upload directives
- security related directives
- session directives
- miscellaneous directives
Error Handling Directives
In this section, we’ll go through directives that are related to error handling and are useful for debugging during development.
display_errors
The display_errors directive allows you to control whether errors are displayed on the screen during script execution. You can set it to On if you want errors to be displayed on the screen and Off if you want to disable it. It’s important that you don’t ever enable this on a production site—it will slow your site down and could give hackers valuable clues to your site’s security vulnerabilities.
error_reporting
This directive allows you to set the error reporting level. Mostly, this directive works in conjunction with the display_errors directive. This directive can accept E_ALL, E_NOTICE, E_STRICT, and E_DEPRECATED constants.
You can set it to E_ALL if you want to display all types of errors like fatal errors, warnings, deprecated functions, etc. You can also combine the different values if you want to filter out specific errors. For example, if you want to display all errors except notices, you can set it to E_ALL & ~E_NOTICE.
error_log
On a production website, you need to make sure that PHP doesn’t display any errors to the client browser. Instead, you can log errors somewhere so that later on you can refer to them if something goes wrong with your site. The error_log directive allows you to set the name of the file where errors will be logged. You need to make sure that this file is writable by the web server user.
File Upload Directives
In this section, we’ll see a couple of important directives that allow you to enable file uploading capabilities in your PHP forms.
file_uploads
This is a boolean directive which allows you to enable HTTP file uploads. If you set it to On, you can use the file field in your forms and users will be able to upload files from their computer. On the other hand, if you set it to Off, file uploading is disabled altogether.
upload_max_filesize
If you have enabled the file upload feature on your website and you’re facing difficulties in uploading files, this is the directive you should check first. It allows you to set the maximum size of a file that can be uploaded.
By default, it’s set to 2MB, and thus users can’t upload files larger than 2MB. You can fine-tune this value as per your requirements—often you’ll want to increase this limit to allow larger file uploads.
post_max_size
This setting allows you to set the maximum size of the POST data in your forms. When a user submits a form with the POST method, the total POST data size should not exceed the value you’ve set in this directive.
This should be larger than the value you’ve set in the upload_max_filesize directive, since file uploads are handled with POST requests.
Security Directives
In this section, we’ll see a few important directives that are related to security.
allow_url_fopen
The allow_url_fopen directive is disabled by default. But when it’s enabled, it allows remote file inclusion in PHP file functions. This means that your PHP files can include code from other servers. Be wary about enabling this—if your code is subject to an injection attack, remote file inclusion will make it much easier for a malicious user to hijack your server.
allow_url_include
The allow_url_include directive is similar to the allow_url_fopen directive, but it enables remote file inclusion in include functions. It allows you to include remote files in the include, include_once, require, and require_once functions.
If you want to enable this directive, you need to make sure that you’ve enabled the allow_url_fopen directive as well.
Session Directives
Session management is one of the most important aspects when you’re working with PHP. In this section, we’ll go through a couple of important session directives.
session.name
The session.name directive allows you to set the name of the session cookie. By default, it is set to PHPSESSID, but you can change it to something else by using this directive.
session.auto_start
If you set the value of the session.auto_start directive to 1, the session module in PHP starts a session automatically on every request, and thus you don’t have to use the session_start function in your scripts.
session.cookie_lifetime
The session.cookie_lifetime directive allows you to set the lifetime of a session cookie. By default, it is set to 0 seconds, and it means that the session cookie is deleted when the browser is closed. This is a really useful setting which allows you to set up a “remember me” kind of functionality, allowing your users to pick up where they left off on your site.
Miscellaneous Directives
In this last section, we’ll see a couple of other directives that are important in the context of PHP script execution.
memory_limit
The memory_limit directive allows you to limit the maximum amount of memory a script is allowed to use.
You want to fine-tune this directive as per your requirements, and you should not set this too high to avoid memory outages on your server—poorly written or buggy scripts can eat up all the memory on your server if you let them!
max_execution_time
The max_execution_time directive sets the maximum amount of time a script is allowed to run before it is terminated. The default is 30 seconds, and you can increase it to a reasonable limit as per your requirements if you need to.
Similar to the memory_limit directive, you should not set this too high to avoid issues on your server.
max_input_time
The max_input_time directive allows you to set the maximum amount of time a script is allowed to parse incoming form data from a GET or POST.
If you have forms on your website that submit a large amount of data, you might like to increase the value of this directive.
Conclusion
It’s impossible to cover each and every directive within a single article, but I’ve tried to cover the important ones. Feel free to post your queries if you want to know about any specific directives, and I’ll be happy to help!
As a PHP developer, it’s important that you understand the different directives in the php.ini file, and that should help you to fine-tune your PHP configuration to your requirements.
The Best PHP Scripts on CodeCanyon
Explore thousands of the best and most useful PHP scripts ever created on CodeCanyon. With a low-cost one-time payment, you can purchase these high-quality WordPress themes and improve your website experience for you and your visitors.

Here are a few of the best-selling and up-and-coming PHP scripts available on CodeCanyon for 2020.