Introduction
In this tutorial, the fourth installment of the SpriteKit From Scratch series, we look at the various visual and audio features SpriteKit provides to add some more detail and variety to your games. This includes particle systems, filters, lighting, and audio.
To follow along with me, you can either use the project you created in the previous tutorial of this series or download a fresh copy from GitHub.
The graphics used for the game in this series can be found on GraphicRiver. GraphicRiver is a great source for finding artwork and graphics for your games.
1. Particle Systems
In SpriteKit, the term particle system refers to a single emitter node, represented by the SKEmitterNode class. It defines the system’s position in your scene and all of the particles it creates. The emitter specifies the various behaviors of the particles that it generates.
Particle systems are best used in SpriteKit games where you need to generate a large number of identical or similar sprites, which don’t need to have a specific location or execute any actions.
In this tutorial, we are going to add two particle systems when the car hits an obstacle:
- a short explosion effect that briefly appears
- a smoke effect that remains in the scene indefinitely
While particle systems can be created programmatically, it is much easier to do so using Xcode’s built in editor. All of the properties of a particle system can be modified in this editor and the changes you make are immediately visualized. This is much easier than having to run your game after every change you make.
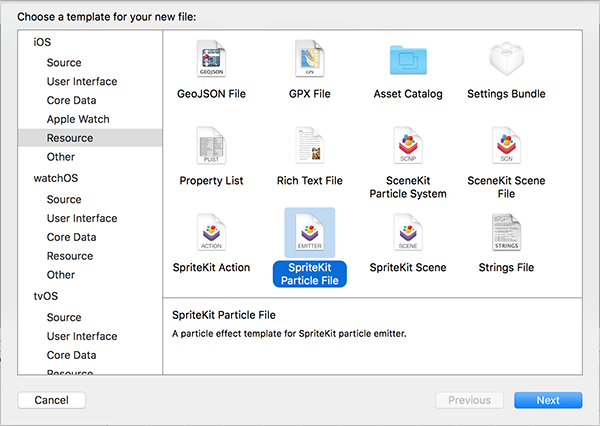
We are first going to create the explosion effect. Create a new file in your project and choose the iOS > Resource > SpriteKit Particle File template.

From the menu that appears, select Fire as the Particle template. Name the file Explosion or something similar.
After Xcode has created the file, you see that there are two new files in your project, Explosion.sks and spark.png.
Explosion.sks contains the particle system and it is the file we will be working with. The second file, spark.png, is a simple image used by the Fire particle template to create its visual effect. If you open Explosion.sks, you can see the fire animating.
The most important changes we need to make to this particle system is to have particles moving outwards from the emitter in all directions and to not continuously spawn new particles.
To make the first change, open the Attributes Inspector and, under the Particles section, change Angle Range to 360°.
Straight away, you can see that the particles are now moving outwards in a circular shape.
To stop the particle system from continuously creating new particles, we can specify a Maximum value. This value tells the particle system how many particles in total it should create. The default value of 0 means that there is no maximum, which causes new particles to be created continuously.
In addition to specifying a maximum value, we are also going to change a few others properties to create a better explosion effect. In the Particles section of the Attributes Inspector, change the following values:
We set Birthrate to a value that is higher than the Maximum property because it determines how many particles are created per second. We want the explosion to happen very quickly. So rather than having 1,000 particles spawning over the span of a full second, which would happen with a Birthrate of 1,000, we specify a Birthrate of 5,000. This means that all the particles are created in just 0.2 seconds.
By setting Lifetime > Start to 3 the particles live for 3 seconds. The Lifetime Range property can be used to add variation to the lifetime of the particles.
Lastly, we set Speed > Start to 200 so that the particles fly out very quickly from the emitter as would happen in a real explosion.
After making these changes, you can see that the particle system looks quite different and more like a proper explosion.
Note that, even though the animation loops periodically in the Xcode editor, the particle system only animates once when added to your scene.
With the explosion particle system completed, it is time to move on to the smoke particle system. Create a new file, Smoke, using the same template we used for the explosion. The only difference is the Particle template, which we set to Smoke.
The only change we need to make to this particle system is to have the smoke move outwards in a circle rather than just straight up. To do so, change the Angle > Range property to 360° like we did for the explosion particle system. After doing so, the smoke particle system should look something like this:
With both particle systems ready, we can add them to our scene. To do this, we load each of the files that we created as SKEmitterNode objects and then add these to the scene like a regular node. Open MainScene.swift and replace the implementation of didBeginContact(_:) with the following:
func didBeginContact(contact: SKPhysicsContact)
As in the previous implementation of didBeginContact(_:), we perform the same check as before to see if either of the nodes involved in the collision is the car node. We then use optional binding to get the paths to both the explosion and smoke particle system resource files. We use these paths to instantiate SKEmitterNode objects from them.
Next, we remove all actions from the camera and player nodes, and we hide the player node by removing it from the scene. We remove the car to avoid more collisions which then lead to more explosions.
We also set the position of the emitter nodes to that of the car and add them to the scene. As a result, SpriteKit immediately begins animating the particle systems as soon as they are added to the scene.
Build and run your game. You should see the explosion particle system as soon as the car hits an obstacle. This is followed by smoke once the fire has cleared.

2. Scene Filters and Effect Nodes
In SpriteKit, there is a special type of node (represented by the SKEffectNode class) that can use a Core Image filter object (represented by the CIFilter class) to render its child nodes with a variety of effects. The SKScene class is also a subclass of SKEffectNode, which means that you can also apply a filter to the entire scene.
Unfortunately, at the time of writing this tutorial, there are a few issues relating to these filters and effect nodes in iOS 9. Currently, as soon as an effect is enabled for an effect node, all of its children are hidden, which results in the effect not being visible.
Even though we can’t implement this into our game and see what it looks like, we can still run through the code that would be used to create an effect. In this case, the following method is an example of adding and gradually fading a blur effect to the entire scene.
func addBlurFilter()
    let blurFilter = CIFilter(name: "CIGaussianBlur")
    blurFilter?.setDefaults()
    blurFilter?.setValue(0.0, forKey: "inputRadius")
    filter = blurFilter
    shouldEnableEffects = true

    runAction(SKAction.customActionWithDuration(1.0, actionBlock:  (node: SKNode, elapsedTime: CGFloat) in
        let currentRadius = elapsedTime * 10.0
        blurFilter?.setValue(currentRadius, forKey: "inputRadius")
    ))
We create a CIFilter object of a particular type. If you want to look at some of the other built-in filters available to you, check out the Core Image Filter Reference. We ensure this filter has all of the default input values and then manually set inputRadius to 0.0, which means that there is initially no blur.
We then assign the filter to the filter property of the current scene and set shouldEnableEffects to true to enable it. Finally, we run a custom SKAction that gradually increases the filter’s input radius to 10.
Hopefully, in a future iOS release, the issues affecting effect nodes are fixed, because they provide a way to add some very unique and interesting effects to your SpriteKit scenes.
3. Light Nodes
SpriteKit also includes an excellent lighting system that can be used to make your scenes feel more realistic. Lights are very easy to implement and are created through the use of the SKLightNode class. A light node defines certain properties, such as the light’s color (including ambient color) and its strength over distance.
In our scene, we are going to create a single white light that will be attached to the car. This light will light up the obstacles in front of the car as well as produce shadows.
Let’s start by creating a light in the didMoveToView(_:) method of your the MainScene class.
override func didMoveToView(view: SKView)

   ...

    let light = SKLightNode()
    light.lightColor = UIColor.whiteColor()
    light.falloff = 0.5

    player.addChild(light)
With this code, we create a new SKLightNode object, change its lightColor property to white, and lower its falloff property from the default value of 1 to 0.5.
Just like when setting up physics collision detecting in SpriteKit, you must specify which lights interact with which nodes in a scene through the use of bit masks. When SpriteKit renders the lights in a scene, it uses a logical AND operator on the light node’s categoryBitMask and the lightingBitMask and shadowCastBitMask of every other node to determine how that particular node should appear.
For our game, we want the obstacles to interact with the light so that they cast shadows in the scene. To do so, add the following two lines at the end of the spawnObstacle(_:) method of the MainScene class:
func spawnObstacle(timer: NSTimer)

    ...

    obstacle.lightingBitMask = 0xFFFFFFFF
    obstacle.shadowCastBitMask = 0xFFFFFFFF
By setting a bit mask with all bits enabled, the obstacles interact with every light in the scene.
Build and run your app. You will see that, as your car moves through the scene, each obstacle has a dynamic shadow, which is always pointing away from the centre of the car.

As you can see, lights in SpriteKit are very simple to use and can add nice effects to your scenes.
4. Audio Nodes
Finally, we are going to look at audio nodes in SpriteKit. Audio nodes are used to add sound effects to a scene. These special nodes are represented by the SKAudioNode class. Because SKAudioNode is an SKNode subclass, you can add and position them anywhere in a scene, like a regular node.
In addition to playing audio in a regular manner and sounding the same no matter how your scene is arranged (for example, background music), SpriteKit allows you to utilize positional audio to create a truly immersive effect. This is done by specifying a listener node for your scene, which is where the sound will be “heard” from.
Audio nodes are positional by default. This means that, if you don’t want to use this functionality in particular cases, you can set a specific node’s positional property to false.
While we won’t be implementing this into our game, the following is an example method of adding a background music node that loops as long as it is part of the scene. In the method, we also add an explosion sound node that start playing when we tell it to.
Note that we import the AVFoundation framework at the top. This is necessary to access and work with the avAudioNode property of an SKAudioNode object. As you can see, audio nodes are very easy to set up and work with in SpriteKit.
import AVFoundation

func addAudioNode()

    listener = player

    let backgroundMusic = SKAudioNode(fileNamed: "backgroundMusic")
    backgroundMusic.positional = false

    let explosion = SKAudioNode(fileNamed: "explosion")
    explosion.autoplayLooped = false

    addChild(backgroundMusic)
    addChild(explosion)

    do
        try explosion.avAudioNode?.engine?.start() // Called when you want to play sound
     catch
        // Do something with the error
Conclusion
You should now be comfortable working with some of the more advanced effects in SpriteKit, including particle systems, filters, light, and audio. These effects combined can greatly impact the appearance of your game and how immersive it is.
In the next and final tutorial of this series, we cover some of the best practices to keep in mind when working with SpriteKit. I also show you how to create texture atlases and save/load scenes.
As always, be sure to leave your comments and feedback in the comments below.