.jpg)
In this post, we’re going to review the Slider Revolution Responsive WordPress plugin, which allows you to create rich and dynamic content on your WordPress websites. And not just sliders: it allows you to build carousels, content modules, and full-fledged websites by using the rich built-in editor!
Nowadays, sliders and carousels are important building blocks of any website. Specifically, when it comes to pitching a new idea or campaign, sliders are one of the best ways to highlight it and attract new visitors. As a WordPress site owner, you would like to have a plugin which allows you to create high-quality sliders and carousels without much hassle.
There are thousands of extensions and scripts available for creating sliders and carousels on your WordPress website. And of course, you’ll also find commercial options that provide ready-to-use features and extended support. In the case of commercial options, you should also expect quality code, bug fixes, and new enhancements.
-
Whether you want to show off customer testimonials, your latest blog posts, your best images, or just celebrate the members of your team, there is a…
-
![]()
When used properly, sliders can help make a website appear more dynamic and lively while at the same time providing more information in a limited space. In…
-
In a crowded online space, just placing images, text, and videos on your website is not enough to build a web presence. How you tell your story matters….
-
![]()
Looking to add an image slider to your WordPress site? Check out some of the best free, paid, and custom solutions for your project here.


Today, we’re going to discuss the Slider Revolution Responsive WordPress Plugin, available at CodeCanyon for purchase at a very reasonable price—especially considering the number of features it provides. It allows you to create very high-quality web content: sliders, carousels, hero headers, and a lot more. It also comes with a powerful built-in visual editor which allows you to create full-fledged websites in no time. Considering the features it provides, it’s a must-have tool for site builders!
Let’s quickly go through the important features Slider Revolution brings:
- new visual editor
- media asset library
- 200+ templates
- 20+ add-ons
- sliders, carousels, hero headers, and content modules
- special FX support by add-ons
- supports customization
- and many more
The Slider Revolution plugin provides a plethora of useful features that allow you to set up modern designs on your WordPress websites quickly and effortlessly. Throughout the course of this tutorial, we’ll explore the different features provided by this tool. We’ll also go through the process of creating a new slider from scratch.
-
In a crowded online space, just placing images, text, and videos on your website is not enough to build a web presence. How you tell your story matters….
-
![]()
If you’re looking for the best WordPress sliders on the market, look no further than the amazing Slider Revolution plugin for WordPress.

To start with, we’ll see how to download and install the plugin from the CodeCanyon marketplace.
Installation and Purchase Code Registration
In this section, we’ll see how to install and configure the Slider Revolution Responsive WordPress plugin once you have purchased and downloaded it from CodeCanyon. For this post, I’ve used WordPress 5.2.3, and the Slider Revolution Responsive WordPress plugin version is 6.1.2. I would recommend that you install it if you want to follow along with this post.
As soon as you purchase this plugin, you’ll be able to download the revslider.zip file. It’s the WordPress plugin file which you could use to install this plugin from the WordPress admin side. So go ahead and follow the standard WordPress plugin installation process and you’re almost done.
Next, we need to register the plugin’s purchase code, and that should unlock access to:
- 200+ premium templates
- 25+ add-on plugins
- 2,500+ free images, videos, and icons
- 100+ pre-made layers and animations
- instant plugin updates
- premium ticket support
Firstly, you need to retrieve your purchase code from the codecanyon.net/downloads section. Click on the Download > License Certificate link, and that should get you a text file which should contain the item purchase code.
Once you get the purchase code, click on the Slider Revolution link in the left sidebar on the admin side of your WordPress site, and it should display the plugin dashboard page. On this page, click on the Activation link and enter and register your code. With that, you have unlocked the full power of Slider Revolution.
How Do I Use the Slider Revolution Responsive WordPress Plugin?
In this section, we’ll briefly discuss the possible ways one could use this plugin. The Slider Revolution Responsive WordPress plugin is mainly used to create three types of content on your WordPress site: sliders, scenes, and carousels.
Let’s quickly go through each type to understand the difference between them.
Slider
Generally, a slider consists of multiple images or slides. Each slide has its own content, and users can navigate between different slides by using the navigation elements.
In the context of this plugin, a slide is not just an image, but it could be anything: text, image, video, audio, or something else. In fact, Slider Revolution allows you to create different layers in your slide to add different elements. If you have used Adobe Photoshop or similar software, you know how important and useful this feature is. In fact, when you open the slide editing UI, it’s hard to believe that it’s a web-based UI. It feels like creating content using professional image-editing software!
Scene
In the terminology of this plugin, a scene is just another type of slider, but with a single slide. Thus, it won’t have navigation elements like a slider, which allows users to navigate between different slides.
The main purpose of the scene type is to create rich content modules that you could embed in different places on your page. You’ll have the same set of customization options available while editing a scene that you get while creating a slider. Thus, you could set up your scene content with many kinds of media and layers.
Carousel
The carousel type allows you to create content in the same way as that of the slider, but it allows multiple slides to be visible at the same time. This is really useful when you want to combine more than one slide in a single frame.
How to Set Up a Slider
In this section, we’ll build a real-world example to demonstrate how to use the Slider Revolution Responsive WordPress plugin to create sliders on your WordPress site.
Before we proceed, make sure that you have installed this plugin in your WordPress site if you want to follow along.
Go ahead and access the Slider Revolution link in the left sidebar on the back-end. That should present you the different options, as shown in the following screenshot.
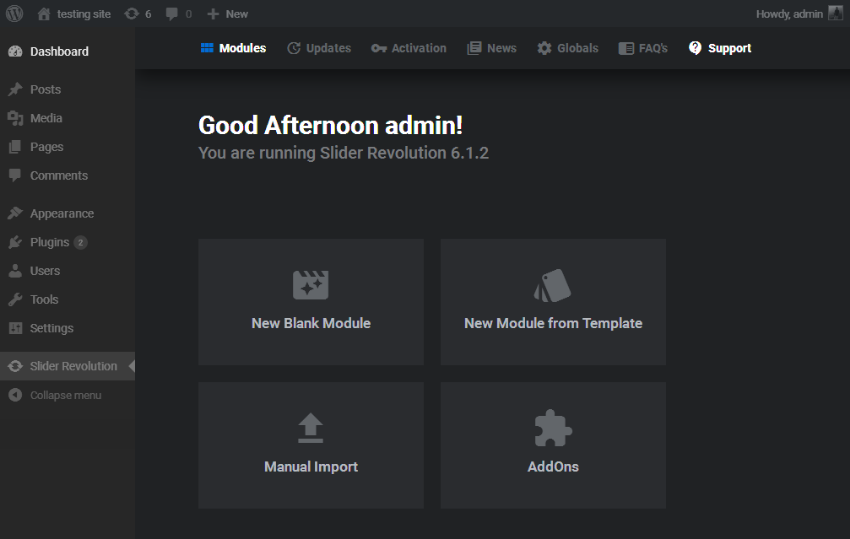
In the terminology of the Slider Revolution plugin, everything is a module, whether it’s a slider, a carousel, or a scene. You could create a new module from scratch, reuse an existing template module, or import one from a file. In our case, we’ll create a new module from scratch, so click on the New Blank Module link.
In the next screen, it should ask you if you want to go through the help guide or straight away start editing. In our case, we want to start editing right away, so click on Quit Guide. That should present you the following UI to create a slider.

As you can see, it’s a pretty rich interface and provides plenty of customization options—just like professional image-editing software!
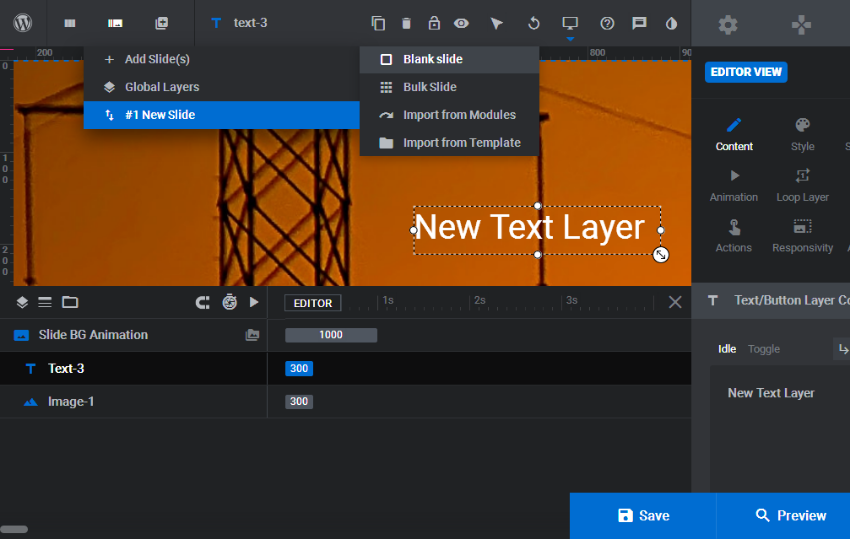
By default, it already creates the first slide for you. As discussed earlier, you can add any type of content to the slide. In our case, we’ll add an image and some text to the slide. Go ahead and access the Image > WordPress Library menu and add an image from the WordPress library, as shown in the following screenshot.

Once the image is added, you can use the configuration options in the right sidebar to adjust image-related settings. You can add different types of content on the same slide by adding layers to it. So, for example, if you want to add text along with the image, you need to add it as shown in the following screenshot.

You can use the drag-and-drop feature to position your layer and adjust it.

Once you’re done with the slide configuration, click on the Save button at the bottom right.
To add a new slide, click on Add Slide(s) > Blank slide as shown in the following screenshot.
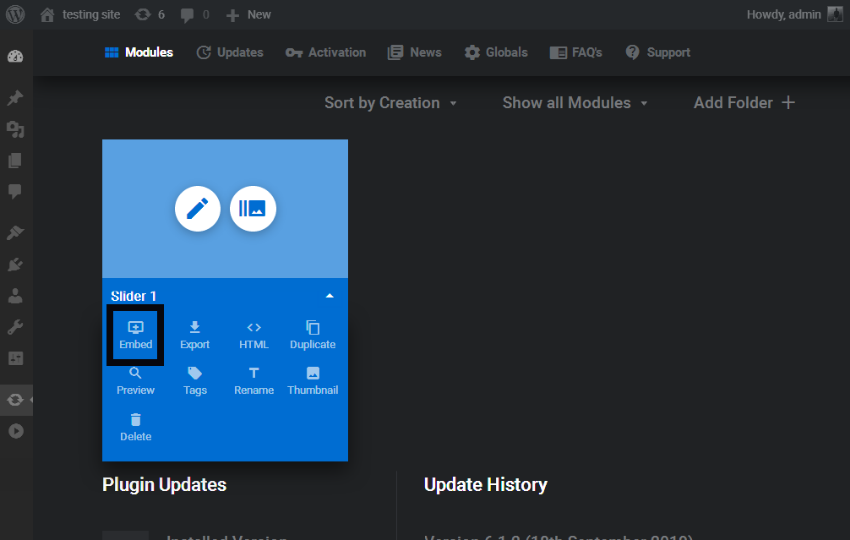
Go ahead and add as many slides as you want to add and configure them. Finally, when you’re done with the slider, you’ll need the embed code to add it to one of your pages. On the main plugin page, you can click on the Embed button in your slider to get the embed code, as shown in the following screenshot.
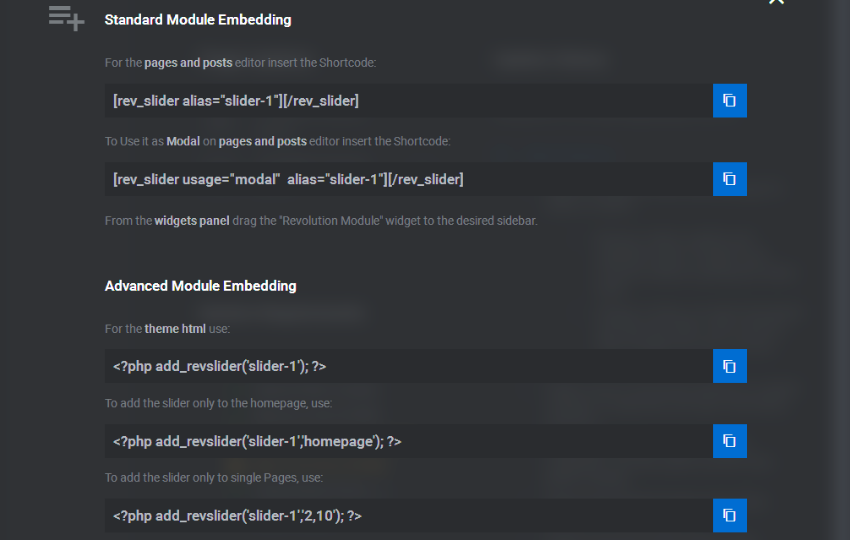
And that should present you different options that you could choose from to embed the slider:
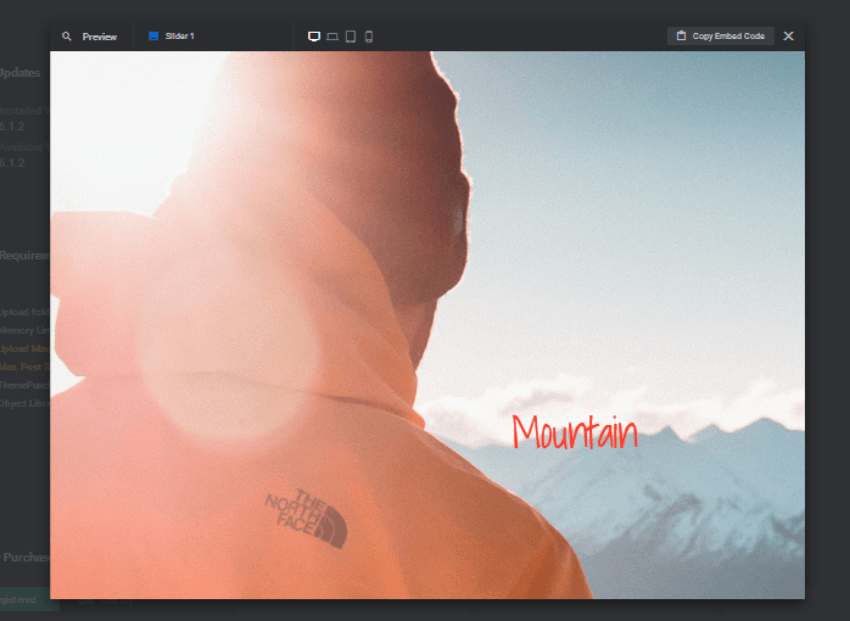
In my case, the preview looks like this!
So that’s how you can create sliders. The process is similar
even if you’re creating carousels or scenes. Although we’ve just
discussed sliders, this plugin is capable of doing a lot of amazing
things. The more you explore it, the more you’ll love it!
The Next Step: A Quick Look at a Couple of Other Slider Scripts
If you’re looking for more advanced slider scripts that you could use right away, I recommend that you check out the following post, which summarizes some excellent scripts that are available for a reasonable cost.
Conclusion
Today, we reviewed the Slider Revolution Responsive WordPress plugin available at CodeCanyon. It allows you to create dynamic and rich content on the fly in your WordPress site. In this post, we’ve barely scratched the surface of the features this plugin provides.
I’m sure you’re convinced that Slider Revolution is a powerful plugin to create dynamic and rich content on your website. Although it’s a commercial plugin, I believe it’s reasonably priced considering the plethora of features it provides.
If you have any suggestions or comments, feel free to use the feed below and I’ll be happy to engage in a conversation!