This tutorial is for those who want to incorporate a real-world drawing technique into digital drawing. If you like texture, grunge, or paint brushes, or if you enjoy drawing in Illustrator and would like to have a more diverse brush arsenal, please stay here. In this quick tip tutorial, you will learn how to make and install a brush in Illustrator. I promise that it’s easy, and after this tutorial you will want to create a few dozen more of them!
If you like grunge or texture Illustrator brushes, but don’t want to spend time making them and would just like to get some free Illustrator brushes—it’s your choice!
If you would like to learn more about how to install and use a custom brush, feel free to check this article about it.
Or maybe you want to stay here, but need some inspiration about what to draw using this brush? Just browse GraphicRiver for some graphics, and I’m sure you will find something you like!
1. How to Create a Stroke for the Illustrator Brush
Step 1
To start creating our texture brush (I assume you already created a new document), delete the stroke color and set a black fill color. Draw a tiny ellipse using the Ellipse Tool (L).
After that, draw some more ellipses that overlap each other. We are now creating the pencil stroke, so try to stay in an imaginary rectangle. Remember how a real pencil leaves its track on a paper? It’s actually a tiny, super narrow rectangle.

Step 2
Then we want to distort the ellipses a little, to make sure that the pencil stroke looks even more realistic. For this, we will need the Wrinkle Tool (this tool is hidden under the Width Tool (Shift-W) or under the Warp Tool (Shift-R)—it depends on which version of AI you have).
Double-click on the Wrinkle Tool, as we need to adjust it. A new dialogue window will pop up, called Wrinkle Tool Options. Enter the options you see in the image below, and press OK.

Step 3
Before distorting our ellipses with the Wrinkle Tool, group them together (select them, and then right-click > Group). Now take the Wrinkle Tool and click on the ellipses here and there. You will notice how the ellipses start to wrinkle, and that’s exactly what we need.

2. How to Install the Adobe Illustrator Brush
Step 1
After you are satisfied with the result or how the stroke looks, select it, and on the Pathfinder panel (Window > Pathfinder), press the Unite button. You just turned all the ellipses into one shape.
And now we are going to create a brush from this shape. Keep it selected, and on the Brushes panel (Window > Brushes), click on the icon that looks like three lines, in the top right corner. Select New Brush… In the new pop-up window, check Art Brush and press OK.
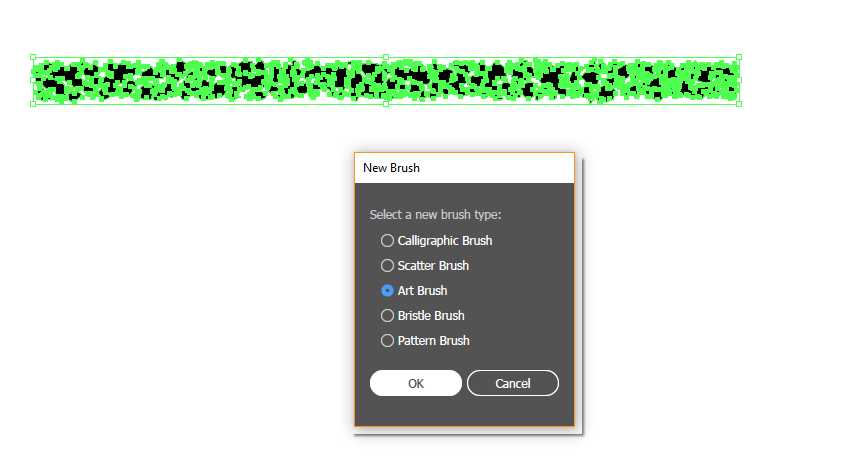
Another window will pop up. Enter the options you see below, and press OK.

Step 2
So, we already created a new brush from a stroke that consists of wrinkled ellipses, but we haven’t used it yet. Now we want to adjust the Paintbrush Tool (B) options to have some nice curved lines later on while using the new brush. It’s as if we prepared the “paint” when we created the texture stroke, and now we need to adjust the brush.
Double-click on the Paintbrush Tool (B). In the new dialogue window, move the Fidelity slider to Smooth, check Edit Selected Paths 12 pixels, and press OK.

Your Paintbrush Tool is already selected, so now take your “paint” on the Brushes panel: the new stroke you created from the wrinkled ellipses. And now the fun begins: draw something!

Conclusion
You did it! Today, you’ve learned how to make a texture or grunge brush in Illustrator, and how to install it on your Brushes panel. Using this technique, you can create another Illustrator brush. It would be great to see your results posted in the comments section down below. And if you still have some questions, please feel free to ask me!

Gritty Rounds – Illustrator Brush Pack
Looking to add texture to your illustrations? Why not try these amazing handmade grunge brushes to create an organic, textured look. This grunge brush pack is made from real paintbrushes and can be used to roughen up your vector artwork within seconds.

Grain and Texture AI Brushes
Help your creativity flow with these amazing grain and texture Illustrator brushes. Carefully hand crafted, they have varying degrees of density, texture, and grunginess. These AI scatter brushes are perfect for shading, or
simply adding some texture or noise to your vector artwork. Just have
some fun and play around with them!

Grunge Texture Brushes
Add some grunge texture to your vector designs. Each brush was made using the texture of various real objects, making
the set one of the most lifelike available. The brushes emulate
anything from the texture of brick to paint or pastel. The uses are
endless!

Inky Brush Strokes Graphic Collection
This is a fun, versatile collection of modern, hand-painted, messy brushstrokes, originally created using Sumi ink and a variety of brushes and non-brush tools. Ideas for usage include unique textile and patterns, marketing
ads, visual branding, T-shirt designs, packaging, modern stationery or
invites, as an image mask, for adding texture to your mood boards, social
media graphics, digital collage, abstract art, and so much more.

Big Illustrator Brushes Pack
Add this big brush pack to your collection: it’s a set of 56 varied illustrator brushes, including stipple brushes, chalk and pastel, ink, flourish, patterns, and more.

Scatter Texture Brushes for Adobe Illustrator
And try some scatter texture brushes! Use them for texturing—it’s really fast and simple to use, and the best thing is that you can vary it in a second.

If you like my tutorials, feel free to check the latest: