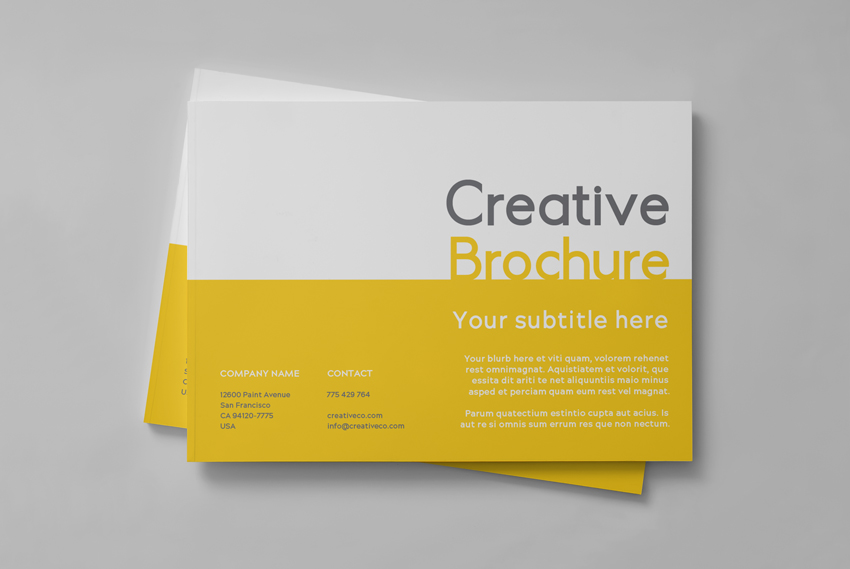
In this quick and simple tutorial, you’ll learn how to make a bi-fold brochure template using Adobe InDesign. You’ll create the basic structure and style for your brochure template, using an on-trend color palette and stylish fonts.


An adaptable pamphlet template for any creative business, this bi-fold brochure can be customized with your own graphics, photos, fonts and colors as you wish.
Looking for more creative brochure templates? You can find a wide range of brochure templates for InDesign and Photoshop on Envato Elements and GraphicRiver.
-
![]()
In Adobe InDesign CC, you have access to hundreds of ready-made templates, which you can adapt with your own text and images. This is a quick and easy way to…
-
![]()
Print marketing is a refreshing compliment to your digital strategy. Having professional InDesign brochure templates is a quality solution to get your…


Ready to create your brochure template? Great! Let’s get started.
What You’ll Need to Create Your Brochure
We’ll use Adobe InDesign to put together the main artwork for the brochure. You’ll also need access to vector software, like Adobe Illustrator, to briefly open the icon illustrations, if you choose to use them.
The fonts used in this brochure design are:
Download and install the fonts on your computer.
In the design pictured here, this set of creative vector icons is also used.
You will also need to download this provided set of Adobe Swatch Exchange (ASE) color swatches. We’ll look at how to load these into your InDesign document a little later.
1. How to Set Up the Basics of Your Brochure Template
Step 1
Open InDesign and go to File > New > Document.
Choose Print from the options along the top of the window, and set the Page Size to A4, Landscape.
Set the number of Pages to 12 (or any number you prefer, you can always add or remove pages later), and keep Facing Pages checked.
Set the Top and Outside Margins to 18 mm, and the Inside and Bottom Margins to a more generous 20 mm.
Add a Bleed of 5 mm to all edges of the page, except the Inside edge, which you can keep as 0 mm.

Click Create.
Step 2
Expand the Swatches panel (Window > Color > Swatches), and choose Load Swatches from the panel’s main menu.

Navigate to the ASE file you downloaded earlier, and click Open. The CMYK swatches will load into the panel, ready for you to use on your brochure template.

Step 3
Expand the Layers panel (Window > Layers) and double-click on Layer 1, renaming it Color.
Create a second new layer and name this Type.

Lock the Type layer, as we’ll work on the Color layer first.

Step 4
Expand the Pages panel (Window > Pages) and double-click on the A-Master icon at the top of the panel to bring up the master spread on screen.
From the left-hand ruler (View > Show Rulers), pull out a guide to 147.5 mm, the center of the left-hand page.

Pull a second guide down from the top ruler to 104 mm, to create a central cross across the page. These guides mark out the center-point of the page, which will help you to position content as you work on the brochure.

Select both guides and Edit > Copy and Edit > Paste them, moving them over to the right page of the master.

2. How to Add Color to Your Brochure
Step 1
Click on the Page 1 icon in the Pages panel to bring up the page on screen. This will be the front cover of your brochure.
Working on the Color layer, use the Rectangle Tool (M) to create a shape across the bottom half of the page, extending it to the bleed on the right and bottom edges.
Set the Fill Color to a bright yellow swatch* from the colors in the Swatches panel.

* You can vary the colors across your brochure design as you like to give your layout a unique look.
Step 2
Copy the shape, and scroll down to the final page of your brochure (which will be the back cover). Edit > Paste the shape onto the page, and arrange it in the same position.

Step 3
Scroll up to Pages 2 and 3 of your document. This will be your contents page.
Create a new shape on the page using the Rectangle Tool (M), extending it across the length of the whole spread and up to about two-thirds from the bottom of the spread.
Set the Fill to a pale pink swatch.

Step 4
Scroll down to the next spread, Pages 4 and 5. This will be the first main inside spread of your brochure.
Create a shape across Page 4, setting the Fill to match the cover’s color.
Copy and Edit > Paste in Place this shape onto the remaining spreads, varying the color between yellow and pink as you work.


3. How to Format Type for the Front Cover of Your Brochure
Step 1
Scroll up to Page 1 of your document.
Lock the Color layer and unlock the top layer, Type.
Use the Type Tool (T) to create a long text frame across the top-right of the page.

Type in the first part of the title of the brochure, and from either the top Controls panel or the Character and Paragraph panels (Window > Type & Tables > Character / Paragraph), set the Font to Adriatic Bold, Size 102 pt, Align Right, and give the text a dark grey Font Color from the Swatches panel.

Step 2
Copy and Paste the text frame, positioning the copy below, and resting the baseline of the text on the colored shape.
Set the Font Color to match the shape’s color, and edit the text to read the second part of the title.

Step 3
Add a subtitle text frame below set in Hamlin ExtraBold, a 40 pt Font Size, and a [Paper] Font Color.

You can place blurb text below this in Hamlin ExtraBold, Size 25 pt.

Step 4
Set the business name in a small text frame to the bottom-left of the cover, setting this in Hamlin ExtraBold, Size 15 pt.

Add an address below, set in a grey Font Color.

Copy and Paste both text frames, and move them to the right of the originals, editing the text to show your contact details.

4. How to Create a Contents Page for Your Brochure
Step 1
Select and Copy one of the title text frames from the cover. Scroll down to Page 3 and Paste onto the page, moving the frame so that it sits on top of the colored shape and adjusting the Font Color to match.

Step 2
To create the list of contents, use the Type Tool (T) to create a small text frame in the center of Page 3.
With the baseline of the text on the central guide, type in the first chapter title. Set the Font to Adriatic Bold, Size 22 pt, and a [Paper] Font Color.

Step 3
Use the Line Tool () to create a long horizontal line from the right edge of the text’s baseline.
Expand the Stroke panel (Window > Stroke) and increase the Weight of the line to 3 pt. Set the Type to Dotted.

Step 4
Copy and Paste the chapter name’s text frame and position it to the right of the dotted line. Edit the text to read the page number.

Select both text frames and the line between them, and Copy and Paste them, moving this trio directly below.

Then continue to Paste more copies, spacing each line evenly.

Step 5
Open the creative icons illustration in Illustrator.
Select one of the icons and Edit > Copy it.

Head back to InDesign, and Edit > Paste the icon onto the left page of the contents spread.
You can directly select parts of the vector and adjust the color from the Swatches panel.

Add more icons to the page to create a row effect.

5. How to Format the Inside Pages of Your Brochure
Step 1
Scroll down to Pages 4 and 5 of your brochure. Working on Page 5, use the Type Tool (T) to create a large text frame on the right side of the page.
Type in the chapter number and set the Font to Adriatic Light, Size 700 pt. Switch the Font Color to match the color of the facing page.

Step 2
Add a title text frame at the top-left of Page 5, and set the Font to Adriatic Bold, Size 60 pt, and a grey Font Color.

Add a subtitle text frame in the same Font, sized at 32 pt.
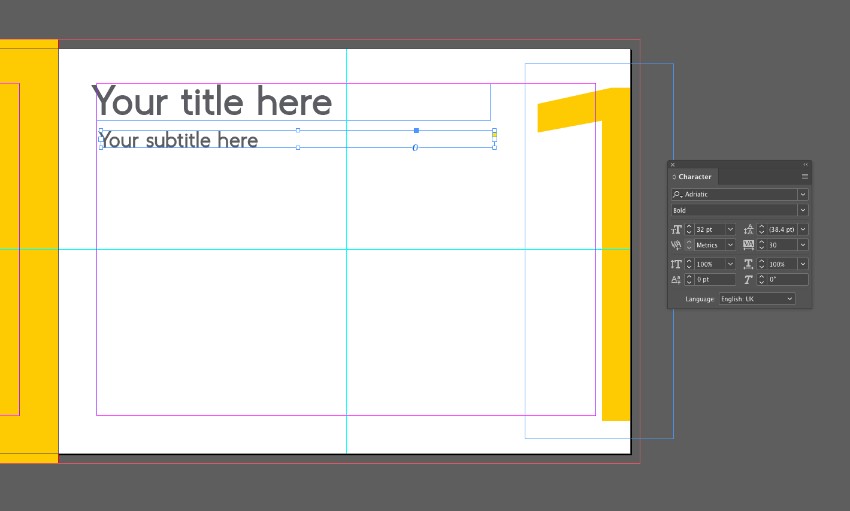
Add body text below this, in two columns, set in Hamlin Regular, 11 pt.

Step 3
Copy over one of the icons from the Illustrator file and Paste this centrally onto the facing page.

Step 4
You can now use this spread as a basic template for the rest of the inside spreads.
Select and Copy all of the text frames on Page 5.

Scroll down to the next spread and Edit > Paste in Place.
Adjust the Font Color of the chapter number to match, and Paste in another icon on the facing page.


Step 5
Continue to use this same process to populate the remaining inside spreads of your brochure template.


You could also replace the icons with photos for a different look to the layout. In these spreads, I’ve used some food photography shots, including this aerial view of a dinner party and this chocolate cake image.


6. How to Export Your Brochure for Printing
When you’ve finished working on your brochure, you’re ready to export it to a print-ready format. Most brochures look best when they’re printed and bound professionally, but to do this, you will have to provide the file as a PDF to the printer first.
Step 1
Go to File > Export and choose Adobe PDF (Print) from the Format menu at the bottom of the window.
Name the file and click Save.
In the Export window that opens, choose [Press Quality] from the Adobe PDF Preset menu at the top. Make sure Pages is checked under the Export As option too.

Step 2
Click on Marks and Bleeds in the window’s left-hand menu.
Check both All Printer’s Marks and Use Document Bleed Settings, before clicking Export.

Awesome work! You can send this PDF straight off to be printed professionally at a print shop or online print-on-demand service.
Conclusion: Your Finished Brochure Template
Your brochure is finished—great job! You can easily add more pages to your design from the Pages panel, or switch up the color swatches and images for a different look.

Looking for a different style of brochure template? You can find a huge range of stylish brochure and pamphlet templates for InDesign and Photoshop on Envato Elements and GraphicRiver.
Don’t miss these tutorials for developing your brochure design skills further:
-
![]()
In this simple tutorial, you’ll learn how to create a portfolio template that can be easily adapted to your own content, complete with a stylish design,…
-
![]()
This is your essential checklist for designing brochures that are guaranteed to grab and hold someone’s attention. Read on to get to know your bifolds,…

