
Anyone in graphic design knows the de facto standard tool is Photoshop – and with good reason. Adobe’s editor is incredibly powerful and offers many advanced features. That’s why so many designers across the globe use it on a daily basis. However, Photoshop is not the only tool available for graphic designers. In fact, there are quite a lot of tools that are up to the task of professional image creation and editing.
One such tool is GIMP. GIMP stands for GNU Image Manipulation Project and is an open-source graphics editor that serves graphic designers, photographers, illustrators, scientists, and more. Regardless of your task, GIMP includes plenty of sophisticated tools that can help you render the perfect images.
But for hard-core designers, the default set of tools in GIMP might seem a bit limiting. Even though GIMP includes a fairly standard set of tools as well as a solid collection of filters, some might find the listing a bit on the smallish side.
Fortunately, GIMP is an open-source tool, so nearly anyone can develop plugins and help extend the feature set. That’s where the G’MIC tool comes into play. G’MIC stands for GREYC’s Magic for Image Computing and is an image processing framework you can use either from the command line, online or via a GTK-based plugin for GIMP.
It’s the GTK GIMP plugin I want to focus on (so designers don’t have to turn to the likes of offshore software testing just to learn how to make use of this tool). With this plugin, you’ll have access to over 400 additional filters and effects. And like GIMP, G’MIC is both free and open source.
I’ll demonstrate how to deploy it on Pop!_OS Linux, but both GIMP and G’MIC are available for nearly every Linux desktop distribution, as well as Windows and macOS. Let’s install the framework and see how you can use it.
Installation
You can carry out the installation of GIMP G’MIC on both Windows and macOS in the same fashion as you would install any application: download and double-click the installer file for your respective platform. On Linux, it is actually easier but does require the use of the command line.
So to install G’MIC, first make sure to close GIMP and then open a terminal window on Linux and issue the command:
sudo apt-get install gimp-gmic
If you are using a Linux distribution that doesn’t work with the apt package manager, make sure to adjust accordingly (such as sudo dnf install gimp-gmic for Red Hat-based systems).
That’s it for the installation. G’MIC is now ready to use.
Using G’MIC
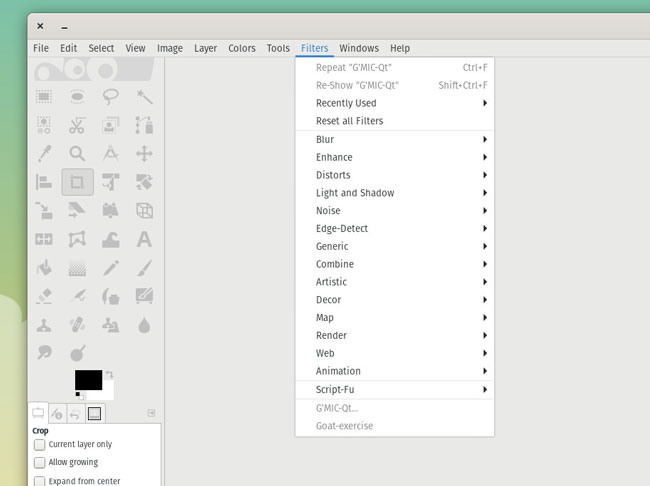
Open GIMP. In the Filters menu, you should now see an entry for G’MIC.
The G’MIC menu entry is now ready for use.
You will notice, however, the G’MIC menu entry is greyed out. Why is that? G’MIC is a framework that runs filter combinations and scripts on an open image. So, in order to access G’MIC, you must first open an image to apply one of the many filters to it.
So open an image in GIMP, and click Filters > G’MIC. A new window will open, containing all of the available G’MIC tools.
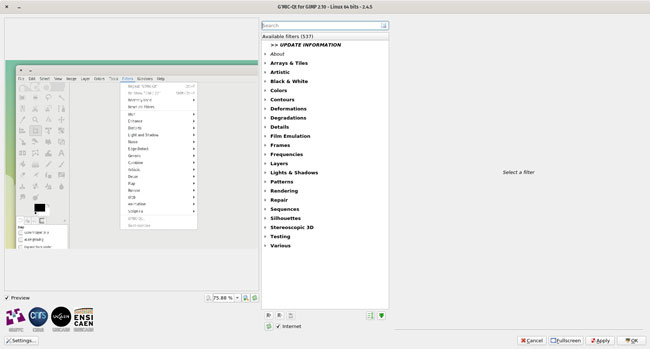
G’MIC is ready to work.
On the left side of the window, you’ll see the image preview tool. This will give you an idea of what your image will look like when you apply the filters. The center pane is the listing of available filter categories. Scan through that listing and expand a category. Once expanded, the category will list out all related filters.
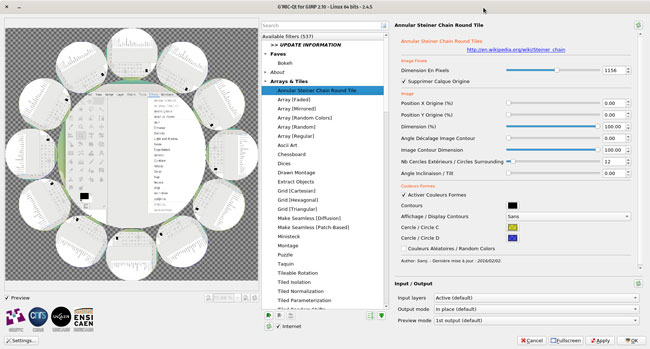
Filters found in Arrays and Tiles.
Click on any one of the filters in the middle pane to see all of the available options for that filter. You can adjust any of those options to perfectly fit your needs. After you make an adjustment to the filter, the preview pane will automatically update, so you can see exactly what’s happening with your image.
If you’re satisfied with how the new G’MIC filter looks with your image, click OK and it will render the image. Just remember that some filters take longer to render than others.
Favorites
After using G’MIC for a while you might find that you tend to work with certain filters over others. For that, G’MIC has a favorite option. Locate a filter you tend to use frequently and then click the Fave button at the bottom of the center pane.

Adding filters to the Fave category.
Once you’ve added your favorites, they’ll show up at the top of the center pane, so you’ll have quick access to them.
Another nice thing about G’MIC is that you can apply multiple filters to your images. With just the right amount of creativity and a few choice filters, you can take your image manipulation to an entirely new level.