In this tutorial, we’ll look at drawing multiple hairstyles that tend to be popular choices for natural, afro textured hair: afros, locs, braids, and twists. While these styles could potentially be worn by people with other hair types, we will primarily focus on Type 4 hair.
We’ll take a stylistic approach in this tutorial. Please note that this is not an exhaustive list; there are a myriad of styles and options out there, and no two subjects are exactly alike. People come in a variety of shapes, sizes, and colors (as does their hair!). One of the best ways to observe a subject is to do just that: observe. When in doubt, look at properly sourced reference materials.
1. Hair Types
Step 1
“Type 4” generally refers to the Andre Walker Hair Typing System, a general classification system for identifying hair’s attributes. It is not a flawless system, nor is it without valid criticisms, but we’ll use it as a general starting point in this tutorial.
Type 4 is coily hair—or very tight curls—which are typically quite voluminous. Note, for example, the difference between a ponytail on Type 1 hair (straight) and Type 4 hair (coily). Denser curls or coils will typically result in volume that you would generally not see in straighter hair types.

Step 2
That said, It’s important to keep the hair’s volume in mind, when observing and visually experimenting with hairstyles. Note, for example, how the hair varies when parting Type 1 hair (straight) and Type 4 hair (coily). Changing the way the hair is sectioned on the head can redistribute its volume.

2. How to Draw Afro Hairstyles
Step 1
Let’s begin by looking at afro inspired hairstyles. I have Type 4 hair myself, and it’s my favorite style to wear!
Type 4 hair is generally separated into 4A, 4B, and 4C, but some people may have a combination of more than one type. Generally speaking, the scale relates to the density or tightness of the coils. This, then, often affects how the volume is distributed on the head. Again, people come in a variety of shapes, sizes, and colors—these are overall insights and not a representation of every person out there (as we all vary!).
Here are some basic contours that illustrate different ways the volume could be distributed on the skull, inspired by 4A, 4B, and 4C hair.

Step 2
Something I like to keep in mind, when drawing this hair type, is that the hair is coily (or curly). So, this generally isn’t a time when I would use straight lines—as the hair isn’t straight. Instead, varied contours will often make for a more organic aesthetic.
For more on drawing this hair type, I recommend checking out my How to Draw Natural, Afro Textured Hair tutorial.
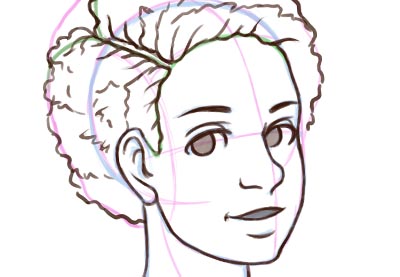
Here’s an example of how we could take those basic contours and add varied lines to begin to define the hair’s shape.

Step 3
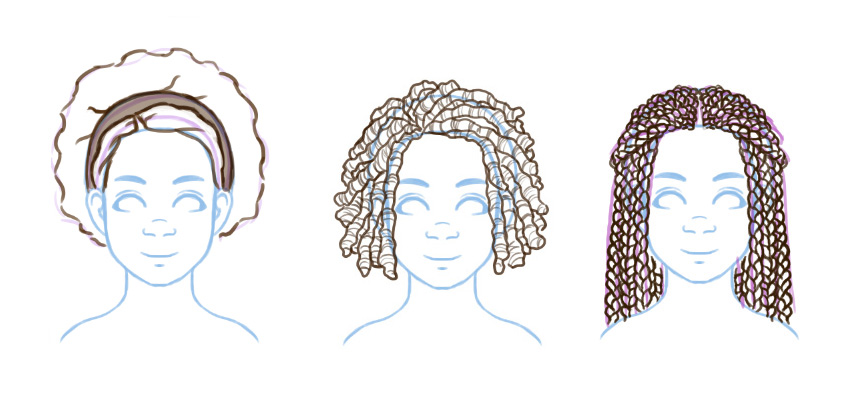
Now, let’s explore some different ways afros can be styled.
These are examples, but by no means an exhaustive list. Again, note that when the hair is pulled back, volume is redistributed.
Here are some basic, initial contours that explore three different styles.

Now, use varied lines to further define the forms and create an organic look and feel.

3. How to Draw Locs
Step 1
Locs are beautiful, aren’t they? Visually, they are typically defined as thick “locks” of hair, permanently bound in strands. That said, when drawing them, I like to approach them as a long, cylindrical shape.
In green, you’ll see a long, cylindrical shape that has some variation to it. These are my initial contours, where I’ve explored the shape I want to draw. Then, I can draw details on top.
We won’t be looking at value or color in this tutorial, but texture and other variations can still be implied with line. Again, I like to use varied, organic lines to establish a more natural look.

Step 2
So, when drawing an entire head of hair, I like to work in a series of layered, cylindrical shapes. In this case, I started at the hairline and continued to build upon it. It’s important to think about how the lines move and flow on the skull.
This might sound a little silly, but I like to think about wrapping thick spaghetti around a round surface, like a bowling ball.

Step 3
Once I’ve blocked out how I’d like the hair to sit and flow on the head, I can begin to refine my work. Again, note the varied lines on the outer contours of the strands.
Then, personally, I like to add a little implied texture with line. Note the purple ovals here; they visually represent the depth of the loc. Notice how it visually implies the circumference, in comparison to the green line, which does not. The surface of the loc is not straight, so a curved line may be a better choice for defining depth and texture here.

Step 4
Let’s try this with some variations. Below, I’ve blocked out some other ways one might wear locs.

Step 5
Once you’re happy with where your shapes have been placed, you can refine your work with varied lines.

Step 6
And finally, line can be used to further establish volume and texture.

4. How to Draw Braids
Braids and locs have some visual similarities; both are generally cylinder-like, when thinking about basic shapes. There are many, many different ways that braids can be created and worn. Personally, I’ve worn braids both layered and flush against my scalp. The difference is exactly as they sound.
Step 1
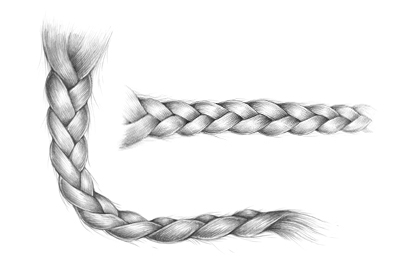
In the first style, the hair is sectioned and braided in a layered fashion. This concept is similar to what we explored in the previous section of this tutorial.
I laid out some simple lines to decide how I’d like the hair to flow. A big difference here, in how I like to draw braids, is the outer contour of the braid. Personally, I like to draw them with a more uniform look.

Step 2
Braids themselves tend to have a pattern to them, as the hair is braided in a repetitive fashion. I like to draw braids via a series of swooping lines, as shown in purple. Then, I create the same kind of lines, in the opposite direction, as shown in blue.
I like to focus on the general texture and pattern that these lines create, when drawing this style with line.

Step 3
In some styles, the hair is sectioned, but braided in a way that conforms to the head. Styles like this come in a wide variety of patterns and beautiful, artistic interpretations. Note the visible scalp area.
Similarly to other styles, I like to start by blocking out basic shapes. Then, I can continue by creating a braid-like pattern on top, keeping the flow that I created in mind as I draw.

Step 4
Now, let’s explore this further with some additional examples. Keep in mind that hair can also be partially braided!
Again, I started with basic contours that help establish what I want to draw, how the hair will be placed, and how it sits on the head.

Step 5
Then, using the same method of creating patterns, I followed my guidelines. Again, I don’t like to focus too hard on geometric perfection in my personal, stylistic choices. Interpret this the way that works best for your artistic goals.

5. How to Draw Twists
Step 1
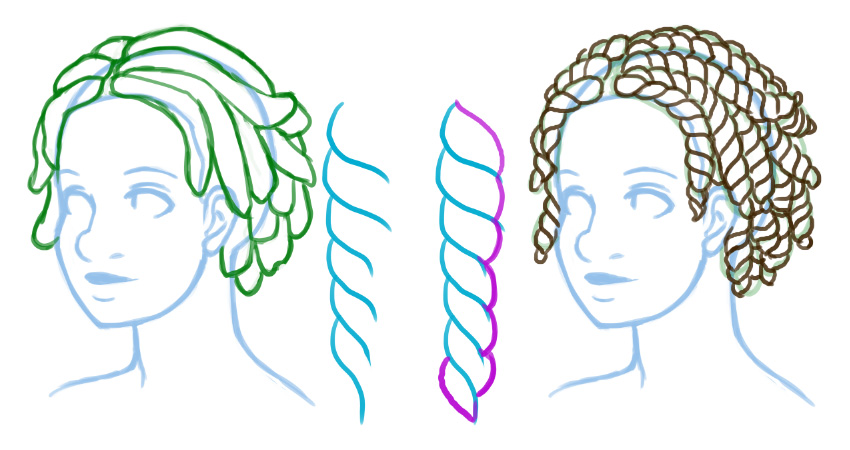
Let’s also take a look at drawing two stranded twists. You’ll notice similarities in the basic shapes here—again, I like to think about long, cylindrical shapes when I’m drawing. However, we’ll work with a different pattern.
Instead of three braided strands, we’re working with two twisted ones. The blue line illustrates how I would start the strand, and the pink illustrates how I would “close” it up.
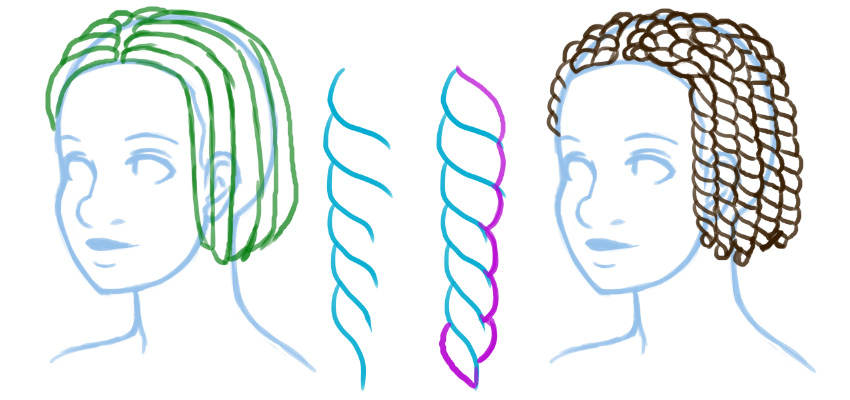
Step 2
Keep in mind, however, that the way the hair sits on the head can vary! Let’s try the same techniques, but with the hair layered on the head in a different way.
Again, I started by blocking out the forms (in green), and then added detail and pattern using the method described in blue and pink.
Step 3
So, when drawing this type of twist, I would recommend keeping the context of the other styles we’ve reviewed in mind. You will generally see similarities in layering and volume, but a difference in pattern.
Let’s try this with some additional examples.
Again, start with basic contours and shapes. Think about how you’d like the strands to sit on the head.

Step 4
Then, you can refine your initial concept, keeping pattern and variation in mind, in a similar fashion to braids.

And There You Have It
We’ve explored multiple hairstyles that are often popular with Type 4 hair. Again, this is by no means “the end”—there are so many different ways hair can be styled! Hopefully, this tutorial provided you with some insight and inspiration to go draw and experiment with your own lovely looks.

If you enjoyed this tutorial, here are some others that might interest you! Happy drawing!