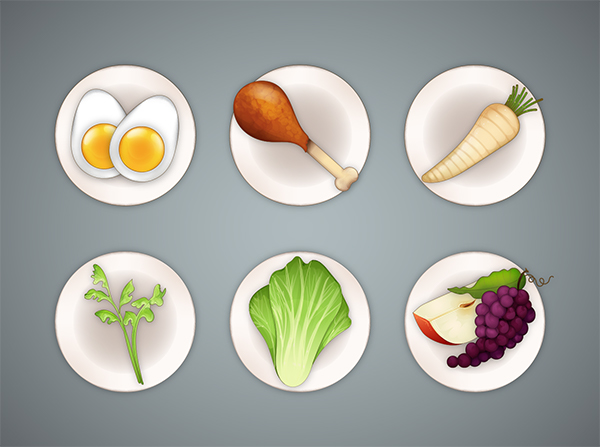
Whether or not you observe Passover, this is a great time to create and learn about the Seder plate and what it means during this Jewish holiday season. Celebrated this year from sunset on 19th April to 27th April, Passover celebrates the story of the exodus of the Israelites from Egypt.
The Passover Seder marks the beginning of Passover and involves the creation of the Seder plate, which contains six items that retell the story of the Passover.
In this tutorial, we’ll work from provided sketches in creating rendered illustrations of the six Seder dishes, while learning a little bit about each. As an alternative, you may want to use references for various food types from stock images purchased from Envato Market. Fire up Adobe Illustrator CC and let’s get to it!
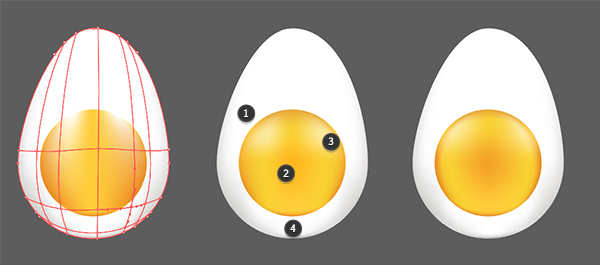
1. Beitzah (Hard-Boiled Egg)
The six items of this tutorial may not be presented in the correct order for the holiday, but are presented in an order that corresponds to the illustration techniques I’ll be covering for the duration of this tutorial. We’ll begin with a hard-boiled egg, of the Beitzah. The Beitzah is a reminder of the festival offering (Hagigah) brought to the Holy Temple.
Step 1
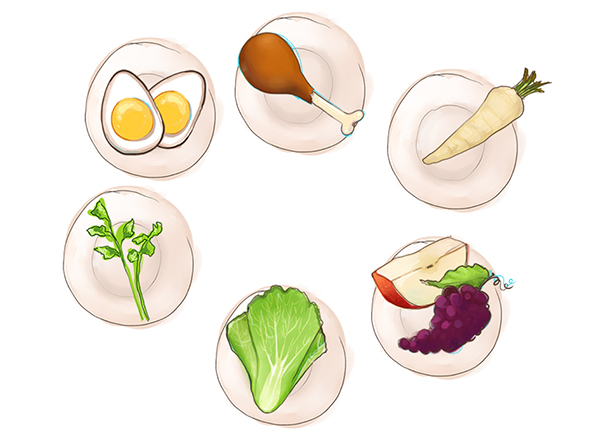
Let’s start with my initial sketches. Below you’ll see all six of the items we’ll be illustrating today. You can download my sketches via the download link to the right of this tutorial if you wish to follow along with my design. You’re also welcome to sketch out your own designs to work from during this tutorial.
Step 2
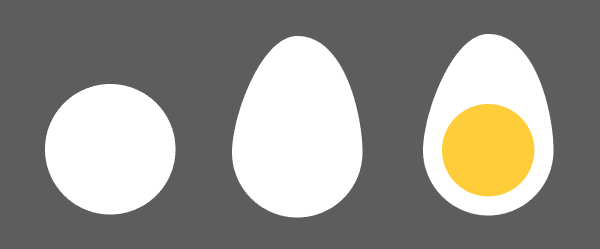
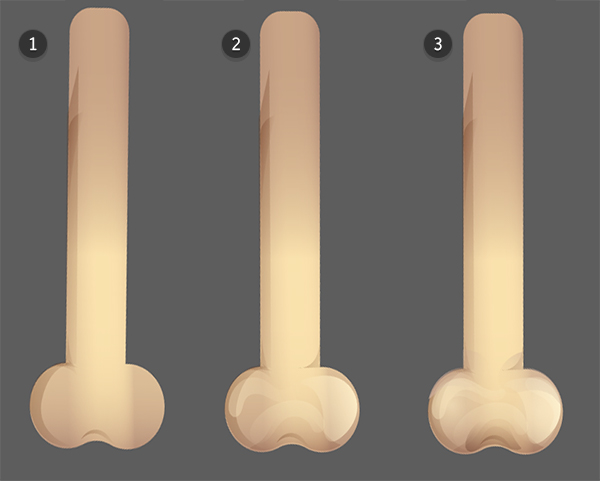
Using the Ellipse Tool (L), draw a circle. Pull the top anchor point upward with the Direct Selection Tool (A) in order to form an egg shape. Draw a yellow circle in the lower half of the egg shape. We now have our basic hard-boiled egg.
Step 3
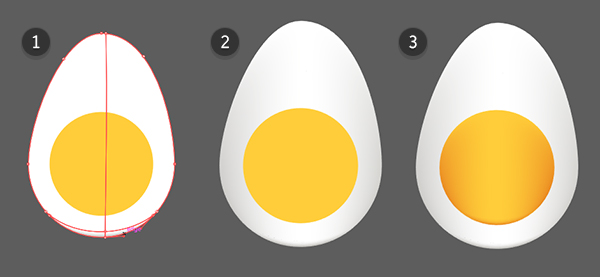
In order to render the egg, let’s create some basic Gradient Meshes.
- Using the Mesh Tool (U), select the white egg base and add instances of gray around the edges of the egg.
- Add mesh points along the lower edge of the egg in order to give it a little bit of depth.
- Do the same for the egg yolk. This time you’ll be adding instances of dark yellow or yellow-orange around the edges of the egg.
Step 4
Further render each egg object (egg white and egg yolk). Notice below how my egg white mesh has five internal horizontal lines and three vertical lines added to it. This was to allow for gray and white to be added around the egg white and around the yolk shape itself.
For the egg yolk’s mesh, however, there are more color variations:
- Two hot spots appear on the top portion of the egg yolk. Make these white or light yellow.
- The center of the yolk is dark yellow or orange.
- The mesh points around the yolk are all dark yellow or orange, giving the yolk some depth.
- The darker color on the bottom edge of the yolk is thinner than on the sides. This is repeated on the egg white itself.
Step 5
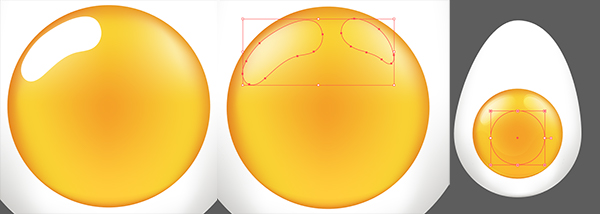
I’ve Zoomed (Z) in on the yolk in order to add some smaller details. Using the Pencil Tool (N) (or whatever drawing tool you’re most comfortable with), draw curving shapes for highlights. Set their fill color to white and their Blending Mode to Overlay or Soft Light. Reduce the Opacity of the highlight shapes to 20-40% and layer a couple of them on each other in order to create a reflection on the egg yolk.
Draw a circle in the center of the yolk with a Radial Gradient that goes from orange in the center at 100% Opacity to 0% Opacity.
Step 6
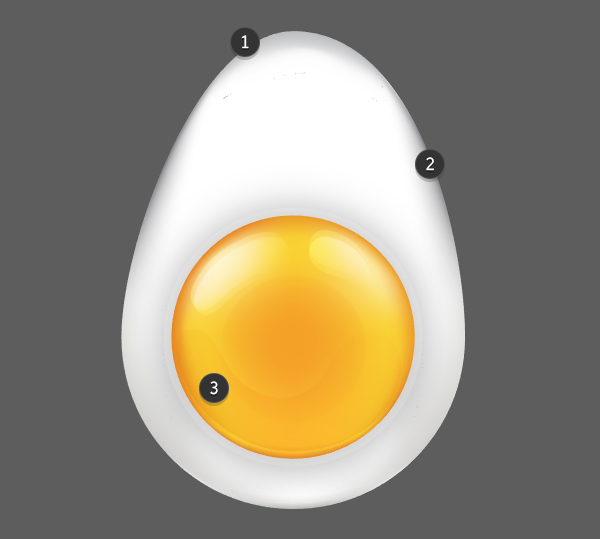
Finally, we have a few more details on the egg white itself:
- Add a couple of mesh points in order to define a thicker edge on the top of the hard-boiled egg.
- Darken the gray used on the sides of the egg white. With how much we’ve rendered the yolk, we need the egg white to pop off the page.
- Finally, I’ve drawn a curved shape on the bottom of the egg yolk to add a bit of shadow. I’ve filled it with dark yellow and set the Opacity to 20% or so.
Experiment with shadow and highlight shapes, gradient mesh points, and additional gradient shapes in order to render your egg as you see fit.
Step 7
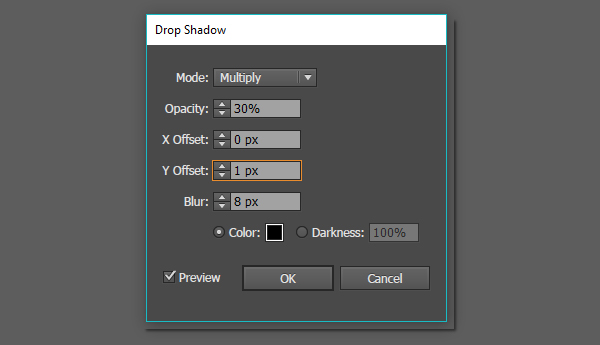
Group (Control-G) your egg components and apply a simple Drop Shadow (Effect > Stylize > Drop Shadow) with the following attributes:
- Mode: Multiply
- Opacity: 30%
- X Offset: 0 px
- Y Offset: 1 px
- Blur: 8 px
This drop shadow will be repeated for each item and their respective plates throughout this tutorial.
2. The Plates
This is an optional section of this tutorial. I decided for my final design that I wanted to have each item arranged on its own plate. You, however, may wish to combine them on a proper Seder plate that has compartments for each item, or no plate at all.
Step 1
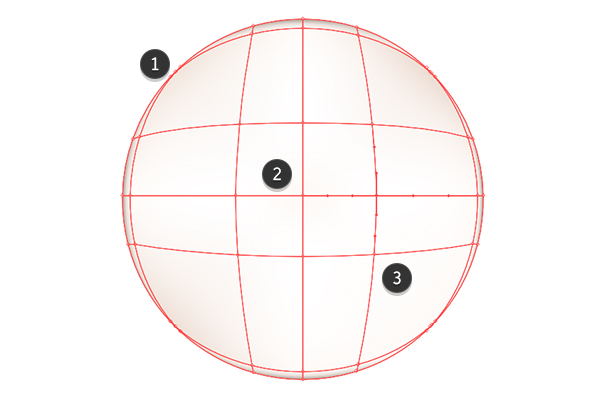
Draw a circle with the Ellipse Tool. Set the fill color to white or light cream. With the Mesh Tool, I’ve added four mesh points around the edge of the circle and four mesh points in the center in order to create three horizontal and vertical lines in the center.
- Set the outer mesh points to a beige or tan, much like what we did with the egg (darker colors on the outer edge).
- Set the center color to a light beige.
- Set each of the four points that form a square around the center to the same beige as the center. Other mesh points should remain as white or light cream.
Step 2
Draw a circle in the center of the plate and set its fill color to a Radial Gradient going from dark beige at 100% Opacity to 0% Opacity. Use the Gradient Tool (G) to adjust the spacing between the gradient’s colors and the radius of the gradient itself.
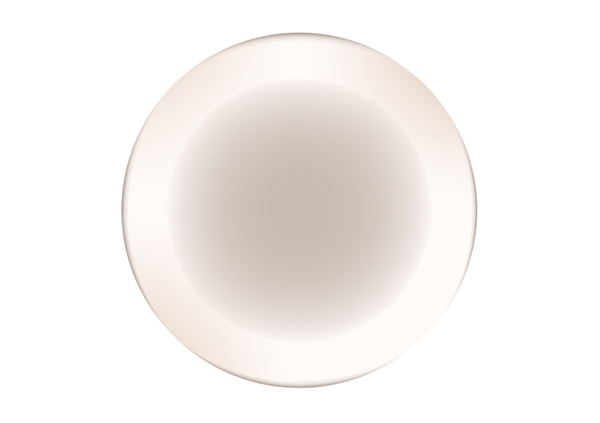
Step 3
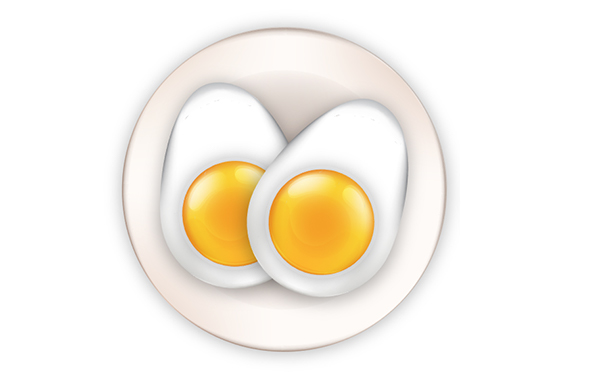
Add a simple Drop Shadow to the plate and arrange two instances of the hard-boiled egg made previously to the center of the plate. Group all three of these objects together.
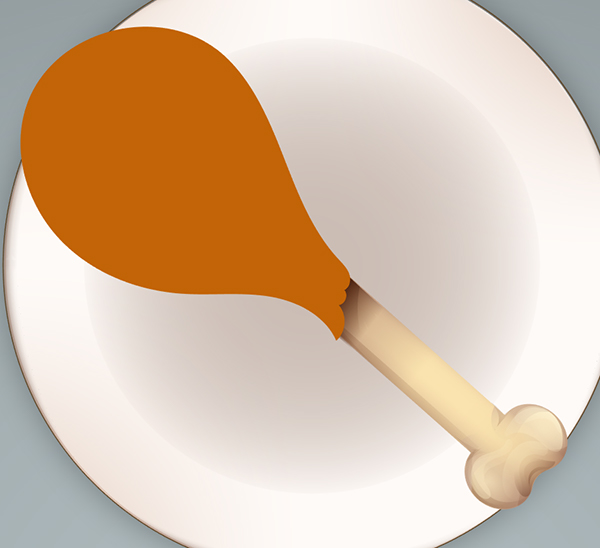
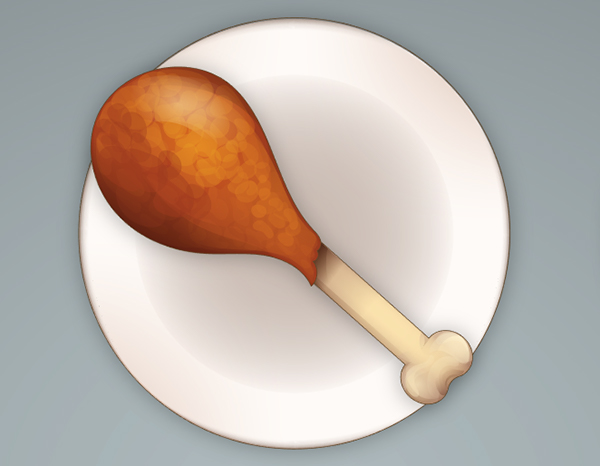
3. Zeroa (A Roasted Bone)
The Zeroa (or Zeroah or Z’roa), or the roasted bone, represents the Paschal sacrifice in the Holy Temple made on the eve of exodus from Egypt. In the case of this tutorial, we’ll be drawing and rendering a drumstick as a representation of the Zeroa. You are more than welcome to alter your representation of this item to be a lamb shank or other roasted meat on a bone.
Step 1
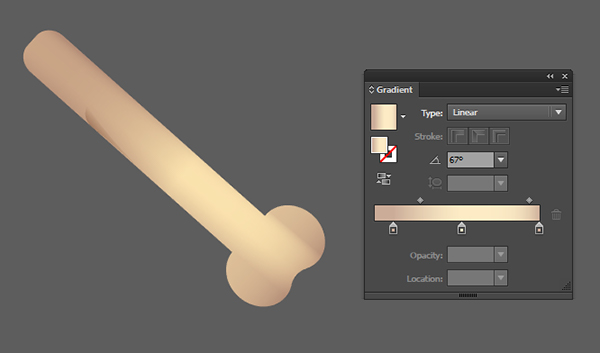
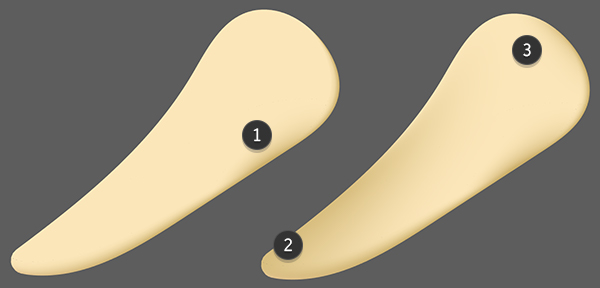
Let’s start with the bone shape itself. We’re going for the classic drumstick bone shape. Draw a rectangle with the Rectangle Tool (M) and two circles with the Ellipse Tool. Unite all three objects together to form the bone shape. Select your bone object with the Direct Selection Tool and pull the Live Corners inward in order to round out the object’s edges slightly.

Step 2
Set the fill color of the bone object to a Linear Gradient that goes from tan to cream and back to tan again. Adjust the angle of the gradient with the Gradient Tool so that the lighter central color is in the middle of the bone.
Step 3
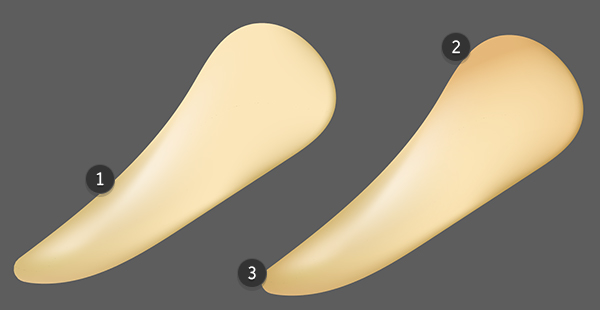
Using the Pen Tool (P), draw shadow and highlight shapes. My aim for these was to add more shadow shapes to the contour of the bone as well as define the indent of the bottom of the bone shape.
- Draw thin shadow shapes on either side of the bone and small curving shapes on the bottom, defining the indent of the bone. I’ve set the fill colors to brown and varied the Opacity with each shape so they can be layered, creating more depth.
- For highlights I’ve used a light cream colored gradient that goes from 100% to 0% Opacity. These curved and rounded shapes are placed on the round end of the bone.
- Keep layering shadow and highlight shapes as you see fit. You can refer to my images below, the sketches I’ve provided, or photo stock.
Step 4
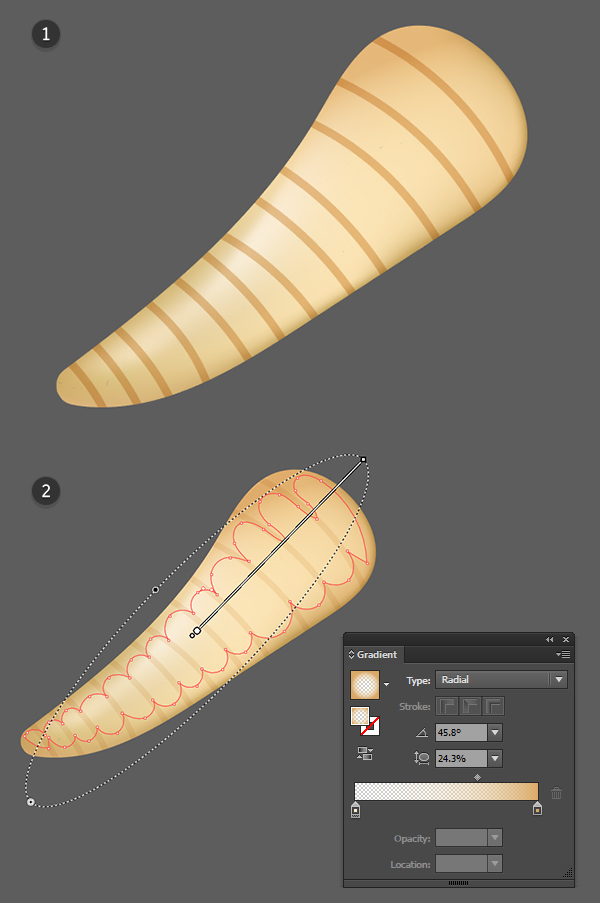
Once you’re satisfied with how you’ve rendered your bone, it’s time to work on the meat portion of the drumstick. I’ve drawn, with the Pencil Tool, a large teardrop-like shape with a jagged edge that overlaps the bone itself. Make sure your bone components are Grouped together and placed below the meat portion of the design.
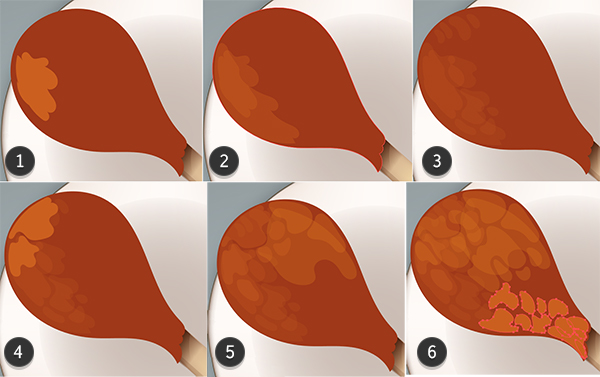
Step 5
For the meat portion I wanted to create a mottled texture in order to make rendering the object a bit easier. Do this by layering brown and tan shapes in varying levels of Opacity. Keep your shapes rounded and splatter-like.
- Starting with the left side of the meat, I’ve drawn a large splat-like shape and filled it with a light brown hue.
- Reduce the opacity to 20% or so and layer various sizes of similarly transparent shapes. I find it easiest to draw these shapes with the Pencil Tool and have set its fidelity to Smooth.
- Add smaller shapes over the top of larger shapes and vice versa in order to create a mottled look. This builds up the texture.
- Notice how these shapes almost fit together like a puzzle.
- As you build up lighter shapes, decide which side of the meat you want your highlights to be. I’ve chosen the right side.
- This process can be tedious, but notice how building texture like this renders the object without having to worry about Mesh shapes and placement.
Step 6
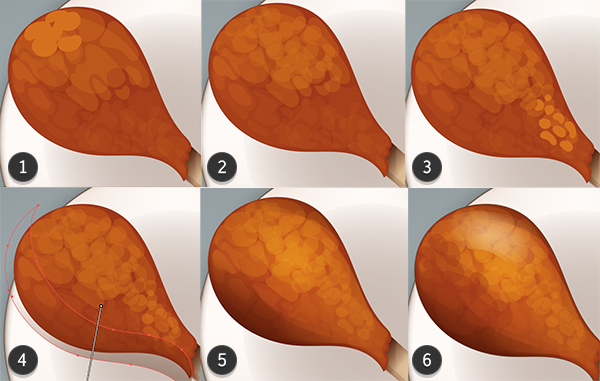
Continue rendering the drumstick with finer details now that you’ve got the basic texture done.
- As you build up your texture and render your meat object, concentrate lighter and brighter colors on the right side of the meat.
- Make sure to alternate between large sections of tiny shapes and larger, transparent, curving shapes in order to create a mottled, painterly effect.
- Smaller pieces work best for lighter, highlighted portions. Consider using orange hues as well, in order to lighten up different areas.
- You can also overlap your meat shape with large Linear Gradients. In this case I’ve used brown with its Opacity going from 100% to 0%. Use the Gradient Tool to change the angle of the gradient, and don’t forget to trim the object to the contour of the drumstick.
- Lighten up the center and upper right of the drumstick and add shadow shapes to either edge of the design.
- Finally, add a bright highlight, similar to the bright reflections used on the egg yolks, to the upper right of the drumstick.
Step 7
In order to make the drumstick pop, I’ve outlined it with a stroked path of 0.5 pt Stroke Weight and added a Drop Shadow to the completed object. Place your finished drumstick group on a plate, and let’s move on to the next item.
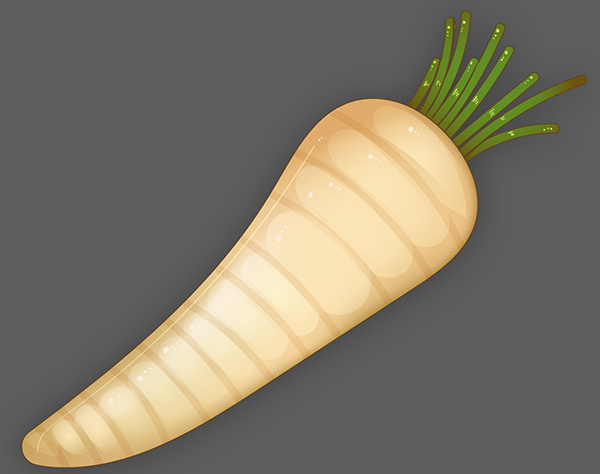
4. Maror (Horseradish Root)
Maror, or horseradish root, is a bitter herb that is meant to symbolize the suffering endured before the exodus from Egypt. I’ll be drawing a version of the whole root below, but you can show grated horseradish or an alternate bitter herb if you wish in your own vector Seder plate.
Step 1
My horseradish root will end up being just as shiny as the other items in this design set. This is a stylistic choice, and if you’d like to make a more realistic root design, definitely go for it!
Starting with the Pencil Tool, I drew a long, curving shape whose top is bulbous and whose end tapers a bit. With the Blob Brush Tool (Shift-B), I’ve drawn nine grass-like protuberances on the right side of the root. Group these together and place them behind the root base.

Step 2
- Using the Mesh Tool, add beige tones to the bottom right edges of the root shape.
- Concentrate various shades of beige around the narrow tip of the root.
- Since we’ll have some portions of the leaves sticking out the top, let’s go ahead and darken up the top edge as well.
Step 3
- Add a couple of mesh points in the lower center of the root and set them to a light cream in order to make a bright highlight.
- Set the mesh points on the upper left of the root to a warm beige or light tan color.
- Repeat the warm tones on a couple of the mesh points on the root’s tip.
Step 4
- Using the Blob Brush Tool, draw bands around the root. You can also use this time to draw lumps and bumps if you wish.
- Draw a shape that outlines the root’s contour and indents at each band. Apply a Radial Gradient so that the outer color is dark and opaque and the inner color transparent. Adjust the radius with the Gradient Tool so that you’ve given the root a slight shadow around its edge.
You may want to create a rougher-looking root than the one I’ve created below if you’re looking to create more realistic designs.
Step 5
- Add highlights to each section by drawing narrow, curving shapes that contain Radial Gradients going from cream at 100% to 0% Opacity with the color in the center. Repeat for each section as you see fit.
- Moving on to the root’s stems, apply a Linear Gradient that goes from brown or dark green to green and the same brown again.
- Add a thin stroked outline (0.5 pt or so) to the root’s stems.
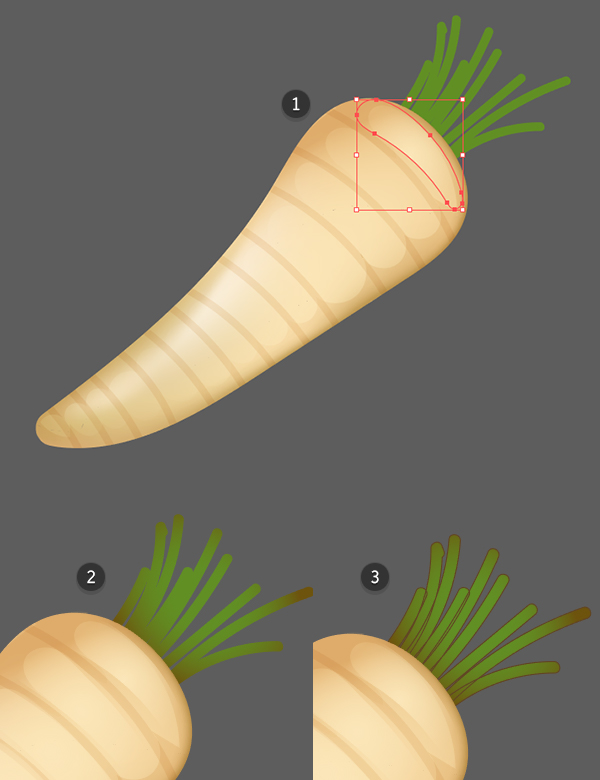
Step 6
Finally, draw small light green and yellow highlights with the Blob Brush Tool as you see fit, and add a Drop Shadow to the final object group. As I said in the beginning of this section, my horseradish root is shiny and cute, which is more of an artistic choice so it fits in with the other pieces in this set versus illustrating a realistic object.
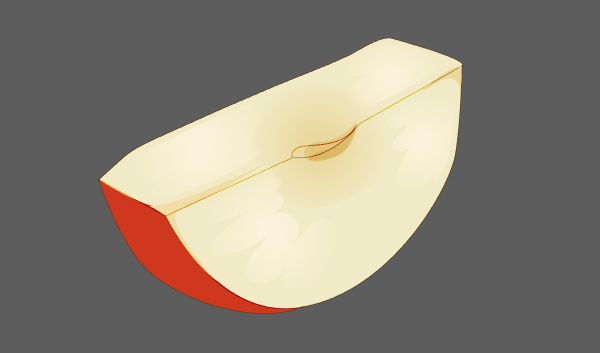
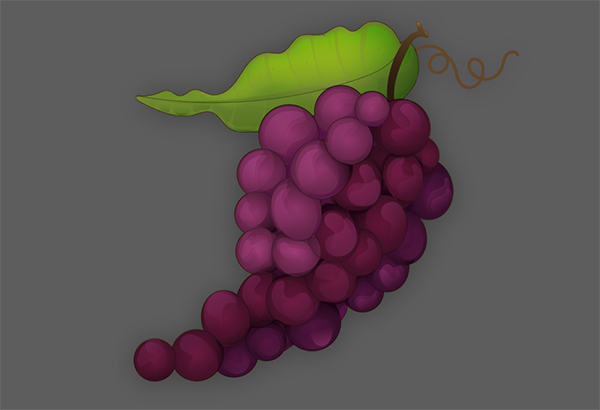
5. Charoset Part One (Apple)
The Charoset is a sweet paste comprised of nuts and fruit. It represents the bricks and mortar used by Jewish slaves when they were forced to work in Egypt.
In the case of this tutorial, I’ve broken down the pieces of the Charoset into a couple of items: an apple and grapes. Push your design further with the addition of nuts or even illustrate the final paste for your set if you wish.
Step 1
- Start with a half circle. Draw a full circle with the Ellipse Tool and drag the ellipse anchor to quickly form a half circle.
- With the Pen Tool, draw the top portion of the apple slice. Note the indent in the center of the apple. This is where the seeds were.
- Draw a curved angled shape that makes up the peel of the apple. Do your best with the apple’s perspective using photographic reference or referring back to my initial sketch if need be.
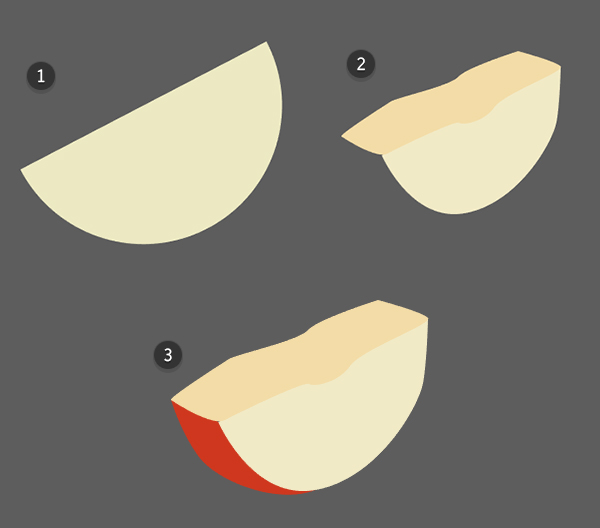
Step 2
I’ve drawn a light tan Radial Gradient shape in the center of the apple where the core would be. Then, with the Paintbrush Tool (B), I outlined the empty seed shape and drew a line defining the planes of the apple slice. I set the stroke color to brown and their Blending Modes to Color Burn.
Using the Blob Brush Tool I drew some scribbled highlights in the center of the apple slice to create a bit of texture on the object.
Step 3
Further render the apple slice by layering brown shadow shapes onto the core of the apple slice and in the corners of the apple slice.
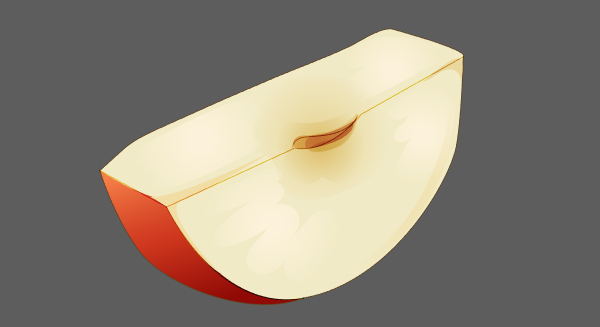
Step 4
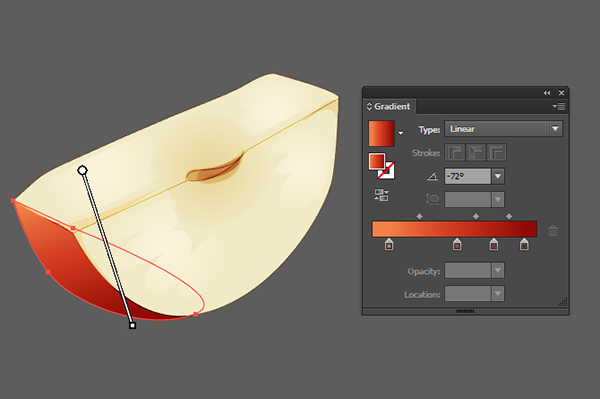
The Linear Gradient on the peel includes red and orange hues, placing the oranges on the left and dark reds on the right.
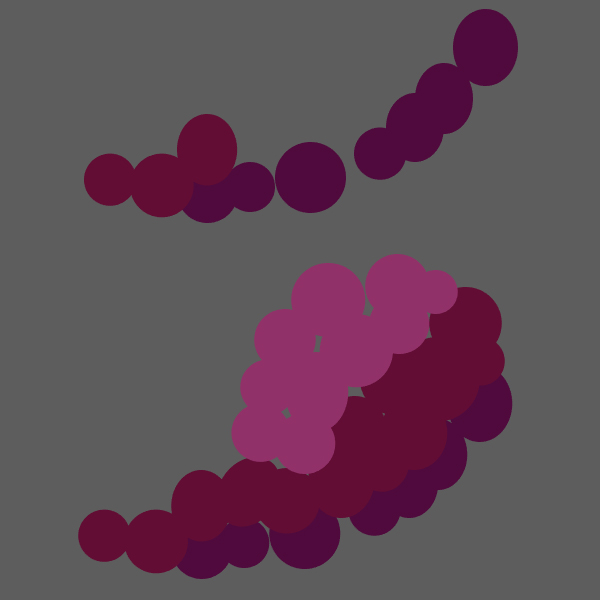
6. Charoset Part Two (Grapes)
Step 1
The grapes begin quite simply: draw circles and ellipses of varying shapes and sizes with the Ellipse Tool. Layer three or more tones of purple and violet with the darker colors below the lighter colors. When you’re satisfied with your grape shapes, let’s move on!
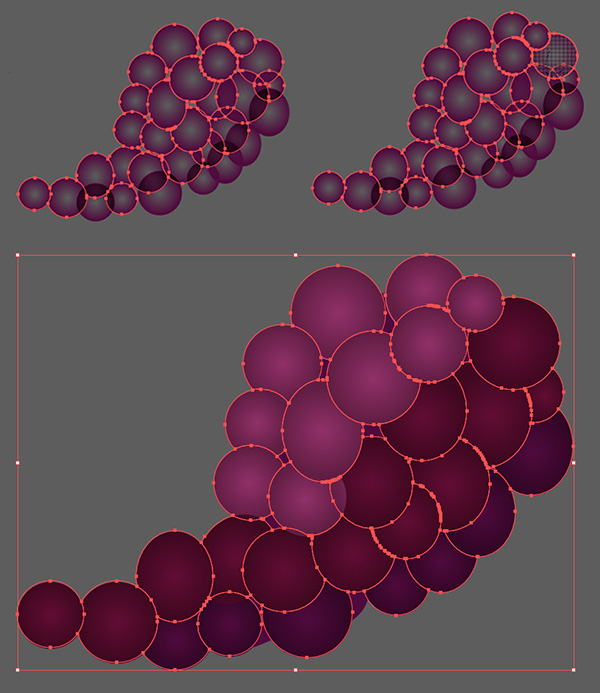
Step 2
Copy (Control-C) and Paste (Control-V) the grape group and set the fill color to a Radial Gradient with dark purple on the outside at 100% Opacity and 0% Opacity on the inside. Use the Shape Builder Tool to unite some overlapping grapes so they don’t look see-through. Place the gradient group over the base grape group. This may help you decide which overlapping shapes to unite in the gradient group.
Step 3
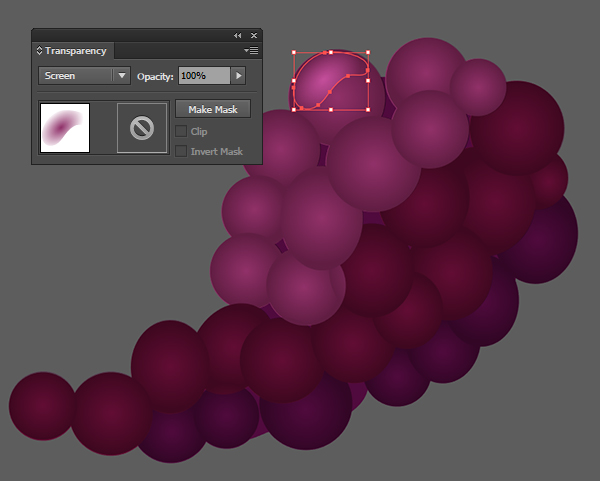
Using the drawing tool of your choice (I used the Pencil Tool), draw curved highlight shapes on each grape. Fill them with an inverted version of the gradient from the previous step and set the Blending Mode to Screen. Adjust the Opacity as you see fit.
Step 4
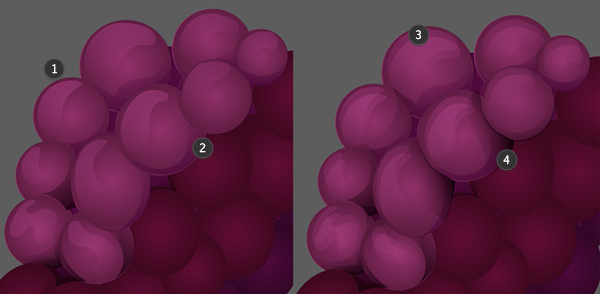
Continue drawing shadow and highlight shapes on each grape.
- Each grape has a highlight shape set to Screen.
- Each grape has a shadow shape that defines the underside of the grape set to Multiply.
- Add an additional highlight to grapes that are higher up in the bunch.
- Add additional shadow shapes to show more depth on the grapes that are below others.
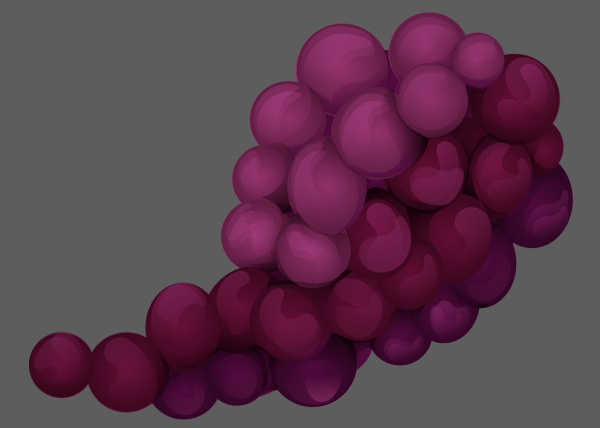
Step 5
When satisfied with your grape rendering shapes, Group everything together and let’s move on to the stem and leaf in our grape bunch design.
Step 6
Draw a large wavy shape for the grape bunch’s leaf. Use the Mesh Tool to add dark green to the mesh points on the bottom edge of the shape.
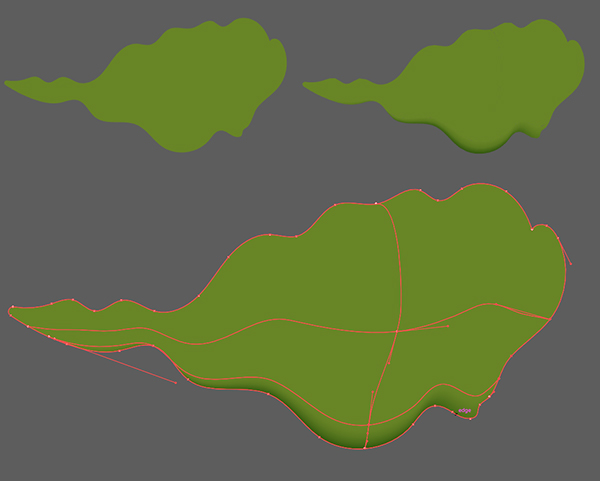
Step 7
Let’s continue rendering the leaf!
- I’ve added light green to the top of half the gradient mesh (add additional nodes to create smooth transitions).
- Feel free to draw shadow shapes with green gradients to create texture and variation in the leaf.
- Draw in veins or larger texture shapes with the Pen Tool or Pencil Tool. Fill them with green gradients or make the shapes transparent (or both).
Step 8
Finalize the grape design with a brown stem and outline the leaf and grapes with a 0.5 pt weight stroked path. Group everything together and add a simple Drop Shadow to the design.
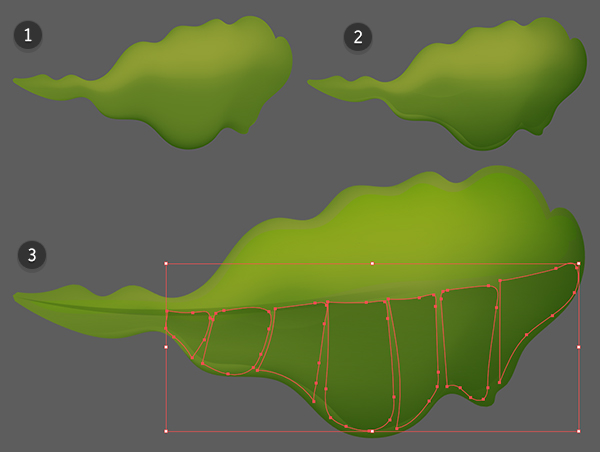
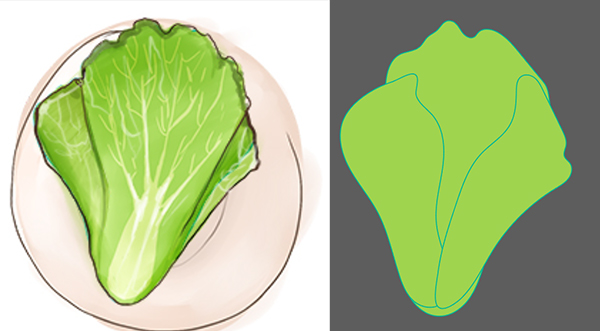
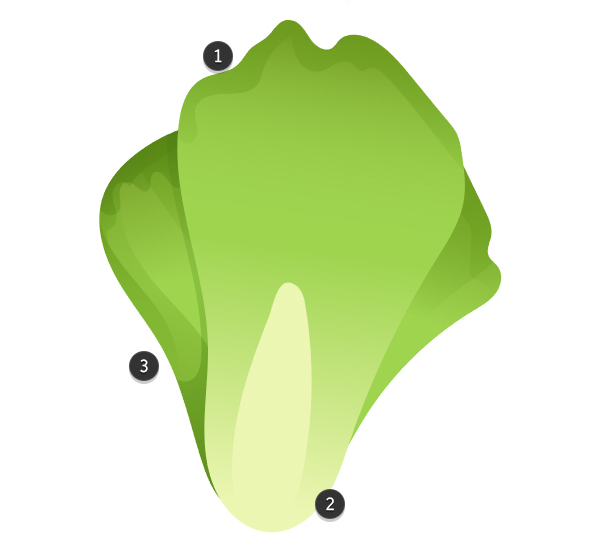
7. Chazeret (Romaine Lettuce)
Chazeret is the second of the bitter herbs. Romaine lettuce is used on account of its initial taste not being bitter, but becoming bitter at second bite. This symbolizes the suffering endured over time by the Israelites in Egypt.
Step 1
I’ll be referencing my sketch heavily for this design. To start, I traced three leaves with the Pencil Tool, filling them with green. I’ve outlined them below so you can see their shapes. The middle leaf (the largest of the three) is to be placed above the others in the next step.
Step 2
Let’s start to render the lettuce. For starters I drew a light green oval-like shape on the lower half of the middle leaf. This will form the light green heart of the lettuce.
Select each leaf shape and apply a Linear Gradient that goes from green to dark green. Romaine lettuce leaves are darker on the outside and top of the leaves than they are toward the center of the plant.
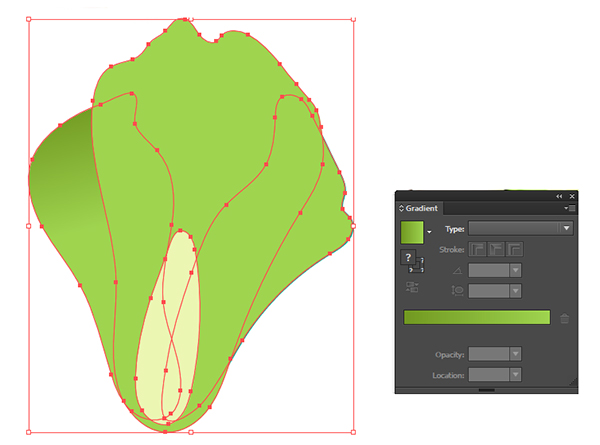
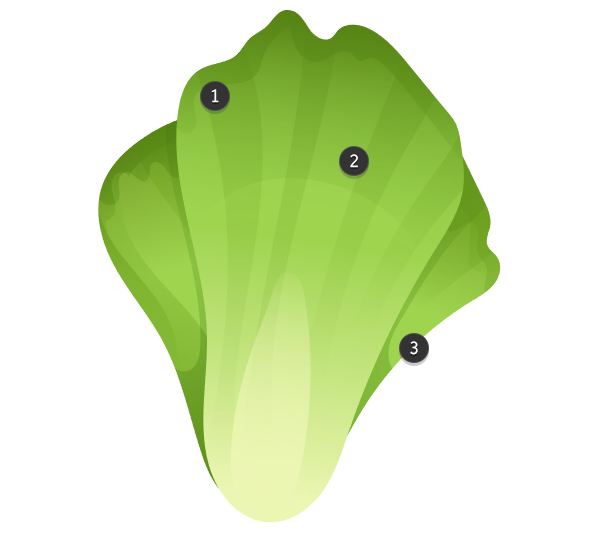
Step 3
Much like the other designs in this tutorial, I’ve used gradient shapes in order to render it.
- I’ve drawn dark green shapes along the top edge of each leaf to let the curves and waves of the lettuce pop.
- The middle leaf’s gradient goes from light green to dark green now.
- Since the middle leaf overlaps the other two leaves, we need to show depth by casting shadows onto the two smaller leaves. Notice the shadow shapes are concentrated around the edges and near the center leaf.
Step 4
Keep building up shadow and highlight shapes as you see fit.
- I added wide dark green shapes to the center leaf in order to prepare the lettuce head for the veins we’ll draw in the next step.
- This large shadow shape adds some variation to the leaf’s texture.
- Repeat the shadow shapes that were drawn on the left leaf on the right leaf.
Step 5
Using the Blob Brush Tool draw veins in the leaves, starting with the middle leaf.
- Start with large vein shapes emanating from the lower center of the lettuce leaf.
- Create smaller veins branching off from the larger ones. Select your first layer of veins and Unite them in the Pathfinder panel.
- Overlap the first layer of veins with lighter, smaller ones.
- Draw some veins on the side leaves. A ton of detail isn’t necessary. Do your best to keep the veins inside the boundaries of the leaves.
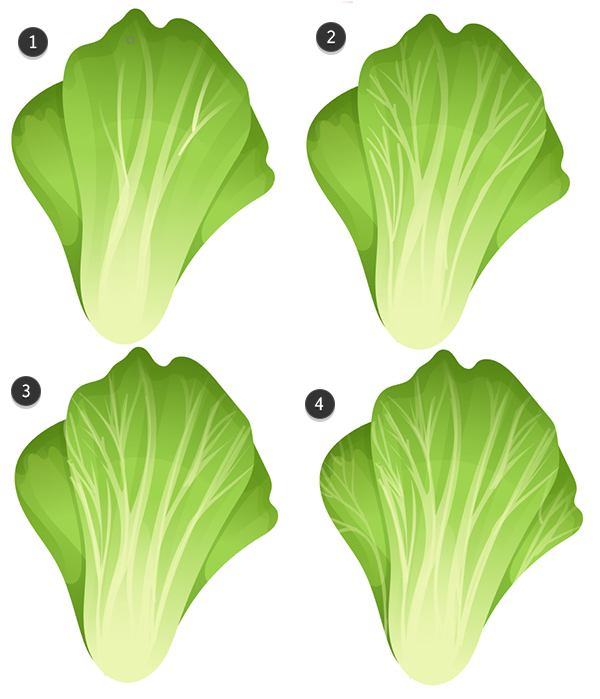
Step 6
Finally, much like the other designs, add some highlight details in light yellow or cream, and outline the lettuce leaves with a thinly stroked brown path. Apply a Drop Shadow to the entire group and place it on your plate. Group everything together and let’s move on to the final item!
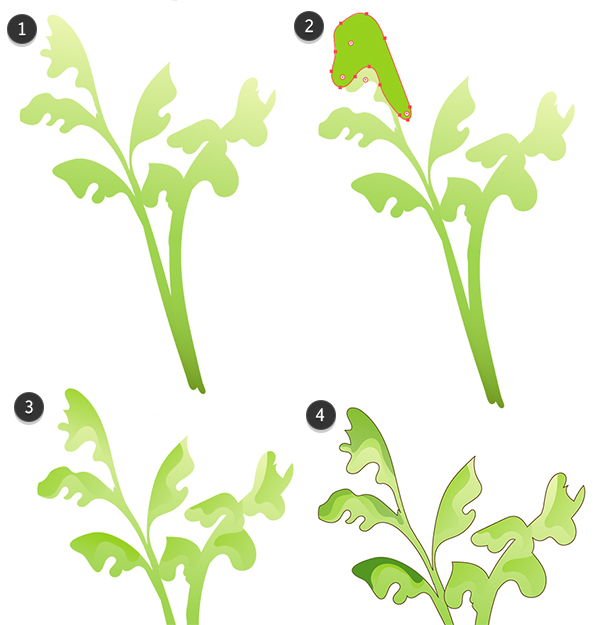
8. Karpas (Parsley)
Karpas is a vegetable other than the bitter herbs in the Seder plate. This vegetable is dipped in salt water and is most often parsley, celery, an onion, or a boiled potato. The dipped vegetable prompts children to ask questions about the Seder and may also represent the salty tear cried by the Israelites when they were kept as slaves.
Step 1
Like the head of lettuce, the parsley is referenced from my initial sketch. To start, I’ve used a drawing tool (in this case the Pencil Tool, though the Pen Tool will do just as well) to draw two stems. Set their fill colors to a Linear Gradient that goes from light green to medium green.

Step 2
- Next I’ve drawn seven leaves (the number is arbitrary) on my stems and United everything in the Pathfinder panel.
- Draw large shadow shapes over each leaf to show how they bend and curve.
- You can use the Shape Builder Tool to select and delete the non-intersecting portions of each shadow shape. Set the shadow shape’s fill color to medium or dark green.
- Copy and Paste the main parsley shape and set the fill color to null and the stroke to 0.5 pt weight. This gives your design a simple outline like those on the other Seder items.
Step 3
- Another leaf rendering technique is to Group together your shadow and highlight shapes (keep layering them on top of each other) and to create a Clipping Mask (Control-7).
- Once your shadow shapes are Grouped, Copy and Paste the main parsley shape. Align it over the entire parsley group and create the Clipping Mask by hitting Control-7.
- Move the outline out of the clipping group and add any additional highlights of veins you want on your parsley leaves. Place your parsley on your plate and add a Drop Shadow to the final design.
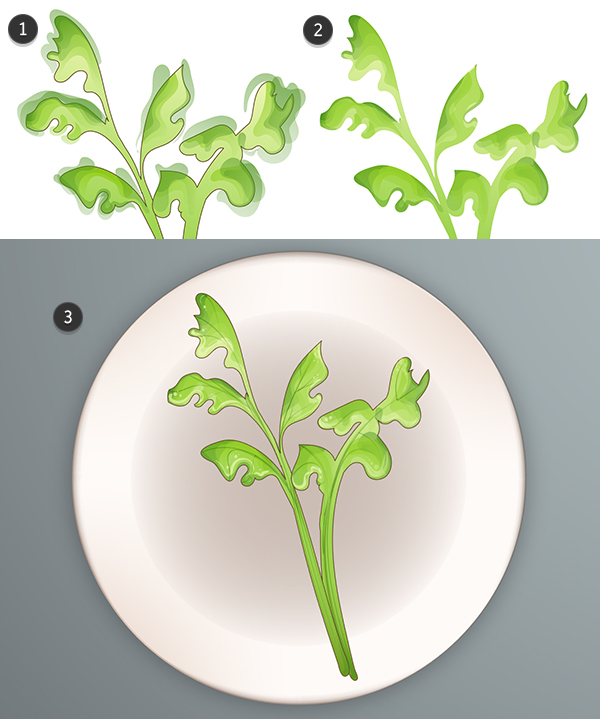
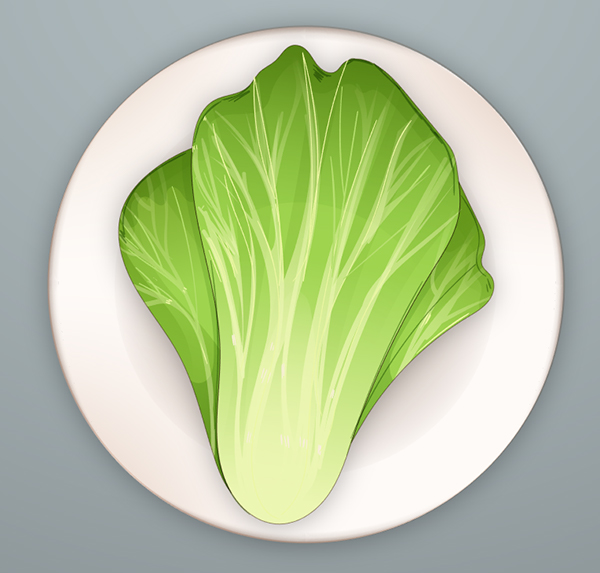
Great Job, You’re Done!
Arrange your items on your plate or in a circle according to the arrangement of a real Seder plate. Feel free to continue with this design, including Matzo and other traditional Seder foods. Share your final designs in the comment section below!
