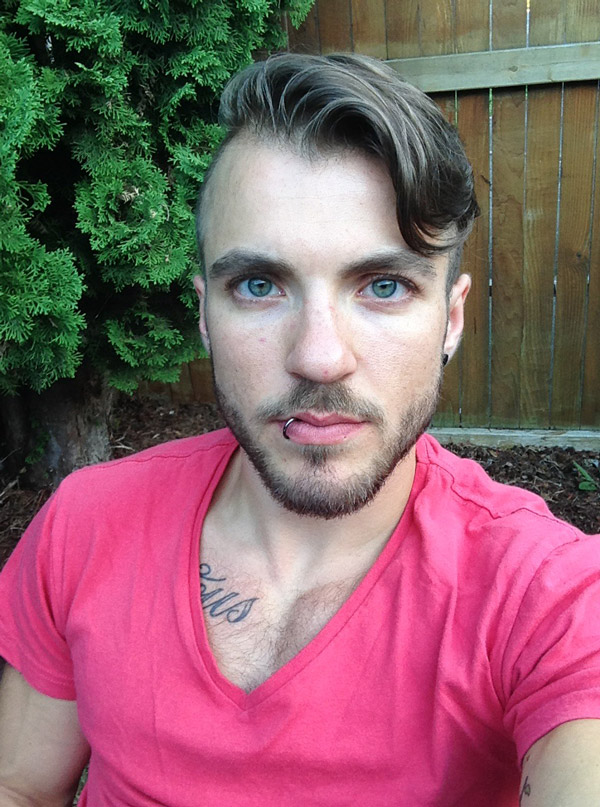
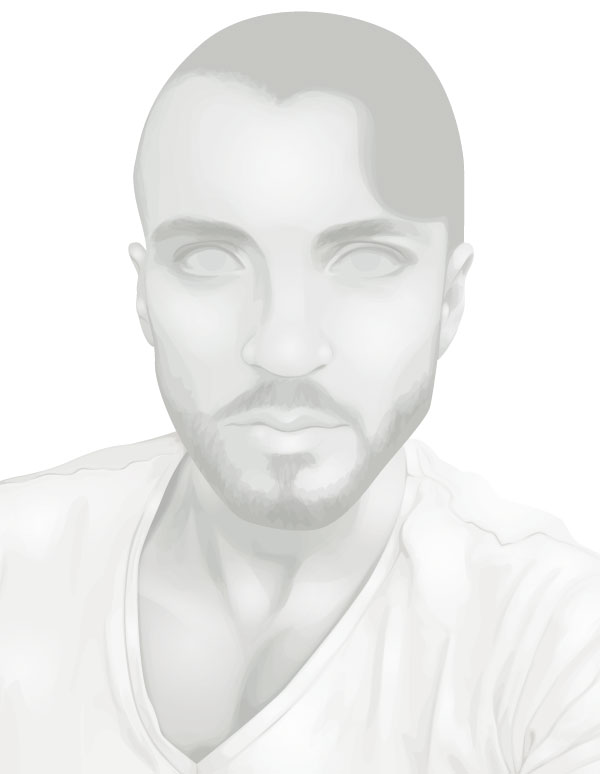
In today’s tutorial, I’m going to show you how to create a monochrome portrait from a photograph. Today’s subject is the inspiring Aydian Dowling, who has given us permission to use one of his photos for this tutorial.
If you’re not aware who Aydian Dowling is, let me introduce you to him. He is a transgender vlogger and activist, who has documented his transition on his YouTube channel ALionsFears. He’s the creator/owner of Point 5cc, a trans style clothing company which helps those going through their own transition.
Aydian had a successful year in 2015 when not only did his take on an iconic Adam Levine photo become viral, but he also became runner up in the Men’s Health cover competition, becoming the first transgender man to be considered as a finalist, even winning the public vote in the process! He has been featured in many places and even interviewed by Ellen DeGeneres.
So let’s get into creating Aydian in vector.
1. Greyscale Your Reference Image
Step 1
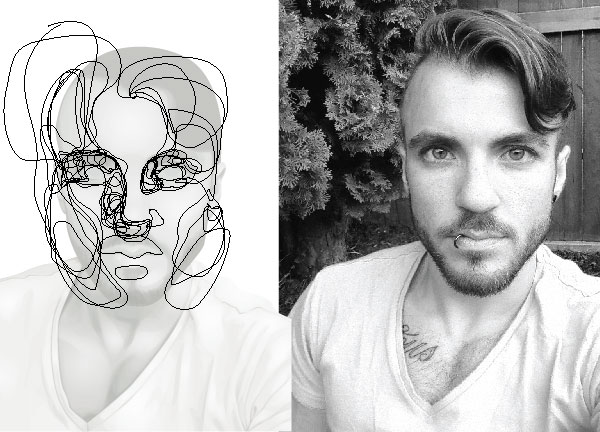
Aydian was kind enough to provide us with a high-resolution image of himself for this tutorial. He’s been photographed by many people, but I have chosen a selfie he took of himself as I know for sure he will hold the copyright to the image.
I’ve picked a photo of him which I feel is a true likeness of him. We all know there are photos of ourselves from certain angles in which we don’t look ourselves. So as I want people to recognise Aydian from the portrait, I needed a true likeness.
Step 2
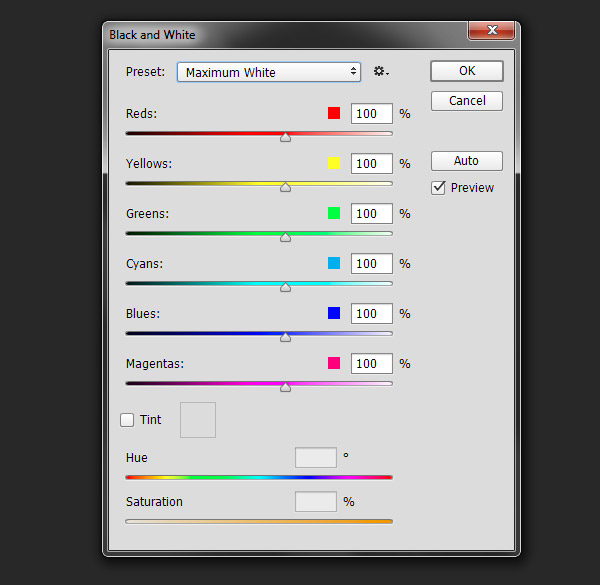
I’m going to use Adobe Photoshop to greyscale the image. I do this by going to Image > Adjustments > Black and White.
Depending on the image you’re using, find the most appropriate preset or modify from the selection you have. I’ve opted for the Maximum White preset and then clicked on OK.
2. Set Up Your File and Create the Bases
Step 1
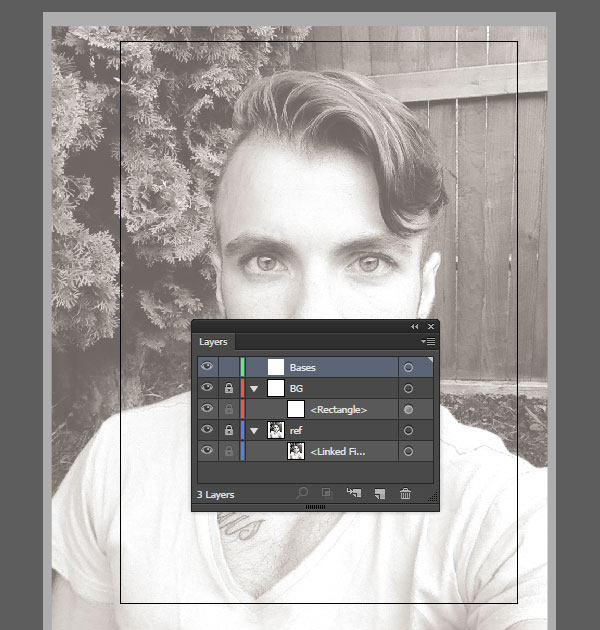
Open up Adobe Illustrator and create a New print document.
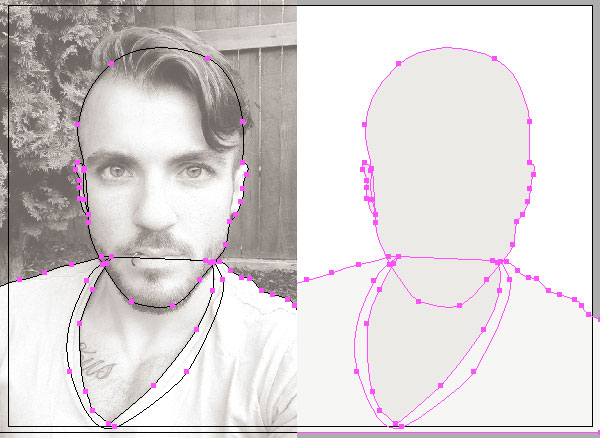
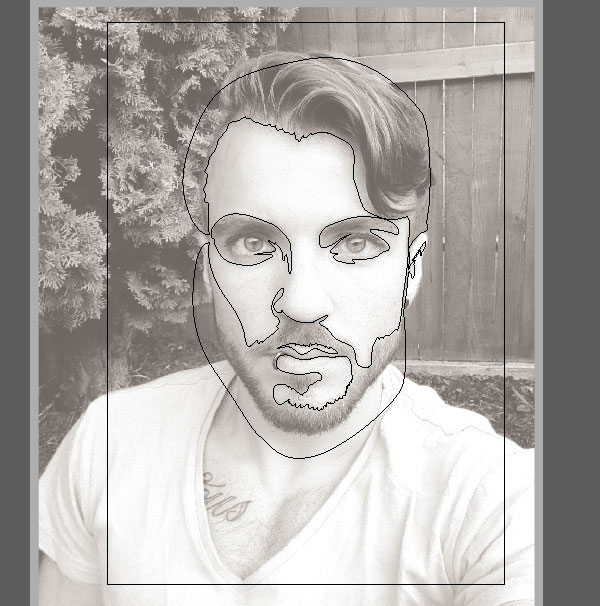
I’ve used File > Place to place our reference image onto the artboard. Then I added a white fill Rectangle (M) set to 50% Opacity in a new layer. Finally I created a layer for adding my base shapes.
Step 2
With the Pen Tool (P), I create bases for each one of the key areas—apart from the hair. I give each one a fill of the average mid-tone colour from those areas.
3. Create the Skin Shading
Step 1
When I’m working on skin shading, I tend to work on the mid tones first. With the reference image in greyscale, it makes it easier to see these mid tones.
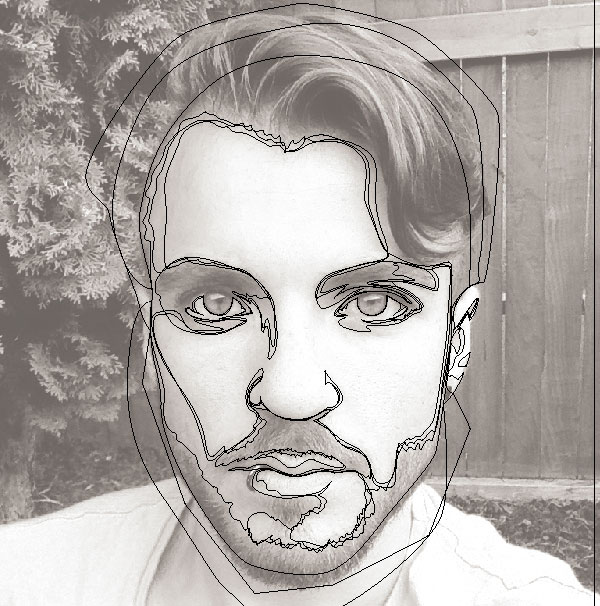
The shapes for the mid tones would be very time consuming to create, so what I do is draw the highlights on the face and then remove them using Pathfinder > Minus Front from a duplicate of the face base shape.
So with the Pen Tool (P), I draw the highlights of Aydian’s face.
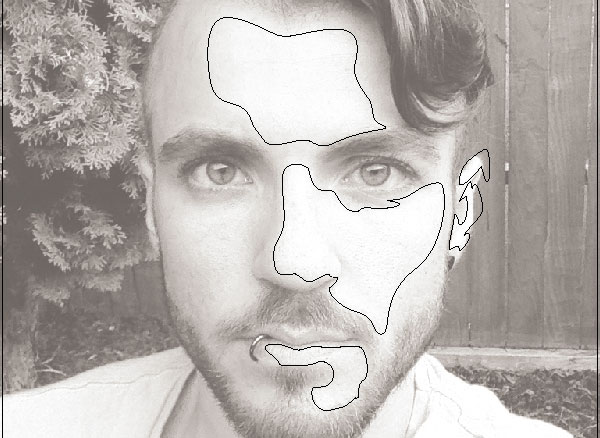
Then I select the shapes and create a Compound Path (Control-8). This makes it easier to then select this single shape and a duplicate of the base to use Pathfinder > Minus Front.
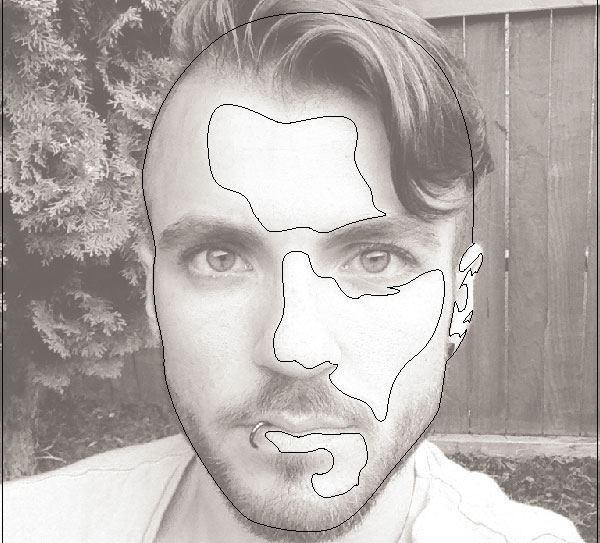
Step 2
Using the first shape as a guide, I then repeat this process to create further shapes to render the skin. By setting the layer to outline mode, I can make sure that the boundaries of the new shapes are not exact duplicates of each other, and therefore create an even graduation in shadow.
Step 3
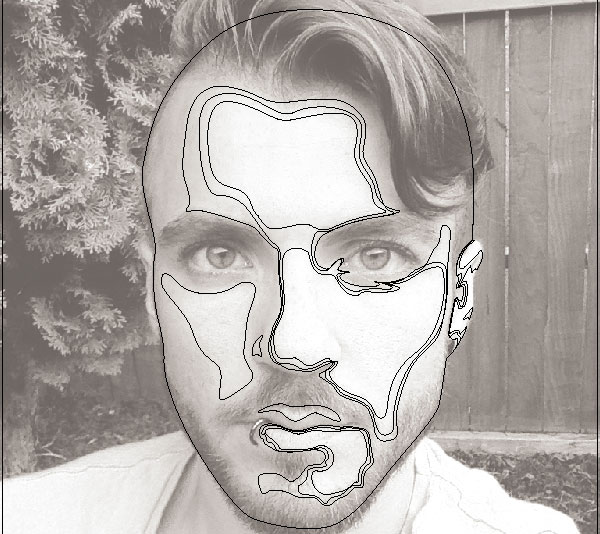
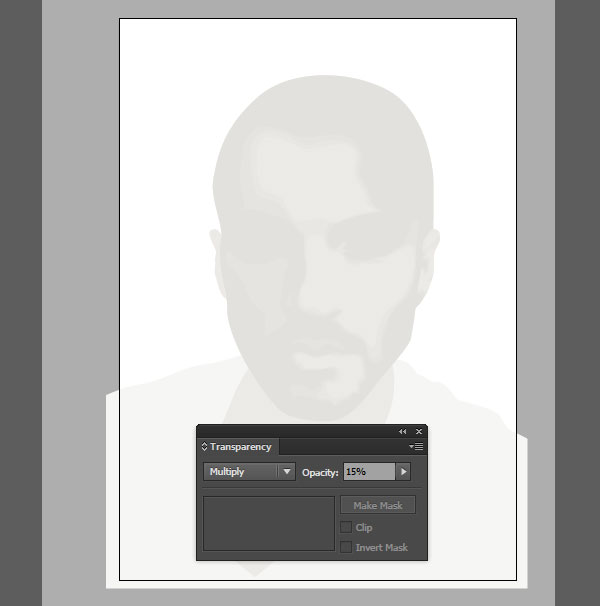
With the first four shading shapes created, I give them a grey fill and set them to Blending Mode Multiply, Opacity 15%.
Step 4
Now that the mid-tone shadows are done, I begin drawing the darker shadows. Again I’ll be using the Pen Tool, but this time I won’t be using the Pathfinder method. I’ll just be drawing the overall shapes.
You’ll notice on the screenshot below, I’ve gone beyond the face base. Don’t worry about this as it will be rectified later.
Step 5
As before, I add further shapes for the darker shadows.
Step 6
I then select the dark shadow shapes and apply Blending Mode Multiply, Opacity 15%. Here is our shading so far.

Step 7
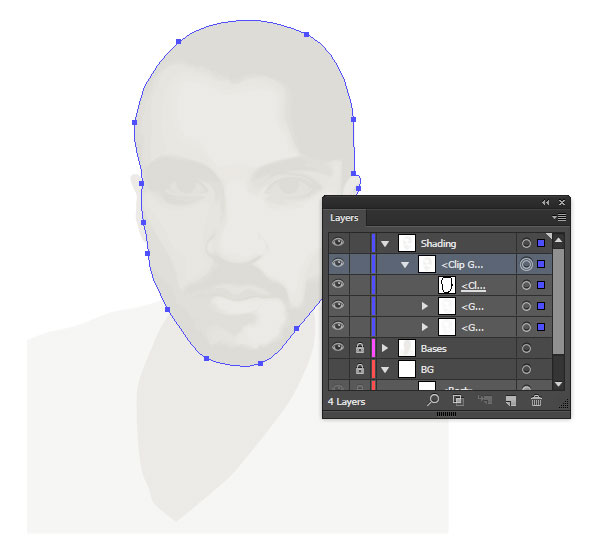
The shading shapes are then Grouped together (Control-G) and with a duplicate of the face base, I select both the group and the duplicate to create a Clipping Mask (Control-7).
Step 8
Now I add further darker shapes. These will use a darker shade of grey and will be smaller shapes. They’ll then be set to Blending Mode Multiply, Opacity 5%. They’ll be grouped together and then added to the clipping mask.

Step 9
Add highlights to the skin. These are done with transparent radial gradients, using an off-white colour. Gradients create a soft edge to the shapes, which make for a smoother transition in shadows and highlights.
These are set to Blending Mode Screen, Opacity 30%.

And this is how we’re looking so far.
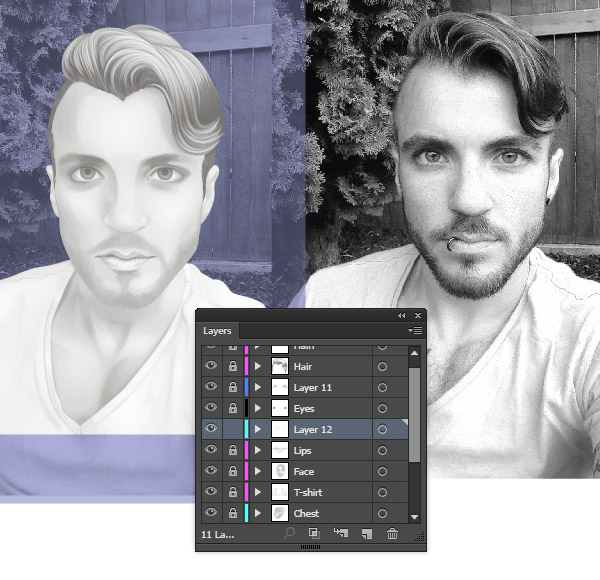
Step 10
I lay the shading and the reference image side by side and scour it for any obvious differences. Sometimes you may add too much shadow or too much highlight to areas, and by observing the original next to your shading, you can see where you need to make changes.
Of course this step only really applies if you’re rendering someone you know or someone recognisable. This extra attention to detail can help push the likeness of your portrait closer to the photograph likeness.
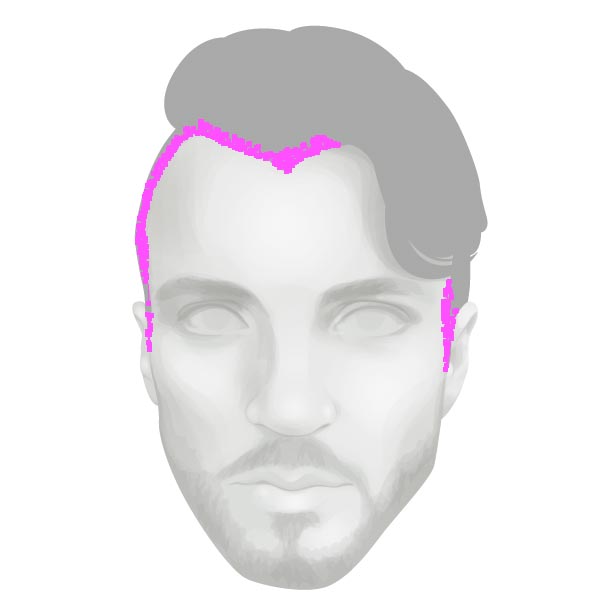
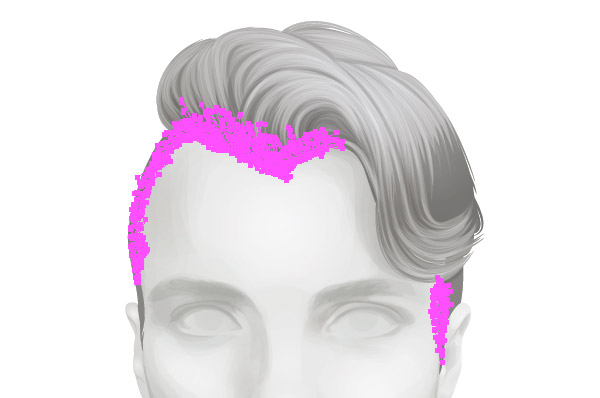
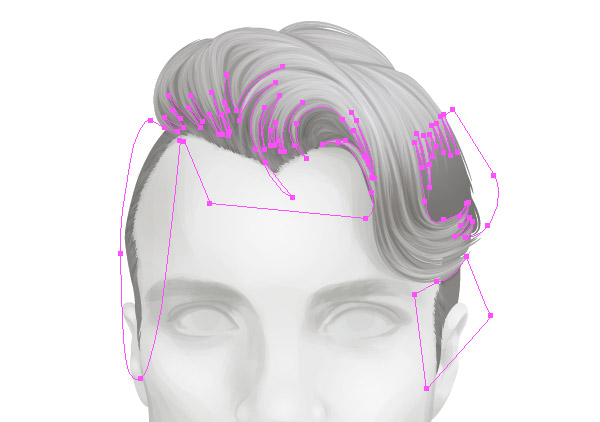
4. Vector the Hair
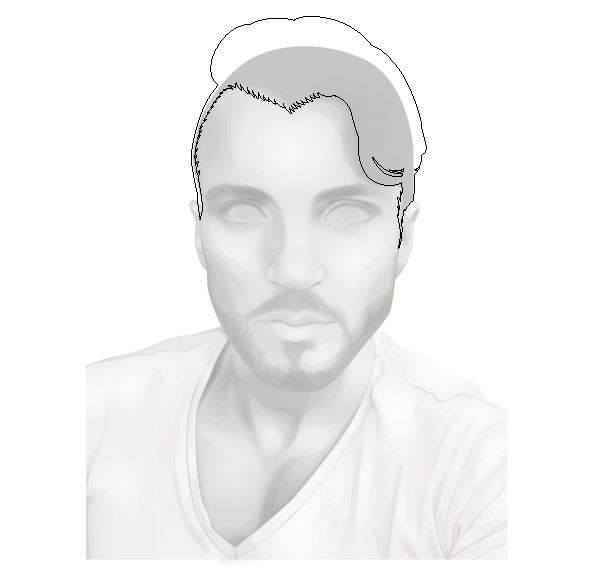
Step 1
The first thing I’m going to do is create the hair base. I do this by tracing the reference image with the Pen Tool. I create a zig-zag line along the hairline but I don’t make it exact, as I’ll put more detailing into this soon.
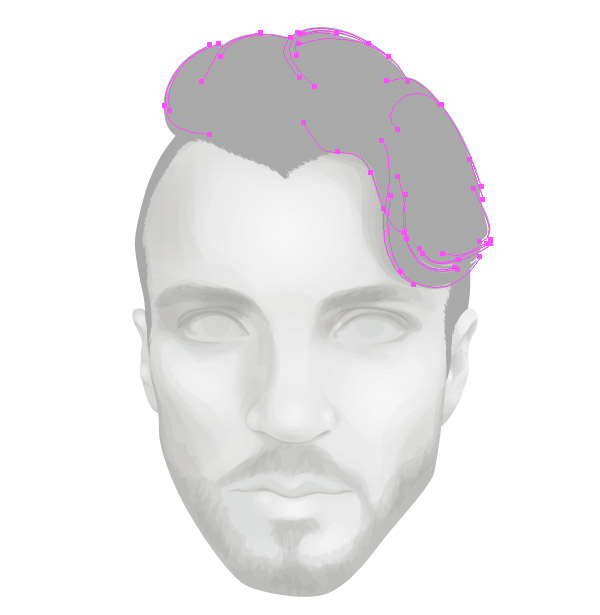
Step 2
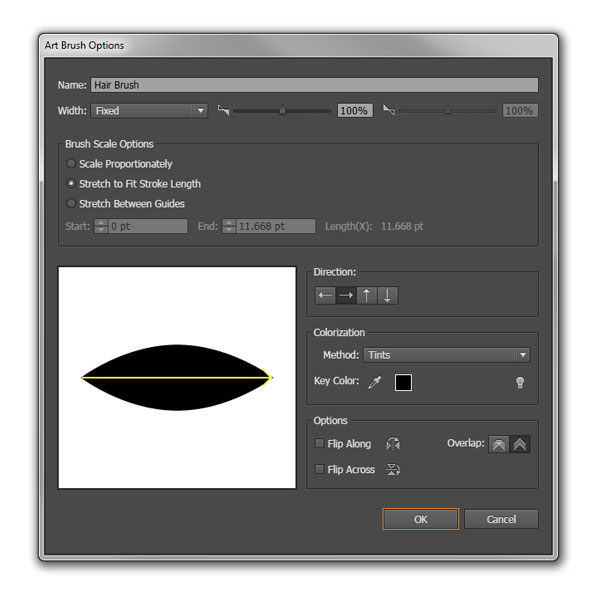
To add detailing to the hair, I’m going to create a tapered Art Brush from a black Ellipse (L).
Step 3
Using the Paintbrush Tool (B), draw small strokes around the hairline with the tapered brush. This is to give a more detailed hairline.
Then select all of the strokes and go to Object > Expand. While the strokes are still selected, select the base as well and use Pathfinder > Unite to combine all shapes to create one base shape for the hair.
Step 4
Now I have a more detailed hairline, the rest of the base needs more detailing. Fine hairs will be coming away from the base. In order to render these, use the Pen Tool (so that the strokes are more controlled) with the tapered brush to draw these fly-away hairs. Then repeat the process of Object > Expand and Pathfinder > Unite.
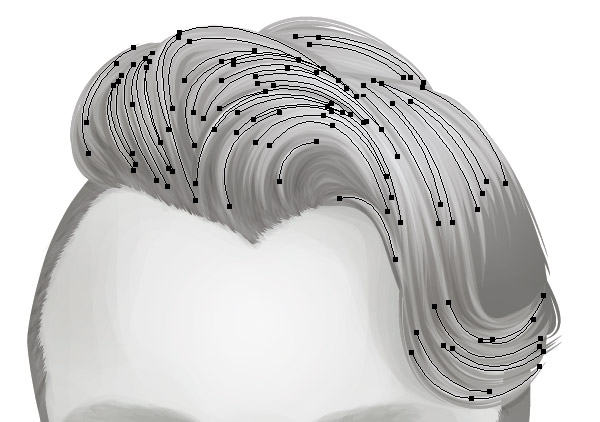
Step 5
The style of rendering I’m working towards is less detailed than my previous portraits. More detailing will go into the base and the subtle shading than in adding hundreds and thousands of individual strokes.
To achieve this, you’ll need to use the Appearance panel to add gradients to darken around the edges of the base shape.
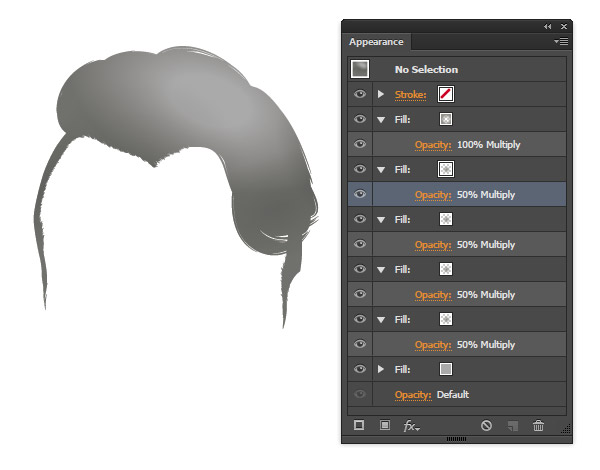
Step 6
As the base is darkened and Aydian’s hair is blond, I’m going to need to add strokes to the hair which use Blending Mode Screen to create a lighter shade. I begin using larger strokes (3 pt) and a low Opacity and then as I add more refined details, I reduce the stroke weight (1 pt) and use a higher Opacity.
The initial strokes will be done with the Pen Tool so I have more control over the curves… then as I progress, I use the Paintbrush Tool.
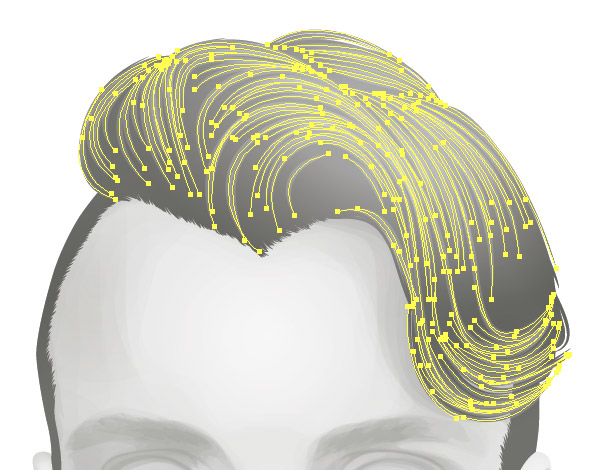
Step 7
To help the hairline blend more into the skin and to give less of a harsh edge, I add loads of strokes along the hairline with a low Opacity. This helps add definition to some of the more defined strokes in the hairline and it helps show more gaps on the scalp.
Step 8
I notice that the roots of the hair and the sides of the hair aren’t as dark as I’d like them. So what I do is create shapes to cover these areas set to Blending Mode Multiply to darken them. I then group them and use a duplicate of the hair base to create a Clipping Mask (Control-7).
Step 9
Finally, I add brighter strokes to the hair to create the peak highlights.
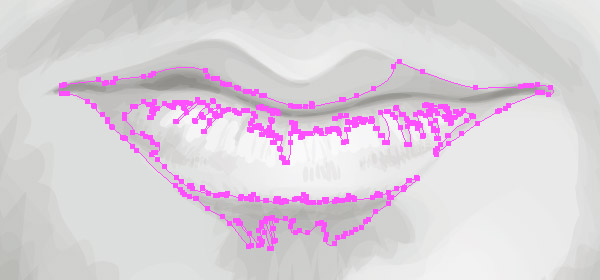
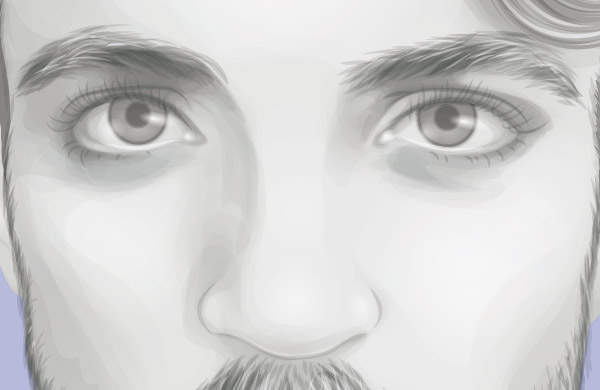
5. Add Details to the Face
Step 1
When I create the skin, I also render the majority of the shading on the lips. I try not to render the lips separately from the skin as the lips are skin and I don’t want them looking as if they’re floating on top of the skin.
However, when I come to adding the finer details, I’ll need to add smaller shapes to intensify the contrast in the lips. I recommend using the Blob Brush Tool (Shift-B) to create these shapes.
Step 2
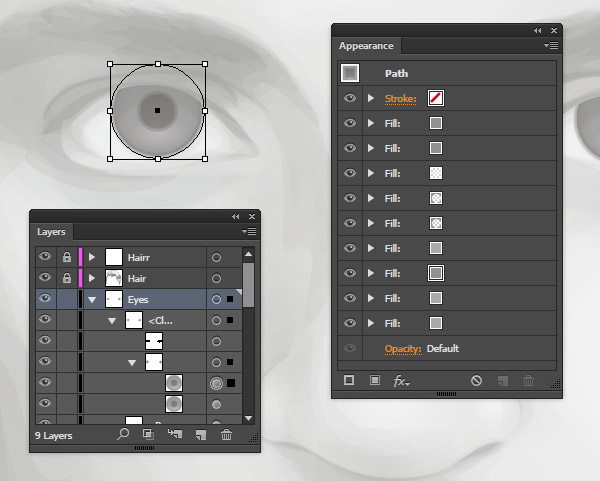
When adding the eyes, I use Ellipses within Clipping Masks of the shapes of the eyeballs. I use the Appearance panel with the help of Offset Path to create the effect needed for the pupil and iris.
Step 3
Again, I compare the portrait with the original image side by side so I can modify the shadows and highlights where required. When using such low opacities, it can sometimes be hard to balance the contrast correctly. So it’s always best to check in with the original image and look at the key areas.
For instance, notice how there are dark shadows around the right eye. These shadows should be darker than the shadows on the nose and so on.
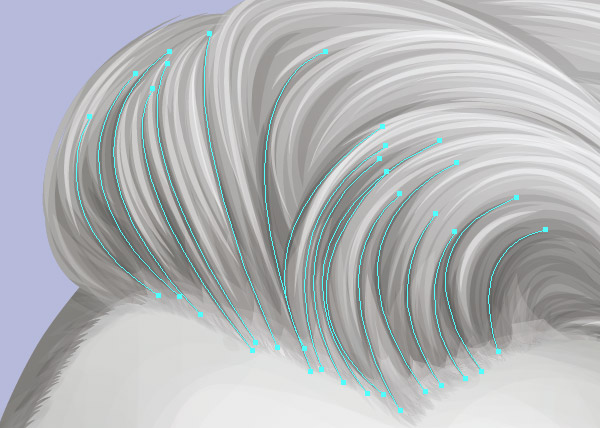
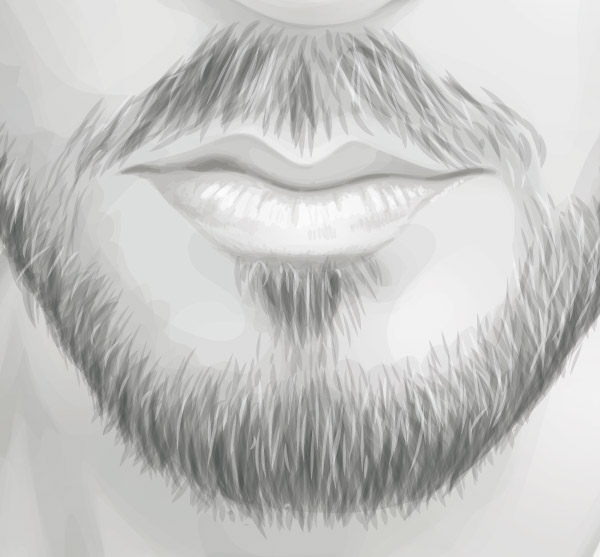
6. Refine the Hair
Step 1
Add darker strokes to the hair to help define it further. If you look at the original image, there are very definite strands and clumps of hair at the front of the hairline. This really needs to be replicated in the hair rendering in order to help make the portrait look more convincing.
Step 2
I then begin adding the facial hair and eyebrows. I start using Blending Mode Screen strokes with the tapered brush and Paintbrush Tool (B).
For the facial hair, I draw the strokes around the area first and then I fill in the strokes. This makes it quicker for me to render.
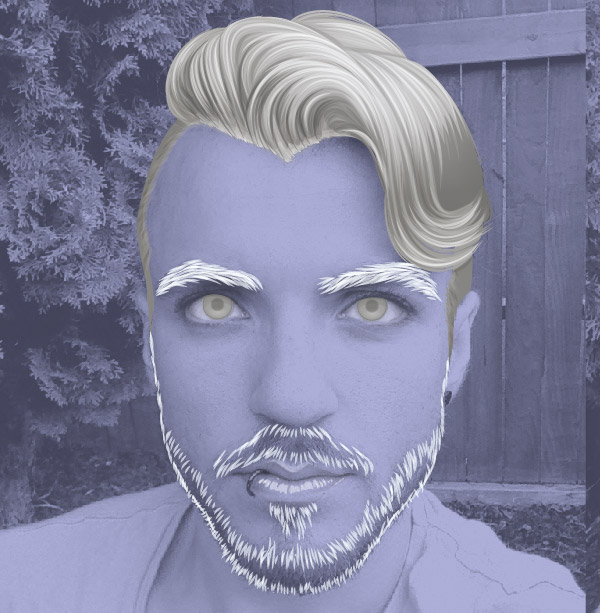
Step 3
I then use Blending Mode Multiply strokes to add shadowed strokes. I finish off by adding thinner Blending Mode Screen strokes to show some whiskers caught by the light.
Step 4
I finish off the portrait by adding eyelashes and highlights to the eyes. Everyone has eyelashes, although women may have more exaggerated lashes due to the use of mascara and cosmetics, so keep this in mind.
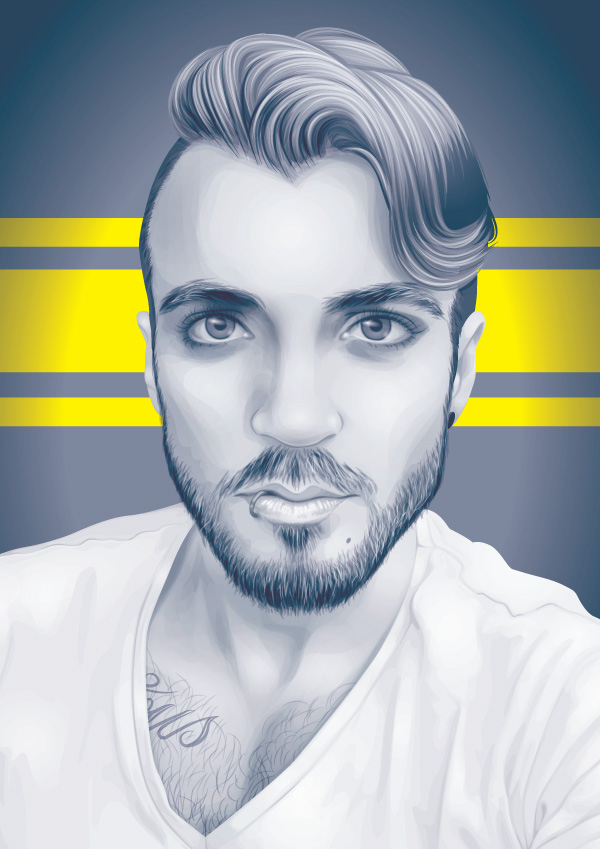
Awesome Work, You’re Now Done!
I finished the portrait off by using a blue fill over the top to create a blue hue. I used Blending Mode Burn to help intensify the contrast.
Then, as a nod to Aydian walking 2015’s LA Marco Marco show, I added dashes of bright yellow in the background.
Those who follow my portrait tutorials will know I like to add beauty spots to symbolise a narrative. Aydian doesn’t have any… so I’ve added one near his mouth as he’s an activist.
I hope you’ve enjoyed this tutorial as much as I’ve enjoyed creating it. A huge thank you to Aydian for granting us permission to use his image for this tutorial.
See you in my next tutorial!