In this tutorial, you will learn how to create a cyberpunk Photoshop effect action to add amazing photo effects to your photos. I will explain everything in so much detail that everyone can create the effect, even those who have just opened Photoshop for the first time.
The effect shown above is the one I will show you how to create in this tutorial. If you would like to create the even more advanced cyberpunk Photoshop effect shown below, using just a single click and in only a few minutes, then check out my Cyberpunk Photoshop Action.

What You’ll Need
To recreate the design above, you will need the following resources:
1. How to Start Creating an Action
Step 1
First, open the photo that you want to work with. To open your photo, go to File > Open, choose your photo, and click Open. Now, before we get started, just check a couple of things:
- Your photo should be in RGB Color mode, 8 Bits/Channel. To check this, go to Image > Mode.
- For best results, your photo size should be 2000–4500 px wide/high. To check this, go to Image > Image Size.
- Your photo should be the Background layer. If it is not, go to Layer > New > Background from Layer.

Step 2
Now go to Window > Actions, and in the Actions panel, click on the menu icon in the top right-hand corner, choose New Set to create a new set, and name it Cyberpunk. Then, click on the same menu icon again, choose New Action to create a new action, and name it Cyberpunk.

2. How to Create the Color Look
Step 1
In this section, we are going to create the color look. Go to Layer > New Adjustment Layer > Gradient Map to create a new gradient map adjustment layer and name it Color_Look_1.

Step 2
Now Double-click on this layer thumbnail, and then in the Properties panel, click on the gradient to open up the Gradient Editor panel and enter the settings below:

Step 3
Change the Blending Mode of this layer to Soft Light and set the Opacity to 70%.

Step 4
Now select the Background layer, go to Layer > New Adjustment Layer > Hue/Saturation to create a new hue/saturation adjustment layer, and name it Color_Look_2.

Step 5
Double-click on this layer thumbnail and enter the settings below in the Properties panel:

Step 6
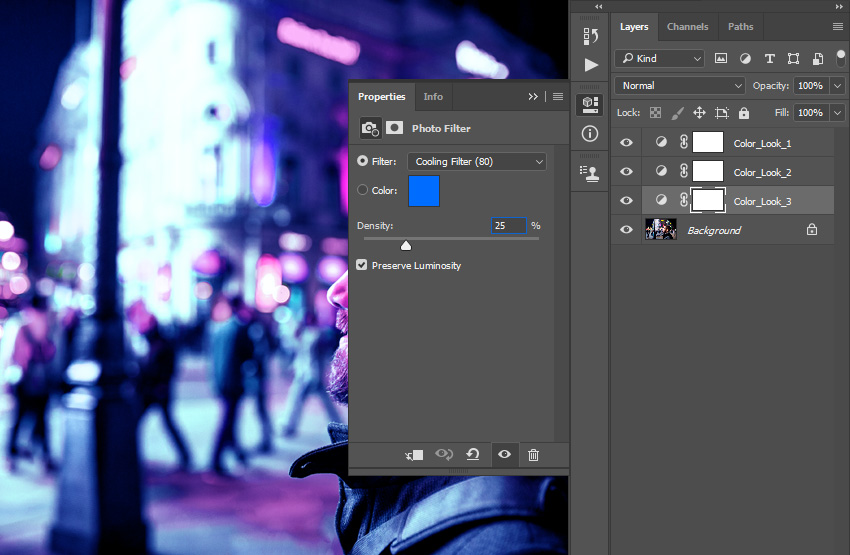
Now select the Background layer, go to Layer > New Adjustment Layer > Photo Filter to create a new photo filter adjustment layer, and name
it Color_Look_3.

Step 7
Double-click on this layer thumbnail and, in the Properties panel, set Filter to Cooling Filter (80), Density to 25%, and check the Preserve Luminosity option.
3. How to Make the Final Adjustments
Step 1
In this section, we are going to make some final adjustments to the design. Select the Color_Look_1 layer and press D on your keyboard to reset the swatches. Then, go to Layer > New Adjustment Layer > Gradient Map to create a new gradient map adjustment layer and name it Overall Contrast.

Step 2
Now change the Blending Mode of this layer to Luminosity and set the Opacity to 80%.

Step 3
Go to Layer > New Adjustment Layer > Vibrance to create a new vibrance adjustment layer and name it Overall Vibrance/Saturation.

Step 4
Now Double-click on this layer thumbnail and, in the Properties panel, set the Vibrance to +25 and Saturation to +10.

Step 5
Go to Layer > New Adjustment Layer > Levels to create a new levels adjustment layer, and name it Overall Brightness.

Step 6
Now Double-click on this layer thumbnail and, in the Properties panel, enter the settings below:

Step 7
Press Control-Alt-Shift-E on your keyboard to make a screenshot, and then press Control-Shift-U to desaturate this layer. Then, go to Filter > Other > High Pass and set the Radius to 2 px.

Step 8
Change the Blending Mode of this layer to Hard Light and set the Opacity to 80%. Name this layer Overall Sharpening.

You Made It!
Congratulations, you have succeeded! You have now learned how to create cool photo effects in Photoshop. Here is our final result:

If you would like to create the even more advanced cyberpunk Photoshop effect
shown below, using just a single click and in only a few minutes, then
check out my Cyberpunk Photoshop Action.
Using this action, you can create amazing cyberpunk photo effects
from your photos with no work at all! Simply open your photo and just play the action. It’s really that simple! The action
will do all the work for you, giving you fully layered and customizable results that you can further modify. Finally you can create cyberpunk color effects for pictures using a single click and in seconds with the first ever cyberpunk photo effects action.
The action comes with a detailed video tutorial that demonstrates how to use the action and customize the results to get the most out of the effect.
If you want to add some cyberpunk style text effect, check out Cyberpunk – 80s Retro Text Effects.
Do you like Photoshop actions? Then you may also like:
-
![]()
In this beginner’s tutorial, you will learn how to create an amazing sparkling light effect in Adobe Photoshop.
-
![]()
In this tutorial, I’m going to teach you how to create a Photoshop sketch effect. You will learn how to turn your photos into amazing, advanced sketches. I…
-
![]()
In this tutorial, you will learn how to create an action in Photoshop. We are going to create a fog effect Photoshop action to add amazing fog photo effects…
-
![]()
Learn how to create an amazing watercolor photo effect in Adobe Photoshop. Everything’s explained in so much detail that anyone can create it, even those who…