
Depending on where you’re uploading your video content, you’ll need to find the correct file settings to get the right result.
Choosing a container format
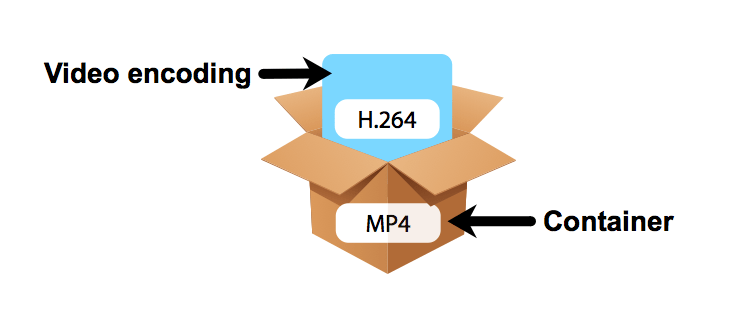
A video container format is a digital wrapper for your content. They determine the extension of your video file. Popular container formats include MP4 (.mp4), AVI (.avi), QuickTime (.mov) and Matroska (.mkv).
The different container formats all have different strengths and weaknesses, with certain formats preferred by certain content providers. The container itself doesn’t effect the quality of the video directly, but it can limit the compression codecs available for use.
If you’re choosing a container format to use for an encoded video, you’ll want to pick one that has the right mix of supported compression codecs and features. For web playback, this typically means we’ll want to use mp4. It’s a flexible, universally-accessible codec that combines strong compression capability and a laundry list of options.
Choosing a codec
Compression codecs are the algorithms used to compress digital video for distribution. They’re essentially invisible to the viewer. There are dozens in existence, but only a handful are widely used.
Your choice of codec determines both your video’s size and quality. You’ll want to choose a codec that balances size and quality, with a small emphasis on size for web streaming.
With MP4, the most common codec is H.264. While H.265 has been released and is gradually spreading through the industry, it won’t have the widespread compatibility of H.264 for some years yet. It also turns out that H.264 is a quality codec. So, if you have no idea what to do, MP4/H.264 will work for nearly any content.
H.264 is a powerful compression codec designed specifically for digital HD video, achieving a good mix of quality of space savings. H.264 playback is nearly universally supported, from DSLR video to embedded playback. While it doesn’t do as well with 4K video or unusual color depths, it provides the right balance for standard web videos.
If you’re trying to upload a clip that requires the highest available quality, then we should throw away concerns about space and stick with professional codecs. These make enormous files with require significant upload and download files, but when quality is a must, there’s simply no getting around it. Professional codecs like ProRes 422 and the MOV container format will produce the highest-quality (and largest) video files.
The quality of a codec is revealed by its bitrate. Expressed in Mbps or Kbps, this describes how large each second of video can be. The higher the bitrate, the higher the potential quality. This won’t ever increase the quality of the video, but a high bitrate will prevent the quality from decreasing. In general, you won’t want to encode higher than 50 Mbps. Something like 5 Mbps is common in streaming video, but you’ll want to test various bitrates with your content.
Plenty of video sharing websites compress video when uploaded. YouTube is one such platform. On upload, it transcodes your video to either H.264 or V9, better known as WebM. It might seem that such transcoding eliminates the need for compression before upload, or means that your compression choice at this stage is meaningless. That’s not exactly true, however. The better the quality of the video you upload, the better the quality of the video on playback.
When working with YouTube, it’s best to upload the largest practical video size. YouTube will handle downscaling based on user settings, so just provide the maximum quality possible and let YouTube sort it out.
Important Export Settings
There are few settings you’ll want to optimize, like the following:
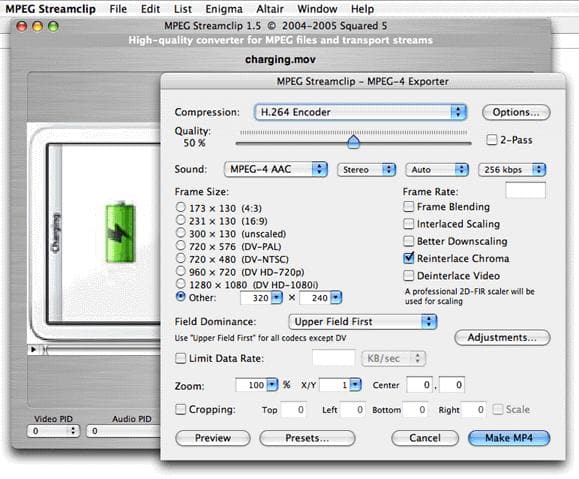
- Resolution: Set the correct resolution for your use case. You will probably want to export at full resolution. If you want to reduce it, make sure that you don’t accidentally change the aspect ratio when adjusting the resolution. Using a scale multiplier is typically a good choice.
- Progressive Encoding: Avoid options for “interlaced” encoding. This is an old method of HD video encoding which is no longer necessary or supported. Make sure to choose a progressive setting, which will likely have a “p” at the end of its resolution: 1080p, 720p, and so on. If you don’t see the options for interlaced exporting, don’t worry about it.
- Pixel Aspect Ratio: Always set to “square.” Changing the dimensions of the pixels will not play nicely with most playback settings.
- Bitrate: Controls the maximum data size of each second of video, should be kept at a moderate balance between 5 and 50 Mbps. Test with your content to determine the best balance between file size and video quality.
- Frame rate: This measurement is determined by the source video. Depending on the device you recorded the video with, you’ll see different frame rate settings. If you don’t know what the setting for frame rate should be, match it to the source video’s frame rate, which can be found with VLC.
Apps for Encoding Videos
To figure out the right compression, use your eyes! They’re the best determinant of what is and is not acceptable. Consider your audience, your streaming platform, and the quality of the clips you recorded. Higher quality is not always strictly better.
Video files can be encoded with a huge variety of software packages. On Windows, FreeMake Video Compressor provides a large range of compression formats and a simple workflow. On macOS, free, open-source tools like MPEG Streamclip or the command-line ffmpeg. You’ll also find basic video compression tools in the macOS Finder. The same open-source tools are available on Linux.
Generally, the best tool for the job is the one that is easiest to use. In most cases, that will be the software you’re using to edit the video. Regardless of software, there will be various options for export.
Author: Alex Fox