To get paid for goods and services provided, companies/freelancers need to send invoices to their customers informing them of the services that they will be charged for. Back then, people had paper invoices which they gave to the customers when they contact them for their services. Right now, with the advent and advancement of technology, people are now able to send electronic invoices to their customers.
In this article, we are going to look at how to build a mini invoicing application using Vue and NodeJS. This application will perform simple function such as – creating an invoice, sending an invoice, editing and deleting an invoice.
Requirements
To follow through the article adequately, you’ll need the following:
- Node installed on your machine
- Node Package Manager (NPM) installed on your machine
To verify your installation, run the following :
    node --version
    npm --version
If you get version numbers as results then you’re good to go.
Setting Up Server
Now that we have the requirements all set, the next thing to do is to create the backend server for the application. The backend server will simply:
- Maintain the database connection
Now, let’s get to creating the server.
Create a folder to house the new project and initialize it as a node project:
    mkdir invoicing-app
    cd invoicing-app && npm init
For the server to function appropriately, there are some node packages that need to be installed, you can install them by running the command :
npm install --save express body-parser connect-multiparty sqlite3 bluebird path umzug bcryptbcryptto hash user passwordsexpressto power our web applicationsqlite3to create and maintain the databasepathto resolve file paths within our applicationbluebirdto use Promises when writing migrationsumzugas a task runner to run our database migrationsbody-parserandconnect-multipartyto handle incoming form requests
Now, go ahead to create a server.js file that will house the application logic:
touch server.jsIn the server.js, Import the necessary modules and create an express app:
    // server.js

    const express = require('express')
    const bodyParser = require('body-parser');
    const sqlite3 = require('sqlite3').verbose();
    const PORT = process.env.PORT || 3128;

    const app = express();
    app.use(bodyParser.urlencoded({extended: false}));
    app.use(bodyParser.json());

    [...]
then create a simple / route to test our server works:
    // server.js
    [...]

    app.get('/', function(req,res){
        res.send("Welcome to Invoicing App");
    });

    app.listen(PORT, function(){
        console.log(`App running on localhost:${PORT}`);
    });
app.listen() tells the server the port to listen to for incoming routes.
To start the server, run the following in your project directory:
node serverYour application begins to listen to incoming requests.
Creating And Connecting To Database Using SQLite
For an invoicing application, a database is needed to store the existing invoices. SQLite is going to be our database client of choice for this application.
To create a database folder, create a file for your database in the folder:
    mkdir database
    cd database && touch InvoicingApp.db
In the database directory, run the sqlite3 client and then open InvoicingApp.db database
    $ invoicing-app/database/   sqlite3
    > .open InvoicingApp.db
Now that the database to be used has been selected, next thing is to create the needed tables.
Database Structure
For this application, there are 3 tables needed:
- Users – This will contain the user data (id, name, email, company_name, password)
- Invoices – Store data for an invoice (id, name, paid, user_id)
- Transactions – Singular transactions that come together to make an invoice (name, price, invoice_id)
Since the necessary tables have been identified, the next step is to run the queries to create the tables.
Writing Migrations
Migrations are used to keep track of changes in a database as the application grows. To do this, create a migrations folder in the database directory.
mkdir migrationsThis will house all the migration files.
Now, create a 1.0.js file in the migrations folder. This naming convention is to keep track of the newest changes.
cd migations && touch 1.0.jsIn the 1.0.js file, you first import the node modules:
    // database/migrations 1.0.js
    "use strict";
    const Promise = require("bluebird");
    const sqlite3 = require("sqlite3");
    const path = require('path');

    [...]
Then, the idea now is to export an up function that will be executed when the migration file is run and a down function to reverse the changes to the database.
    // database/migrations/1.0.js

    [...]
    module.exports = {
      up: function() {
        return new Promise(function(resolve, reject) {
          /* Here we write our migration function */
          let db = new sqlite3.Database('./database/InvoicingApp.db');
          //   enabling foreign key constraints on sqlite db
          db.run(`PRAGMA foreign_keys = ON`);

          [...]
In the up function, connection is first made to the database and then, foreign keys are enabled on the sqlite database
In SQLite, foreign keys are disabled by default to allow for backwards compatibility so, the foreign keys have to be enabled on every connection
After successful connection, the queries to create the tables are then specified
    // database/migrations/1.0.js
          [...]
          db.serialize(function() {
            db.run(`CREATE TABLE users (
              id INTEGER PRIMARY KEY,
              name TEXT,
              email TEXT,
              company_name TEXT,
              password TEXT
            )`);

            db.run(`CREATE TABLE invoices (
              id INTEGER PRIMARY KEY,
              name TEXT,
              user_id INTEGER,
              paid NUMERIC,
              FOREIGN KEY(user_id) REFERENCES users(id)
            )`);

            db.run(`CREATE TABLE transactions (
              id INTEGER PRIMARY KEY,
              name TEXT,
              price INTEGER,
              invoice_id INTEGER,
              FOREIGN KEY(invoice_id) REFERENCES invoices(id)
            )`);
          });
          db.close();
        });
      },
      [...]
The
serialize()is used to specify that the queries should be run sequentially and not simultaneously
Afterwards, the queries to reverse the changes are also specified in the down() function below
    // database/migrations/1.0.js
      [...]

      down: function() {
        return new Promise(function(resolve, reject) {
          /* This runs if we decide to rollback. In that case we must revert the `up` function and bring our database to it's initial state */
          let db = new sqlite3.Database("./database/InvoicingApp.db");
          db.serialize(function() {
            db.run(`DROP TABLE transactions`);
            db.run(`DROP TABLE invoices`);
            db.run(`DROP TABLE users`);
          });
          db.close();
        });
      }
    };
Running Migrations
Once the migration files have been created, the next step is running them to effect the changes in the database. To do this, create a scripts folder from the root of your application and then create a file called migrate.js.
    mkdir scripts
    cd scripts && touch migrate.js
The migrate.js file will look like this:
    // scripts/migrate.js

    const path = require("path");
    const Umzug = require("umzug");

    let umzug = new Umzug({
      logging: function() {
        console.log.apply(null, arguments);
      },
      migrations: {
        path: "./database/migrations",
        pattern: /.js$/
      },
      upName: "up",
      downName: "down"
    });

    [...]
First, the needed node modules are imported and then, a new umzug object is created with the following configurations. The path and pattern of the migrations scripts are also specified. To learn more about the configurations, head over here
To also give some verbose feedback, create a function to log events as shown below and then finally execute the up function to run the database queries specified in the migrations folder.
    // scripts/migrate.js
    [...]

    function logUmzugEvent(eventName) {
      return function(name, migration) {
        console.log(`${name} ${eventName}`);
      };
    }

    // using event listeners to log events
    umzug.on("migrating", logUmzugEvent("migrating"));
    umzug.on("migrated", logUmzugEvent("migrated"));
    umzug.on("reverting", logUmzugEvent("reverting"));
    umzug.on("reverted", logUmzugEvent("reverted"));

    // this will run your migrations
    umzug.up().then(console.log("all migrations done"));
Now, to execute the script, go to your terminal and in the root directory of your application, run:
    > ~/invoicing-app node scripts/migrate.js up
    all migrations done
    == 1.0: migrating =======
    1.0 migrating
Creating Application Routes
Now that the database is adequately set up, the next thing is to go back to the server.js file and create the application routes. For this application, the following routes will be made available:
| URL | METHOD | FUNCTION |
|---|---|---|
/register |
POST |
To register a new user |
/login |
POST |
To log in an existing user |
/invoice |
POST |
To create a new invoice |
/invoice/user/{user_id} |
GET |
To fetch all the invoices for a user |
/invoice/user/{user_id}/{invoice_id} |
GET |
To fetch a certain invoice |
/invoice/send |
POST |
To send invoice to client |
Registering a New User
To register a new user, a post request will be made to the /register route of our server. This route will look like this :
// server.js
[...]
const bcrypt = require('bcrypt')
const saltRounds = 10;
[...]
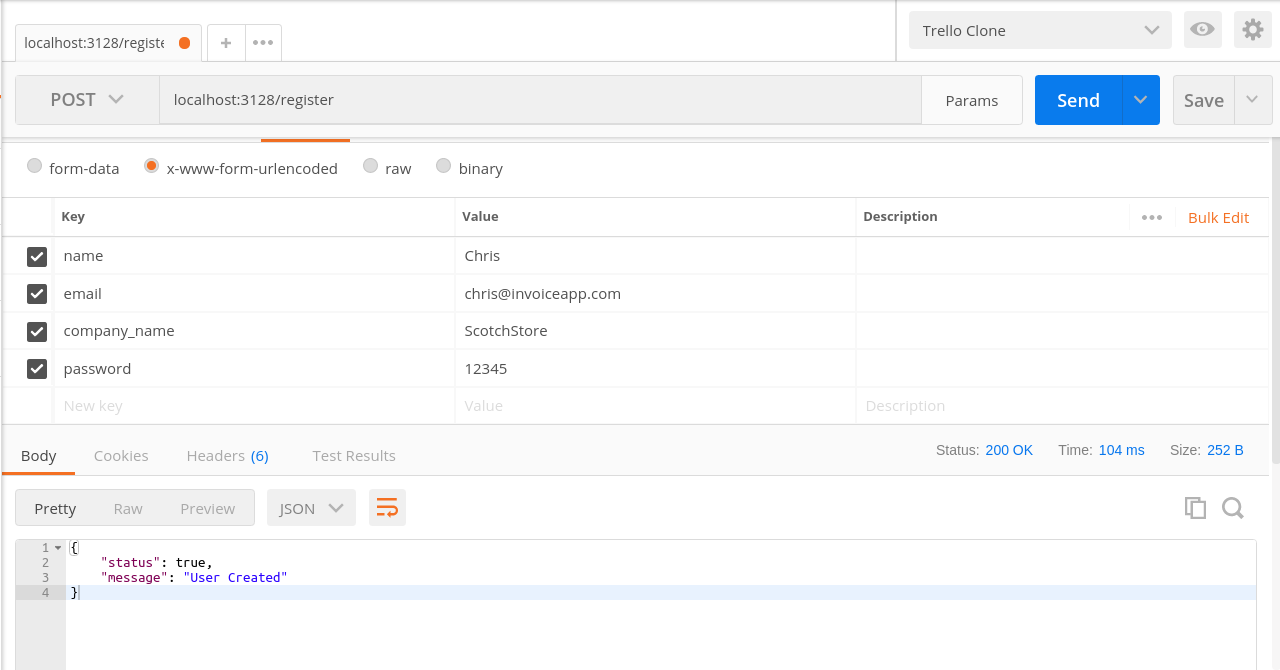
app.post('/register', function(req, res){
// check to make sure none of the fields are empty
if( isEmpty(req.body.name) || isEmpty(req.body.email) || isEmpty(req.body.company_name) || isEmpty(req.body.password) ){
return res.json({
'status' : false,
'message' : 'All fields are required'
});
}
// any other intendend checks
[...]A check is made to see if any of the fields are empty. If no fields are empty and if the data sent matches all the specification. If an error occurs, an error message is sent to the user as a response. If not, the password is hashed and the data is then stored in the database and a response is sent to the user informing them that they are registered.
    // server.js
        bcrypt.hash(req.body.password, saltRounds, function(err, hash) {
        let db = new sqlite3.Database("./database/InvoicingApp.db");
        let sql = `INSERT INTO users(name,email,company_name,password) VALUES('${
          req.body.name
        }','${req.body.email}','${req.body.company_name}','${hash}')`;
        db.run(sql, function(err) {
          if (err) {
            throw err;
          } else {
            return res.json({
              status: true,
              message: "User Created"
            });
          }
        });
        db.close();
      });
    });
When a sample request is made from Postman, the result below is obtained :

Logging in a New User
Now, if an existing user tries to log in to the system using the /login route, they need to provide their email address and password. Once they do that, the route handles the request as follows :
    // server.js
    [...]

    app.post("/login", function(req, res) {
      let db = new sqlite3.Database("./database/InvoicingApp.db");
      let sql = `SELECT * from users where email='${req.body.email}'`;
      db.all(sql, [], (err, rows) => {
        if (err) {
          throw err;
        }
        db.close();
        if (rows.length == 0) {
          return res.json({
            status: false,
            message: "Sorry, wrong email"
          });
        }

      [...]
A query is made to the database to fetch the record of the user with a particular email. If the result returns an empty array, then it means that the user doesn’t exist and a response is sent informing the user of the error.
If the database query returned user data, further check is made to see if the password entered matches that password in the database. If it does, then a response is sent with the user data.
    // server.js
      [...]
        let user = rows[0];
        let authenticated = bcrypt.compareSync(req.body.password, user.password);
        delete user.password;
        if (authenticated) {
          return res.json({
            status: true,
            user: user
          });
        }
        return res.json({
          status: false,
          message: "Wrong Password, please retry"
        });
      });
    });

    [...]
When the route is tested from Postman, you get this result:


Creating a new Invoice
The /invoice route handles the creation of an invoice. Data passed to the route will include the following:
- User ID, Name of the invoice and invoice status.
- Singular Transactions to make up the invoice.
The server handles the request as follows:
    // server.js
    [...]
    app.post("/invoice", multipartMiddleware, function(req, res) {
      // validate data
      if (isEmpty(req.body.name)) {
        return res.json({
          status: false,
          message: "Invoice needs a name"
        });
      }
      // perform other checks

      [...]
First, the data sent to the server is validated and then, a connection is made to the database for the subsequent queries.
    // server.js
      [...]
      // create invoice
      let db = new sqlite3.Database("./database/InvoicingApp.db");
      let sql = `INSERT INTO invoices(name,user_id,paid) VALUES(
        '${req.body.name}',
        '${req.body.user_id}',
        0
      )`;
      [...]
The insert query needed to create the invoice is written and then, it is executed. Afterwards, the singular transactions are inserted into the transactions table with the invoice_id as foreign key to reference them.
    // server.js
      [...]
      db.serialize(function() {
        db.run(sql, function(err) {
          if (err) {
            throw err;
          }
          let invoice_id = this.lastID;
          for (let i = 0; i < req.body.txn_names.length; i++) {
            let query = `INSERT INTO transactions(name,price,invoice_id) VALUES(
                '${req.body.txn_names[i]}',
                '${req.body.txn_prices[i]}',
                '${invoice_id}'
            )`;
            db.run(query);
          }
          return res.json({
            status: true,
            message: "Invoice created"
          });
        });
      });
    [...]
Once this is executed, the invoice is successfully created:

On checking the SQLite database, the following result is obtained:
    sqlite> select * from invoices;
    1|Test Invoice New|2|0
    sqlite> select * from transactions;
    1|iPhone|600|1
    2|Macbook|1700|1
Fetching All Invoices
Now, when a user wants to see all the created invoices, the client will make a GET request to the /invoice/user/:id route. The user id is passed as a route parameter. The request is handled as follows:
    // index.js
      [...]
    app.get("/invoice/user/:user_id", multipartMiddleware, function(req, res) {
      let db = new sqlite3.Database("./database/InvoicingApp.db");
      let sql = `SELECT * FROM invoices LEFT JOIN transactions ON invoices.id=transactions.invoice_id WHERE user_id='${req.params.user_id}'`;
      db.all(sql, [], (err, rows) => {
        if (err) {
          throw err;
        }
        return res.json({
          status: true,
          transactions: rows
        });
      });
    });

    [...]
A query is run to fetch all the invoices and the transactions related to the invoice belonging to a particular user.

Fetching Single Invoice
To fetch a specific invoice, the a GET request is with the user_id and invoice_id to the /invoice/user/{user_id}/{invoice_id} route. The request is handles as follows
    // index.js
    [...]

    app.get("/invoice/user/:user_id/:invoice_id", multipartMiddleware, function(req, res) {
      let db = new sqlite3.Database("./database/InvoicingApp.db");
      let sql = `SELECT * FROM invoices LEFT JOIN transactions ON invoices.id=transactions.invoice_id WHERE user_id='${
        req.params.user_id
      }' AND invoice_id='${req.params.invoice_id}'`;
      db.all(sql, [], (err, rows) => {
        if (err) {
          throw err;
        }
        return res.json({
          status: true,
          transactions: rows
        });
      });
    });

    // set application port
    [...]
A query is run to fetch a single invoice and the transactions related to the invoice belonging to the user.
Running the request on Postman will give you the result below :

Conclusion
In this part of the series, we walked though how to get up your server with all the needed routes for the mini invoicing application. In the next part of this series, we will look at how to Create the Interface for the invoicing application using Vue. Here’s a link to the full Github repository. Feel free to leave a comment below.