Whether you are running an online store, marketplace, or blog on your WordPress website, you will need a few essential elements displayed. One of these is a contact form.
Without a contact form on your website, your website visitors will have no way of contacting you with their questions and comments. The absence of this forum will eventually cause your overall traffic and returning traffic to steadily decline over time.
Fortunately, there are numerous WordPress form builders that you can add to your website to create a modern and stylish looking contact form. However, one form plugin stands out above the rest: FormCraft 3.
The FormCraft 3 plugin is the most complete, flexible and customizable form plugin on the market. FormCraft 3 allows you to create any type of form that you can think of and allows you to customize it to your website’s theme.
In this article, I am going to show you how to create an eye-catching contact form with the FormCraft 3 WordPress plugin.
Creating a Contact Form
To create a form, head on over to your WordPress dashboard and click FormCraft > Forms. This will open up the form editor.
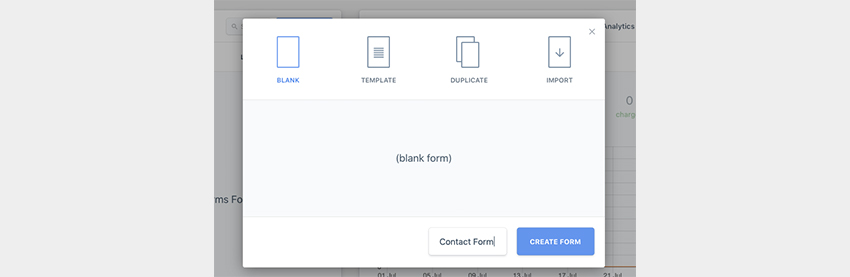
From there, click the blue button labeled + New Form. A pop-up menu will now appear on your screen. We are going to start from scratch with the form creation process so choose the Blank option at the top left of the form.
Next, we are going to type in the name of our form, Contact Form, in the input field on the bottom right of the pop-up. Now click Create Form.
We are now redirected to the actual form editor where we will see a blank form.
From here, we are going to add the necessary fields for the contact form and style it.
Add a Header
The first piece of text we would like to add to the form is a title, so our website viewers will know what type of form this is. To add this title, we are going to click the Add Field button at the top right of the form editor.
This will display a drop-down menu where we will choose the first option, Heading. A heading will now be added to the blank form.
Click on this header and a popup will appear next to it. Under heading text, we are going to type in, Contact Form.
Since this is a header, we would like the text to appear bold. So, click the B button under Format to make this header bold. We would also like to make the text bigger and we can accomplish this by clicking the A+ button twice under the Format section.
Add a Field for Name Input
Next, we would like to add a field for the user to put in their name. Click Add Field again and select One Line Input. This will place the one line input right under our header.
The one-line input default already is titled Name and has the sub-label your full name, so we don’t need to make any adjustments to this field.
We do want to make this a required field for users, so click the checkbox next to Required Field at the bottom of the one-line input pop-up editor. A red asterisk will now appear next to Name to signal to the user that this is a required field.
Add an Email Input Field
Finally, we’d like to add an email input to the form. Again, click Add Field and choose the Email Input option. The email input will now be added below the name field.

We would also like this field to be a required field, so check the Required Field box in the Email pop-up editor.
Add a Message Field
After the email field, we want to add a message field so the user can input their message on the contact form. Click Add Field > Text Area. This will add a message field below our email input field.
We are going to change the label and sub-label for this field. We will type in Message under label and Type your message for the sub-label. Again, we want to make this a required field, so click the checkbox next to Required Field.
Add a Submit Button!
Finally, we need to add the submit button so the user can submit the form to us. Click Add Field > Submit.
To view the form creation process in action, check out the video below:
Styling Your Form
Now that we have added all the necessary fields to the contact form, it is time to style the form. We are going to change the styling of all the fields that we have on our from as well as the font.
At the top of the form editor, you will see a blue menu bar—in it, click on the Styling option. From there, click the Font Styling drop-down menu. Click the default font drop-down menu and choose Helvetica / Arial.
You can now see that the font on the contact form is now Helvetica or Arial.
Next, click on the Field Styling drop-down menu right below the Font Styling menu. Under Field Layout, we are going to choose the third option, which puts the label and sub-label text on top of the input field.
Finally, we are going to change the background of the form. Click the Background tab and choose Preset Image on the styling menu. We are going to choose the second to last preset image that is grey.
This will make our form a bit more visually pleasing to look at!
To watch how to style the form, watch the video below.
Adding the Form to Your Website
Now that you have created and styled the form that you would like to add to your website, it is time to add the form to your site.
The FormCraft 3 plugin uses shortcodes to add the forms to your WordPress website.
To receive the specific shortcode for the form you created, you are going to head on over to Settings > Embed > Shortcode on the top menu bar of the form editor. You will then see the shortcode for your specific form. You can copy this shortcode to your clipboard and paste it into any WordPress page or post that you want the form to appear on.
Click Preview to view the form on your post or page. And that’s it, you’ve added the contact form to your website!
View how to add the contact form to your website in the video below.
Conclusion
Having a contact form is a must for almost any kind of site. Your website viewer will need some sort of contact form available to them in order to contact you with any questions or comments that they may have.
By using the FormCraft 3 plugin, will you be able to easily create a stylish looking form that will fit the theme of your website.
In this tutorial, you saw step-by-step how to create a contact form with FormCraft 3 and add it to any page or post on your website.
To download this plugin, head on over to CodeCanyon. Also, check out some of the many other form and form builder WordPress plugins on CodeCanyon if this one isn’t what you’re looking for.