Creating an iOS-like Home Screen with CoffeeScript
Today we are going to create an iOS-like home screen using CoffeeScript – a new JavaScript based language, and the jQuery library. CoffeScript has a clean syntax that lies somewhere in between Ruby and Python. If you haven’t used any of them, don’t worry – it is not required. However you will need to be familiar with JavaScript so you can better understand the concepts behind the language.
We are also going to use the Touchable plugin, so we can listen for touch-based events.
First, what is CoffeeScript?
CoffeeScript is a neat programming language meant to enhance the good parts of JavaScript, while working around the not so good. It makes OOP easy and introduces a number of useful additions such as comprehensions, new syntax for functions and scope handling, along with numerous small improvements.
CoffeeScript works in every browser out there, and is compatible with all your existing JavaScript code (including libraries like jQuery and plugins). But how does this work if it is a different language? Simple –CoffeeScript compiles down to JavaScript, so it works in any browser that supports it.
Before you start following this tutorial, I would suggest that you read through the examples on theCoffeeScript website (be sure to check out the “Try CoffeeScript” tab), and The Little Book on CoffeeScriptfor an introduction to the language.
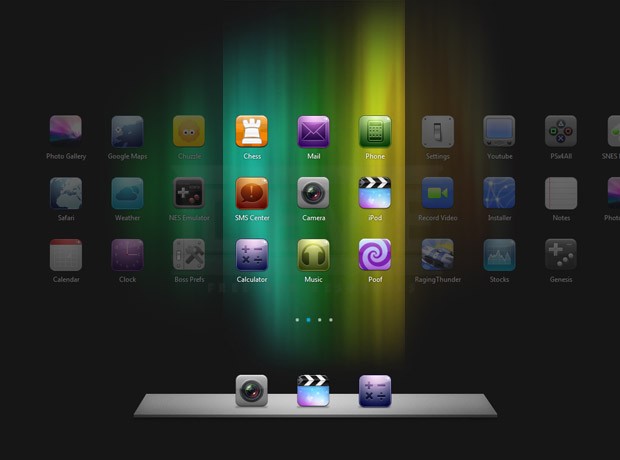
iOS -like Home Screen with CoffeeScript
The HTML
Lets start with the HTML markup of our iOS-like home screen. As usual, this is a regular HTML5 document with stylehseets in the head and JS includes before the closing body tag.
We have the #homeScreen section, which is the main container of our experiment. Inside it is the#mask, which uses overflow:hidden to show only one screen at the time. The #allScreens div inside it, as the name suggests, contains all the dynamically generated .screen divs with icons.
Following is the indicators UL, which shows the little dots with the currently shown screen, and the#dock div. As mentioned previously, CoffeeScript requires an extra compilation step, which will convert the source code to JavaScript.
For small scripts, you can also include the compiler directly in your page and write your code inline in a <script> tag – which we will be using today. At the bottom of the page, you can see our script includes. These are the jQuery library, the Touchable plugin, which will help us work with touch events, and the CoffeeScript compiler – coffee-script.js. The compiler will look for
tags on the page, which is where we will be writing our code.
The CoffeScript Code
As we are writing the code inline, we do not need to compile it before deploying the web page. This is great for small web pages and during development. However, if you plan on writing larger applications, it would be a better idea to compile your code using one of the tools described above. Now lets start with writing a simple class Icon
# The Icon class.
class Icon

# The constructor. The -> arrow signifies
# a function definition.

constructor: (@id, @title) ->
# @ is synonymous for "this". The id and title parameters
# of the constructor are automatically added as this.id and this.title

# @markup holds the HTML of the icon. It is
# transformed to this.markup behind the scenes.

 @markup = "
"
Objects of this class are going to represent the icons in the home screen. Each icon has a markup property which contains the HTML code needed to display it. You can see that functions in CoffeeScript are defined as arrows (->), with the parameters to the function given on the left in braces. Notice that comments here start with the # symbol. You can use three ### to denote multiline comments.
Now lets define a class for the dock icons. It will be pretty similar to the Icon class, so we are going to extend it:
# The DockIcon class inherits from Icon

class DockIcon extends Icon
constructor: (id, title)
# This calls the constructor if Icon

super(id, title)

# Changing the class name of the generated HTML

@markup = @markup.replace("class='icon'","class='dockicon'")
Using super() will call Icon’s constructor and initialize the markup property. We only need to replace the class name.
We will divide the home screen in individual .screen divs, each holding their own set of icons. Here is the class for that:
# The Screen Class
class Screen

# Function arguments can have default values
constructor: (icons = [])->
@icons = icons

attachIcons: (icons = [])->
Array.prototype.push.apply(@icons, icons)

generate: ->
markup = []

# Looping through the @icons array
markup.push(icon.markup) for icon in @icons

# The last line of every function is implicitly returned
{markup.join('')}
Instead of a markup property, here we are using a generate() method that will return the HTML. Notice how we are looping over the array – this is called a comprehension. The part before the for keyword is executed on every element in the icons array.
The iOS Dock
We now need a class that pulls everything together, and controls the transitions between the screens. Here is what it looks like:
class Stage
# The width of our "device" screen. This is
# basically the width of the #mask div.

screenWidth: 332

constructor: (icons)->

@currentScreen = 0
@screens = []

# Calculating the number of screens
# necessary to display all the icons

num = Math.ceil(icons.length / 9)
i = 0

while num--
# we pass a slice of the icons array
s = new Screen(icons[i...i+9])

# adding the screen to the local screens array
@screens.push(s)

i+=9

# This method populates the passed element with HTML
addScreensTo: (element)->

# We are using the jQuery library from within CS:
@element = $(element)
@element.width(@screens.length*@screenWidth)

for screen in @screens
@element.append(screen.generate())

addIndicatorsTo: (elem)->

# This method creates the small circular
# indicators. Also using jQuery

@ul = $(elem)

for screen in @screens
@ul.append('
')
@ul.find('li:first').addClass('active');
# ... More methods go here ...
The Stage takes an array of icons in the constructor. It then calculates how many screens will be needed, and creates an object for each one, passing it a slice of the icons array.
We now have the markup of all these elements on the page, but we are still missing the methods that control the transition between the slides. You can see them below (still part of the Stage class):
goTo: (screenNum){

# This method animates the allScreen div in
# order to expose the needed screen in #mask

if @element.is(':animated')
return false

# if this is the first or last screen,
# run the end of scroll animation

if @currentScreen == screenNum

# Parallel assignment:
[from, to] = ['+=15','-=15']

if @currentScreen != 0
[from, to] = [to, from]

# Tell the user there aren't any more screens:
@element.animate( { marginLeft : from }, 150 )
.animate( { marginLeft : to }, 150 )
else
# If everything is ok, animate the transition between the screens.
# The fat arrow => is a function that preserves the context of "this"

@element.animate( { marginLeft:-screenNum*@screenWidth }, => @currentScreen = screenNum )
@ul.find('li').removeClass('active').eq(screenNum).addClass('active');

next: >
toShow = @currentScreen+1

# If there is no next screen, show
# the last one

if toShow == @screens.length
toShow = @screens.length - 1

@goTo(toShow)

previous: >
toShow = @currentScreen-1

# If there is no previous screen,
# show the first one

if toShow == -1
toShow = 0

 @goTo(toShow)
Both the next() and previous() methods call goTo() internally, passing a screen number (starting from zero). The goTo() method animates the #allScreendiv to show the needed screen.
All we need to do now is bind a function to the document.ready event. For this we will use jQuery .
# This is equivalent to $(function(){}):

$ >

# You can skip the comma if it's on the end of a line:
allIcons = [
new Icon('Photos', 'Photo Gallery'), new Icon('Maps', 'Google Maps')
new Icon('Chuzzle', 'Chuzzle'), new Icon('Safari', 'Safari')
new Icon('Weather', 'Weather'), new Icon('nes', 'NES Emulator')
new Icon('Calendar', 'Calendar'), new Icon('Clock', 'Clock')
new Icon('BossPrefs', 'Boss Prefs'), new Icon('Chess', 'Chess')
new Icon('Mail', 'Mail'), new Icon('Phone', 'Phone')
new Icon('SMS', 'SMS Center'), new Icon('Camera', 'Camera')
new Icon('iPod', 'iPod'), new Icon('Calculator', 'Calculator')
new Icon('Music', 'Music'), new Icon('Poof', 'Poof')
new Icon('Settings', 'Settings'), new Icon('YouTube', 'Youtube')
new Icon('psx4all', 'PSx4All'), new Icon('VideoRecorder', 'Record Video')
new Icon('Installer', 'Installer'), new Icon('Notes', 'Notes')
new Icon('RagingThunder', 'RagingThunder'), new Icon('Stocks', 'Stocks')
new Icon('genesis4iphone', 'Genesis'), new Icon('snes4iphone', 'SNES Emulator')
new Icon('Calendar', 'Calendar'), new Icon('Clock', 'Clock')
new Icon('Photos', 'Photo Gallery'), new Icon('Maps', 'Google Maps')
]

dockIcons = [
new DockIcon('Camera', 'Camera')
new DockIcon('iPod', 'iPod')
new DockIcon('Calculator', 'Calculator')
]

allScreens = $('#allScreens')

# Using the Touchable plugin to listen for
# touch based events:

allScreens.Touchable();

# Creating a new stage object
stage = new Stage(allIcons)

stage.addScreensTo(allScreens)
stage.addIndicatorsTo('#indicators')

# Listening for the touchablemove event.
# Notice the callback function. Braces on
# function calls are optional
allScreens.bind 'touchablemove', (e,touch)->
stage.next() if touch.currentDelta.x < -5
stage.previous() if touch.currentDelta.x > 5

# Adding the dock icons:

dock = $('#dock')

 for icon in dockIcons
dock.append(icon.markup)
By calling the Touchable method we are extending the element to support several touch based events. Among them is touchablemove, which is executed when the user moves his finger across the screen. It is also called when we drag with the mouse. Further down, when we bind for that event, we get a touchobject as the second argument of the callback function. It holds the delta, or difference, from the beginning of the movement.
With this our iOS-like Home Screen is complete!
Conclusion
CoffeeScript is an interesting language that can make developing in the browser easier. You can expect to write up to 50% less code comparing to pure JavaScript.
But don’t fall pray to the hype surrounding it just yet – CoffeeScript isn’t going to replace JavaScript any time soon, as it sacrifices some of the agility that JS provides in attempt to make development easier. The CS way might not be the best fit for your project.
CoffeeScript also introduces an extra compilation step that separates you from deploying your code, but this can be solved by web frameworks that compile the code for you as is the case with Rails, where CS became a default.